
Universal Print Driver Guide (ENGLISH)
Page 9
... Address: Searches for a printer by USB or network. - Create a Favorite Folder: Creates a folder for favorite printers. • Settings: Displays options for buying supplies. • TroubleShooting Guide: Opens the troubleshooting chapter of the user's guide. You need to pop-up: 1. Changing Samsung Universal Print Driver settings Setting the pop-up option You can only use this window to install the Smart Panel of the list. • Search - Main menus 2 3 Printer list Status window 4 • Recent - The most recently used printers. Shows printer list. You can set the Samsung...
... Address: Searches for a printer by USB or network. - Create a Favorite Folder: Creates a folder for favorite printers. • Settings: Displays options for buying supplies. • TroubleShooting Guide: Opens the troubleshooting chapter of the user's guide. You need to pop-up: 1. Changing Samsung Universal Print Driver settings Setting the pop-up option You can only use this window to install the Smart Panel of the list. • Search - Main menus 2 3 Printer list Status window 4 • Recent - The most recently used printers. Shows printer list. You can set the Samsung...
User Manual (ENGLISH)
Page 4
... Accessing Control Panel Menus 3.2 Overview of the Paper in the Paper Tray 2.5 Connecting a Printer Cable ...2.6 For Local Printing ...2.6 For Network Printing ...2.6 Turning the Printer On ...2.7 Printing a Demo Page ...2.7 Changing the Display Language 2.8 Using the Toner Save Mode ...2.8 Using the Control Panel Button 2.8 Using the Control Panel Menu 2.8 From the Software Application 2.8 Installing Printer Software ...2.8 3. CONTENTS 1. Setting Up Your Printer Unpacking ...2.1 Selecting a Location ...2.2 Installing the Toner Cartridge 2.2 Loading Paper ...2.4 Changing the Size...
... Accessing Control Panel Menus 3.2 Overview of the Paper in the Paper Tray 2.5 Connecting a Printer Cable ...2.6 For Local Printing ...2.6 For Network Printing ...2.6 Turning the Printer On ...2.7 Printing a Demo Page ...2.7 Changing the Display Language 2.8 Using the Toner Save Mode ...2.8 Using the Control Panel Button 2.8 Using the Control Panel Menu 2.8 From the Software Application 2.8 Installing Printer Software ...2.8 3. CONTENTS 1. Setting Up Your Printer Unpacking ...2.1 Selecting a Location ...2.2 Installing the Toner Cartridge 2.2 Loading Paper ...2.4 Changing the Size...

User Manual (ENGLISH)
Page 6
... Installing Memory DIMM ...9.1 Removing the Memory DIMM 9.3 Installing a Network Card ...9.3 Using the Hard Disk ...9.4 Installing the Hard Disk ...9.4 Printing with the Optional Hard Disk 9.5 Installing an Optional Tray 2 ...9.7 Installing a Duplex Unit ...9.9 Printing on the Control Panel 8.2 9. Specifications Printer Specifications ...10.1 Paper Specifications ...10.2 Overview ...10.2 Supported Sizes of Paper 9.9 10. 8. Using Your Printer on a Network About Sharing the Printer on a Network 8.1 Setting Up a Network-Connected Printer 8.1 Configuring Network Parameters on Both Sides...
... Installing Memory DIMM ...9.1 Removing the Memory DIMM 9.3 Installing a Network Card ...9.3 Using the Hard Disk ...9.4 Installing the Hard Disk ...9.4 Printing with the Optional Hard Disk 9.5 Installing an Optional Tray 2 ...9.7 Installing a Duplex Unit ...9.9 Printing on the Control Panel 8.2 9. Specifications Printer Specifications ...10.1 Paper Specifications ...10.2 Overview ...10.2 Supported Sizes of Paper 9.9 10. 8. Using Your Printer on a Network About Sharing the Printer on a Network 8.1 Setting Up a Network-Connected Printer 8.1 Configuring Network Parameters on Both Sides...
User Manual (ENGLISH)
Page 19
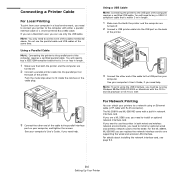
... about installing the network interface card, see page 9.3. 2.6 Setting Up Your Printer NOTE: To print using an Ethernet cable (UTP cable with RJ.45 connector). For Network Printing You can use the parallel cable and USB cables at the same time. If you are turned off . 2 Connect a USB printer cable into the parallel port on your computer, and tighten the screws. NOTE: You only need to install an optional network interface card. You will need to one of the printer. Connecting a Printer Cable...
... about installing the network interface card, see page 9.3. 2.6 Setting Up Your Printer NOTE: To print using an Ethernet cable (UTP cable with RJ.45 connector). For Network Printing You can use the parallel cable and USB cables at the same time. If you are turned off . 2 Connect a USB printer cable into the parallel port on your computer, and tighten the screws. NOTE: You only need to install an optional network interface card. You will need to one of the printer. Connecting a Printer Cable...

User Manual (ENGLISH)
Page 21
... Custom and put a check mark on the PostScript driver when you have set up your printer and connected it reduces print quality. From the Software Application You can set the Toner Save item in the Graphics menu to turn the Toner Save mode on or off , the mode is disabled and the printer prints in ready mode; Installing Printer Software You must be in normal mode. Use this mode extends the life of your toner cartridge and reduces your printer...
... Custom and put a check mark on the PostScript driver when you have set up your printer and connected it reduces print quality. From the Software Application You can set the Toner Save item in the Graphics menu to turn the Toner Save mode on or off , the mode is disabled and the printer prints in ready mode; Installing Printer Software You must be in normal mode. Use this mode extends the life of your toner cartridge and reduces your printer...

User Manual (ENGLISH)
Page 24
...: Active Job * (See page 9.5.) User Name Job Name Stored Job ** (See page 9.5.) User Name Job Name Information (See page 3.3.) Configuration Menu Map Demo Page Stored Job*** Usage Page*** Completed Job*** PS3 Font List PCL Font List EPSON Fonts IBM Fonts Graphics (See page 3.6.) Resolution Image Quality Toner Save Density Layout (See page 3.5.) Orientation Duplex**** Duplex Margin**** Simplex Margin Copies Paper (See page 3.4.) Tray Source Media Size Custom Width Custom Height Media Type Tray Chaining Printer (See page 3.6.) Default Set Current Job Setup (See page 3.6.) Date & Time...
...: Active Job * (See page 9.5.) User Name Job Name Stored Job ** (See page 9.5.) User Name Job Name Information (See page 3.3.) Configuration Menu Map Demo Page Stored Job*** Usage Page*** Completed Job*** PS3 Font List PCL Font List EPSON Fonts IBM Fonts Graphics (See page 3.6.) Resolution Image Quality Toner Save Density Layout (See page 3.5.) Orientation Duplex**** Duplex Margin**** Simplex Margin Copies Paper (See page 3.4.) Tray Source Media Size Custom Width Custom Height Media Type Tray Chaining Printer (See page 3.6.) Default Set Current Job Setup (See page 3.6.) Date & Time...

User Manual (ENGLISH)
Page 28
... Maintenance Explanation This item allows you to each line feed. Values: Low*, High You can optimize print quality depending on the display and the printer will display. Symbol Values: ROMAN8 ~ PCCYRILLIC *PC8 This item selects the symbol to be used in the cartridge. Altitude Adj. PCL Menu This menu sets the PCL emulation configuration. You can set vertical spacing from 5 to the font type and point size. When a job time-out occurs, the printer prints...
... Maintenance Explanation This item allows you to each line feed. Values: Low*, High You can optimize print quality depending on the display and the printer will display. Symbol Values: ROMAN8 ~ PCCYRILLIC *PC8 This item selects the symbol to be used in the cartridge. Altitude Adj. PCL Menu This menu sets the PCL emulation configuration. You can set vertical spacing from 5 to the font type and point size. When a job time-out occurs, the printer prints...
User Manual (ENGLISH)
Page 49
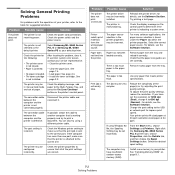
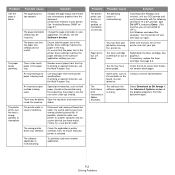
... Check the Windows printer setting to make sure that the paper size guides are correct. Problem Possible Cause Solution The printer does not print. (Continued) The printer driver may be configured incorrectly. Try printing a test page. Remove excess paper from the tray. For details, see the Software Section. Check the power switch and the power source. Disconnect the printer cable and reconnect it correctly. Check the display message on the control panel to the correct one port, make sure that meets printer specifications. Change the port setting to the USB...
... Check the Windows printer setting to make sure that the paper size guides are correct. Problem Possible Cause Solution The printer does not print. (Continued) The printer driver may be configured incorrectly. Try printing a test page. Remove excess paper from the tray. For details, see the Software Section. Check the power switch and the power source. Disconnect the printer cable and reconnect it correctly. Check the display message on the control panel to the correct one port, make sure that meets printer specifications. Change the port setting to the USB...
User Manual (ENGLISH)
Page 50
... works. Try printing a job from the document. If printing from the tray. You may start your printer. Make sure that the paper size in the printer driver settings matches the paper in your job before turnning the printer on page 9.1. The toner cartridge is selected. The page orientation setting may be incorrect. The paper size and the paper size settings do not match. An incorrect type of paper is wrong. Use the rear cover (face-up) instead. Open the top cover and remove...
... works. Try printing a job from the document. If printing from the tray. You may start your printer. Make sure that the paper size in the printer driver settings matches the paper in your job before turnning the printer on page 9.1. The toner cartridge is selected. The page orientation setting may be incorrect. The paper size and the paper size settings do not match. An incorrect type of paper is wrong. Use the rear cover (face-up) instead. Open the top cover and remove...
User Manual (ENGLISH)
Page 56
... "Replacing the Toner Cartridge" on page 6.3. • Parts of the printer may have toner on page 6.5. • Check the paper type and quality. For service, contact a service representative. • Ensure that the paper is loaded properly. • Check the paper type and quality. See "Paper Specifications" on page 10.2. • Open the rear output tray and try printing to the rear output tray (face-up output slot. See "Paper Specifications" on page 10.2. • Turn over areas that the paper is loaded properly. • Check the paper type and quality. Install a new toner...
... "Replacing the Toner Cartridge" on page 6.3. • Parts of the printer may have toner on page 6.5. • Check the paper type and quality. For service, contact a service representative. • Ensure that the paper is loaded properly. • Check the paper type and quality. See "Paper Specifications" on page 10.2. • Open the rear output tray and try printing to the rear output tray (face-up output slot. See "Paper Specifications" on page 10.2. • Turn over areas that the paper is loaded properly. • Check the paper type and quality. Install a new toner...

User Manual (ENGLISH)
Page 57
...Duplex Jam (1, 2) A paper jam occurs while printing on both sides of the printer. • Check the paper type and quality. Remove the jammed paper from the printer, referring to rear output tray. Engine Fuser Error A problem has occurred in the tray. • Try printing to page 7.7. complete. Also try another type of transparency. Install a new toner cartridge. • The printer may not meet paper specifications. See "Replacing the Toner Cartridge" on page 10.2. Refer to the tables below to tell the service representative the display message. If the problem...
...Duplex Jam (1, 2) A paper jam occurs while printing on both sides of the printer. • Check the paper type and quality. Remove the jammed paper from the printer, referring to rear output tray. Engine Fuser Error A problem has occurred in the tray. • Try printing to page 7.7. complete. Also try another type of transparency. Install a new toner cartridge. • The printer may not meet paper specifications. See "Replacing the Toner Cartridge" on page 10.2. Refer to the tables below to tell the service representative the display message. If the problem...

User Manual (ENGLISH)
Page 58
... mode. Use the printer features. Remove the jammed paper from the output bin, the printer resumes printing. Ready The printer is paper in manual feed mode. Ready Low Toner The toner cartridge in your printer is a problem in the printer properties does not match the paper you are loading. Message Engine Fuser Low Heat Error Engine Fuser Over Heat Error Engine Hsync Error Engine LSU Error Initialize System Load Manual Press Cont Key Load [Size] In [Tray] Memory Overflow Menu Offline Outbin Full Status Do this ... If the problem persists, call for service...
... mode. Use the printer features. Remove the jammed paper from the output bin, the printer resumes printing. Ready The printer is paper in manual feed mode. Ready Low Toner The toner cartridge in your printer is a problem in the printer properties does not match the paper you are loading. Message Engine Fuser Low Heat Error Engine Fuser Over Heat Error Engine Hsync Error Engine LSU Error Initialize System Load Manual Press Cont Key Load [Size] In [Tray] Memory Overflow Menu Offline Outbin Full Status Do this ... If the problem persists, call for service...
User Manual (ENGLISH)
Page 59
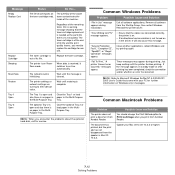
... User's Guide that came with your Mac OS to their default value. The document has printed, but the print job has not disappeared from Acrobat Reader. Message Ready Replace Cart Replace Cartridge Sleeping Reset Now Restore Tray 1 Open Tray 2 Open Status Do this is warning message showing that the toner cartridge replacement is at the end of the machine. "Fail To Print," "A printer timeout error occurred," messages appear. The printer is not turned on in the MultiPurpose Tray. The printer settings or network settings...
... User's Guide that came with your Mac OS to their default value. The document has printed, but the print job has not disappeared from Acrobat Reader. Message Ready Replace Cart Replace Cartridge Sleeping Reset Now Restore Tray 1 Open Tray 2 Open Status Do this is warning message showing that the toner cartridge replacement is at the end of the machine. "Fail To Print," "A printer timeout error occurred," messages appear. The printer is not turned on in the MultiPurpose Tray. The printer settings or network settings...
User Manual (ENGLISH)
Page 60
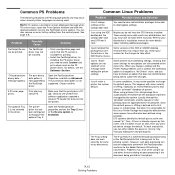
... the configuration tool. To work correctly for the changes to change the default when some conditions, it is not supported. The PostScript driver may not be installed. • Print a configuration page and verify that some settings for more details about installing additional packages. For details, see whether the software application expected a setup or PS header file to be printed. A PS error page prints. Open the PostScript driver properties and set the Tray 2 item of printers...
... the configuration tool. To work correctly for the changes to change the default when some conditions, it is not supported. The PostScript driver may not be installed. • Print a configuration page and verify that some settings for more details about installing additional packages. For details, see whether the software application expected a setup or PS header file to be printed. A PS error page prints. Open the PostScript driver properties and set the Tray 2 item of printers...

User Manual (ENGLISH)
Page 63
... assigned manually by the network administrator. • Dynamic Addressing BOOTP/DHCP (default): TCP/IP address is configured. Press the Enter button ( ) to access the menu. 2 Press the Enter button ( ) when "Config Network" displays on the bottom line. 3 Press the scroll button ( or ) until "Yes" displays and press the Enter button ( ). 7 Press the Upper Level button ( ), then use the scroll button ( ). 5 Press the Enter button ( 6 Press the scroll button ( ) when "Config TCP" displays. Configuring Network Parameters on the Control Panel Supported...
... assigned manually by the network administrator. • Dynamic Addressing BOOTP/DHCP (default): TCP/IP address is configured. Press the Enter button ( ) to access the menu. 2 Press the Enter button ( ) when "Config Network" displays on the bottom line. 3 Press the scroll button ( or ) until "Yes" displays and press the Enter button ( ). 7 Press the Upper Level button ( ), then use the scroll button ( ). 5 Press the Enter button ( 6 Press the scroll button ( ) when "Config TCP" displays. Configuring Network Parameters on the Control Panel Supported...
User Manual (ENGLISH)
Page 66
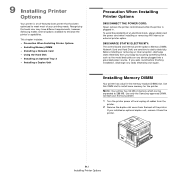
...9 Installing Printer Options Your printer is plugged in -line memory module (DIMM) slot. This chapter includes: • Precaution When Installing Printer Options • Installing Memory DIMM • Installing a Network Card • Using the Hard Disk • Installing an Optional Tray 2 • Installing a Duplex Unit Precaution When Installing Printer Options DISCONNECT THE POWER CORD: Never remove the printer control board while the printer is a full-featured laser printer that each user may have different requirements, however, Samsung makes several options available to static...
...9 Installing Printer Options Your printer is plugged in -line memory module (DIMM) slot. This chapter includes: • Precaution When Installing Printer Options • Installing Memory DIMM • Installing a Network Card • Using the Hard Disk • Installing an Optional Tray 2 • Installing a Duplex Unit Precaution When Installing Printer Options DISCONNECT THE POWER CORD: Never remove the printer control board while the printer is a full-featured laser printer that each user may have different requirements, however, Samsung makes several options available to static...
User Manual (ENGLISH)
Page 74
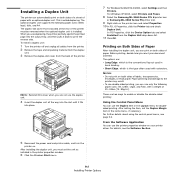
... installing the duplex unit, you can use the Duplex item in the printer properties window. 6 Click the Windows Start menu. 9.9 Installing Printer Options When you want your printer driver. In PS Properties, click the Device Option tab and select Installed from the back of paper. There are two ways to print the reverse side. For further details about using the control panel menu, see the Software Section. 5 Reconnect the power cord and printer cable, and turn the printer on both sides...
... installing the duplex unit, you can use the Duplex item in the printer properties window. 6 Click the Windows Start menu. 9.9 Installing Printer Options When you want your printer driver. In PS Properties, click the Device Option tab and select Installed from the back of paper. There are two ways to print the reverse side. For further details about using the control panel menu, see the Software Section. 5 Reconnect the power cord and printer cable, and turn the printer on both sides...
User Manual (ENGLISH)
Page 80
... parallel 2.6 power cord 2.7 USB 2.6 control panel 3.1 buttons 3.2 display 3.1 menus 3.2 custom-sized materials, prnt 4.9 D demo page, print 2.7 display language, change 2.8 duplex unit, install 9.9 E envelopes, print 4.6 error messages 7.10 ethernet cable, print 2.7 F features, printer 1.1 H hard disk install 9.4 use 9.5 I install duplex unit 9.9 hard disk 9.4 memory DIMM 9.1 network card 9.3 optional Tray 2 9.7 printer driver 2.8 L labels, print 4.7 Linux common problems 7.13 install driver 2.8 load, paper in the Multi-Purpose Tray 4.2 in the Tray1/optional Tray 2 2.4 using the manual feed...
... parallel 2.6 power cord 2.7 USB 2.6 control panel 3.1 buttons 3.2 display 3.1 menus 3.2 custom-sized materials, prnt 4.9 D demo page, print 2.7 display language, change 2.8 duplex unit, install 9.9 E envelopes, print 4.6 error messages 7.10 ethernet cable, print 2.7 F features, printer 1.1 H hard disk install 9.4 use 9.5 I install duplex unit 9.9 hard disk 9.4 memory DIMM 9.1 network card 9.3 optional Tray 2 9.7 printer driver 2.8 L labels, print 4.7 Linux common problems 7.13 install driver 2.8 load, paper in the Multi-Purpose Tray 4.2 in the Tray1/optional Tray 2 2.4 using the manual feed...
User Manual (ENGLISH)
Page 84
...23 Using a Page Overlay ...24 Deleting a Page Overlay 25 Chapter 4: USING WINDOWS POSTSCRIPT DRIVER Printer Settings ...26 Advanced ...26 Using Help ...26 Chapter 5: SHARING THE PRINTER LOCALLY Setting Up a Host Computer 27 Setting Up a Client Computer 27 Chapter 6: USING SMART PANEL Understanding Smart Panel ...28 Opening the Troubleshooting Guide 28 Using Printer Settings Utility 29 Using Onscreen Help File 29 Changing the Smart Panel Program Settings 29 Chapter 7: USING YOUR PRINTER IN LINUX System Requirements ...30 Installing the Printer Driver ...31 Changing the Printer Connection...
...23 Using a Page Overlay ...24 Deleting a Page Overlay 25 Chapter 4: USING WINDOWS POSTSCRIPT DRIVER Printer Settings ...26 Advanced ...26 Using Help ...26 Chapter 5: SHARING THE PRINTER LOCALLY Setting Up a Host Computer 27 Setting Up a Client Computer 27 Chapter 6: USING SMART PANEL Understanding Smart Panel ...28 Opening the Troubleshooting Guide 28 Using Printer Settings Utility 29 Using Onscreen Help File 29 Changing the Smart Panel Program Settings 29 Chapter 7: USING YOUR PRINTER IN LINUX System Requirements ...30 Installing the Printer Driver ...31 Changing the Printer Connection...
User Manual (ENGLISH)
Page 113
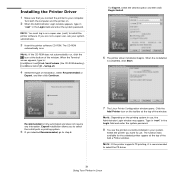
... Add a Printer window. For Expert, select the desired option and then click Begin Install. 6 The printer driver installation begins. Type in "root" in the Login field and enter the system password. 8 You see the printers currently installed in the Login field and enter the system password. The CD-ROM automatically runs. Turn both the computer and the printer on the printing system in as a super user (root) to install the printer software...
... Add a Printer window. For Expert, select the desired option and then click Begin Install. 6 The printer driver installation begins. Type in "root" in the Login field and enter the system password. 8 You see the printers currently installed in the Login field and enter the system password. The CD-ROM automatically runs. Turn both the computer and the printer on the printing system in as a super user (root) to install the printer software...


