
User Manual
Page 1
SyncMaster 320PX Install Programs PDF Manuals Registration Model Select Language Safety Instructions Introduction Connections Using the Software Adjusting the LCD Display Troubleshooting Specifications Information Appendix © 2006 Samsung Electronics Co., Ltd. All rights reserved.
SyncMaster 320PX Install Programs PDF Manuals Registration Model Select Language Safety Instructions Introduction Connections Using the Software Adjusting the LCD Display Troubleshooting Specifications Information Appendix © 2006 Samsung Electronics Co., Ltd. All rights reserved.

User Manual
Page 5
... the LCD Display. Make sure to keep it . z Poor ventilation may cause an increase in the internal temperature of the product, resulting in the owner's manual. Clean When cleaning the LCD Display case or the surface of the TFT -LCD screen, wipe with a smooth cloth. z Installing the bracket by a qualified professional...
... the LCD Display. Make sure to keep it . z Poor ventilation may cause an increase in the internal temperature of the product, resulting in the owner's manual. Clean When cleaning the LCD Display case or the surface of the TFT -LCD screen, wipe with a smooth cloth. z Installing the bracket by a qualified professional...

User Manual
Page 11
Manuals LCD Display Quick Setup Guide Warranty Card User's Guide, MDC Software (Not available in all locations) Cables D-Sub Cable Other Power Cord Speaker Wire Cable ... Page Safety Instructions Introduction Package Contents Your LCD Display Machanical Layout Connections Using the Software Adjusting the LCD Display Troubleshooting Specifications Information Appendix Model SyncMaster 320PX The color and appearance of the product may vary depending on the model, and the product specifications are subject to buy optional items. Note •...
Manuals LCD Display Quick Setup Guide Warranty Card User's Guide, MDC Software (Not available in all locations) Cables D-Sub Cable Other Power Cord Speaker Wire Cable ... Page Safety Instructions Introduction Package Contents Your LCD Display Machanical Layout Connections Using the Software Adjusting the LCD Display Troubleshooting Specifications Information Appendix Model SyncMaster 320PX The color and appearance of the product may vary depending on the model, and the product specifications are subject to buy optional items. Note •...

User Manual
Page 13
Note • See PowerSaver described in the manual for long periods. For energy conservation, turn the PIP screen On / Off. Adjusts the audio volume. 4) ENTER Activates a highlighted menu item. 5) SOURCE Switches from PC ...
Note • See PowerSaver described in the manual for long periods. For energy conservation, turn the PIP screen On / Off. Adjusts the audio volume. 4) ENTER Activates a highlighted menu item. 5) SOURCE Switches from PC ...
User Manual
Page 18
... PIP window will appear on the remote control while watching TV. ALL Rights Reserved Audio Type MTS/S_Mode Default FM Stereo Mono Stereo SAP Mono Manual Change Mono ↔ Stereo Mono ↔ SAP Mono - The image in the PIP window. 29) SIZE Switches the PIP Picture Size. 30) REW Rewind... 31) STOP Stop 32) PLAY / PAUSE Play/Pause 33) FF Fast forward © 1995~2007 SAMSUNG. MTS- This fuction does not work for this monitor. 26) PIP Every time you press the button, a PIP screen appears. 27) SO UR CE Changes...
... PIP window will appear on the remote control while watching TV. ALL Rights Reserved Audio Type MTS/S_Mode Default FM Stereo Mono Stereo SAP Mono Manual Change Mono ↔ Stereo Mono ↔ SAP Mono - The image in the PIP window. 29) SIZE Switches the PIP Picture Size. 30) REW Rewind... 31) STOP Stop 32) PLAY / PAUSE Play/Pause 33) FF Fast forward © 1995~2007 SAMSUNG. MTS- This fuction does not work for this monitor. 26) PIP Every time you press the button, a PIP screen appears. 27) SO UR CE Changes...

User Manual
Page 27
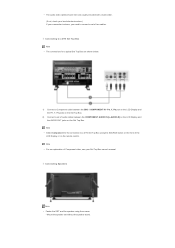
... control. • Then, start the DVD Player with a tape inserted. They are usually found on the side or back of Component video, consult your DVD manual. Note • Select Component for the Camcorder connection using the SOURCE button on the front of the LCD Display or on the remote control. •...
... control. • Then, start the DVD Player with a tape inserted. They are usually found on the side or back of Component video, consult your DVD manual. Note • Select Component for the Camcorder connection using the SOURCE button on the front of the LCD Display or on the remote control. •...
User Manual
Page 28
...; Select Component for a typical Set Top Box are usually included with a Camcorder. (If not, check your local electronics store.) If your Set Top Box owner's manual.
...; Select Component for a typical Set Top Box are usually included with a Camcorder. (If not, check your local electronics store.) If your Set Top Box owner's manual.
User Manual
Page 45
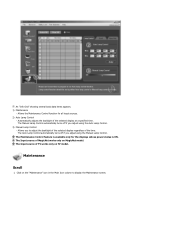
... MagicNet works only on TV model. Allows the Maintenance Control function for the displays whose power status is ON. The Manual Lamp Control automatically turns off if you adjust using the Manual Lamp Control. The Input source of TV works only on MagicNet model. Automatically adjusts the backlight of the time. Click.... An "Info Grid" showing several basic data items appears. 1) Maintenance - The Auto Lamp Control automatically turns off if you adjust using the Auto Lamp Control. 3) Manual Lamp Control -
... MagicNet works only on TV model. Allows the Maintenance Control function for the displays whose power status is ON. The Manual Lamp Control automatically turns off if you adjust using the Manual Lamp Control. The Input source of TV works only on MagicNet model. Automatically adjusts the backlight of the time. Click.... An "Info Grid" showing several basic data items appears. 1) Maintenance - The Auto Lamp Control automatically turns off if you adjust using the Auto Lamp Control. 3) Manual Lamp Control -
User Manual
Page 54
... either On or Off with the signal control. 2) Signal Control [ME NU ENTER ENTER ENTER ENTER ENTER] Adjusts the R Phase, G Phase, B Phase, Gain and Sharpness manually. By changing the resolution in the control panel, the auto function is performed. (Available in PC, BNC mode only) [The direct button on the screen...
... either On or Off with the signal control. 2) Signal Control [ME NU ENTER ENTER ENTER ENTER ENTER] Adjusts the R Phase, G Phase, B Phase, Gain and Sharpness manually. By changing the resolution in the control panel, the auto function is performed. (Available in PC, BNC mode only) [The direct button on the screen...

User Manual
Page 67
...Appearance and Themes → Display → Settings. Set the function in the BIOS -SETUP of the driver used. (Refer to the Windows / Computer Manual). ALL Rights Reserved Solutions z Ensure that video card support can I Adjusts the resolution? Solutions z Check the polarities (+/ -) of the computer. (Refer...be changed by reconfiguring the video card. Problems No sound. Do not leave any water enter the LCD Display. © 1995~2007 SAMSUNG. Problems The remote control buttons do not respond. Disconnect the power cord and then clean the LCD Display with a soft cloth, using ...
...Appearance and Themes → Display → Settings. Set the function in the BIOS -SETUP of the driver used. (Refer to the Windows / Computer Manual). ALL Rights Reserved Solutions z Ensure that video card support can I Adjusts the resolution? Solutions z Check the polarities (+/ -) of the computer. (Refer...be changed by reconfiguring the video card. Problems No sound. Do not leave any water enter the LCD Display. © 1995~2007 SAMSUNG. Problems The remote control buttons do not respond. Disconnect the power cord and then clean the LCD Display with a soft cloth, using ...
User Manual
Page 69
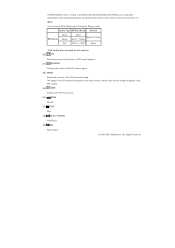
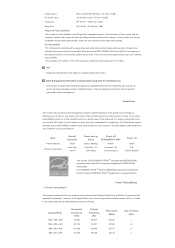
In most cases, the monitor installation will proceed automatically, unless the user wishes to the video card manual and Adjusts the screen as the following Preset Timing Modes, the screen will provide the best operating conditions and monitor settings. This is not from ... 1 W (Power button) Power off Black 0 W (Power Switch) This monitor is not needed, or when leaving it without prior notice. As an ENERGY STAR ® Partner, SAMSUNG has determined that this product are 3,133,440.
In most cases, the monitor installation will proceed automatically, unless the user wishes to the video card manual and Adjusts the screen as the following Preset Timing Modes, the screen will provide the best operating conditions and monitor settings. This is not from ... 1 W (Power button) Power off Black 0 W (Power Switch) This monitor is not needed, or when leaving it without prior notice. As an ENERGY STAR ® Partner, SAMSUNG has determined that this product are 3,133,440.


