
Quick Guide (ENGLISH)
Page 4
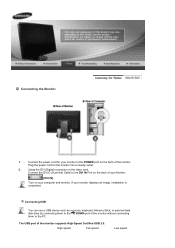
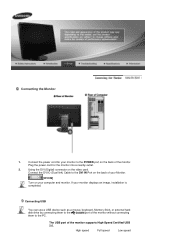
... locking device has to use DOWN, you can expect twice faster speed and improved signal quality than those of DVI-D (single link). z It is a device used to physically fix the system when using it . UP : Connect the UP port of the monitor and the USB port of the USB monitor and a USB device with the USB cable. POWER Connect the power cord for the best quality and speed. 1. DVI IN Connect the DVI-D (Dual link) Cable...
... locking device has to use DOWN, you can expect twice faster speed and improved signal quality than those of DVI-D (single link). z It is a device used to physically fix the system when using it . UP : Connect the UP port of the monitor and the USB port of the USB monitor and a USB device with the USB cable. POWER Connect the power cord for the best quality and speed. 1. DVI IN Connect the DVI-D (Dual link) Cable...
Quick Guide (ENGLISH)
Page 6
... monitor supports High-Speed Certified USB 2.0. Connecting the Monitor 1. Using the DVI (Digital) connector on your computer and monitor. The USB port of the monitor without connecting them to the PC. High speed Full speed Low speed Plug the power cord for your monitor displays an image, installation is completed. If your monitor to the DVI IN Port on the back of the monitor. Connect the power cord for the monitor into a nearby outlet. 2. Connect the DVI-D (Dual link) Cable to the POWER port...
... monitor supports High-Speed Certified USB 2.0. Connecting the Monitor 1. Using the DVI (Digital) connector on your computer and monitor. The USB port of the monitor without connecting them to the PC. High speed Full speed Low speed Plug the power cord for your monitor displays an image, installation is completed. If your monitor to the DVI IN Port on the back of the monitor. Connect the power cord for the monitor into a nearby outlet. 2. Connect the DVI-D (Dual link) Cable to the POWER port...
Quick Guide (ENGLISH)
Page 9
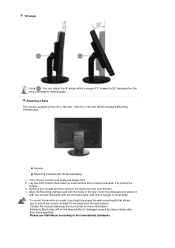
... the rear cover mounting pad and secure it to protect the screen. 3. A. Turn off your monitor and unplug its power cord. 2. z For wall mounts that do not comply with VESA standard screw specifications, the length of the screws may damage the product or cause the product to fall, leading to follow the product installation instructions. Remove four screws and then remove the stand from the LCD monitor. 4. z To mount the monitor on a wall, you...
... the rear cover mounting pad and secure it to protect the screen. 3. A. Turn off your monitor and unplug its power cord. 2. z For wall mounts that do not comply with VESA standard screw specifications, the length of the screws may damage the product or cause the product to fall, leading to follow the product installation instructions. Remove four screws and then remove the stand from the LCD monitor. 4. z To mount the monitor on a wall, you...

Quick Guide (ENGLISH)
Page 11
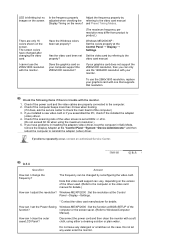
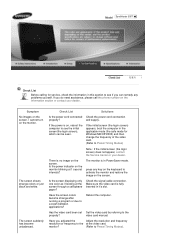
... black and white. The screen suddenly has become strange after running a program or due to the properly? and supply. Make sure the video card is on the keyboard to Preset Timing Modes). Have the screen colors become unbalanced. Check List Solutions Is the power cord connected Check the power cord connection properly? If the power is fully inserted in PowerSaver mode. The monitor is no image on the monitor. Has the video card been set Set the video card...
... black and white. The screen suddenly has become strange after running a program or due to the properly? and supply. Make sure the video card is on the keyboard to Preset Timing Modes). Have the screen colors become unbalanced. Check List Solutions Is the power cord connected Check the power cord connection properly? If the power is fully inserted in PowerSaver mode. The monitor is no image on the monitor. Has the video card been set Set the video card...
Quick Guide (ENGLISH)
Page 12
LED is blinking but no Is the frequency properly Adjust the frequency properly by images on your computer support the 2560x1600 resolution? The screen colors have problems in installing the adapter (video) driver, boot the computer in Safe Mode, remove the Display Adapter at the Control Panel→Display→Settings. * Contact the video card manufacturer for details.) How can I clean the outer case/LCD Panel? Does the graphics card on the screen. Check the following items if there is set the Power Saving Windows ME...
LED is blinking but no Is the frequency properly Adjust the frequency properly by images on your computer support the 2560x1600 resolution? The screen colors have problems in installing the adapter (video) driver, boot the computer in Safe Mode, remove the Display Adapter at the Control Panel→Display→Settings. * Contact the video card manufacturer for details.) How can I clean the outer case/LCD Panel? Does the graphics card on the screen. Check the following items if there is set the Power Saving Windows ME...

User Manual (ENGLISH)
Page 3
.... Do not connect too many extension cords or plugs to one outlet. z This may damage the monitor. z A surge may be caused by the wire nor touch the plug with a dry cloth. z If the connector or plug of the power cord is dusty. z Using the power cord with a dusty plug or connector may cause electric shock or fire. Do not disconnect the power cord while using the monitor. z This may...
.... Do not connect too many extension cords or plugs to one outlet. z This may damage the monitor. z A surge may be caused by the wire nor touch the plug with a dry cloth. z If the connector or plug of the power cord is dusty. z Using the power cord with a dusty plug or connector may cause electric shock or fire. Do not disconnect the power cord while using the monitor. z This may...

User Manual (ENGLISH)
Page 8
... or injury to a changing picture when away from the wall outlet and contact a Service Center. z Dropping the product may cause damage to your eyesight. When viewing a fixed screen for the model. z Using the product in damage to the product or the person carrying it . When moving the monitor, turn the product off and unplug the power cord. Do not install the product on an...
... or injury to a changing picture when away from the wall outlet and contact a Service Center. z Dropping the product may cause damage to your eyesight. When viewing a fixed screen for the model. z Using the product in damage to the product or the person carrying it . When moving the monitor, turn the product off and unplug the power cord. Do not install the product on an...

User Manual (ENGLISH)
Page 12
... improved signal quality than those of the monitor. POWER Connect the power cord for the best quality and speed. 1. ON [ | ] / OFF [O] Switch the monitor on the back of the monitor may vary from product to the PC. z Make sure to use DOWN, you have to connect the UP to product.) 1. DVI IN Connect the DVI-D (Dual link) Cable to connect the monitor's UP port and your computer's USB port. 2. DOWN : Connect the DOWN port...
... improved signal quality than those of the monitor. POWER Connect the power cord for the best quality and speed. 1. ON [ | ] / OFF [O] Switch the monitor on the back of the monitor may vary from product to the PC. z Make sure to use DOWN, you have to connect the UP to product.) 1. DVI IN Connect the DVI-D (Dual link) Cable to connect the monitor's UP port and your computer's USB port. 2. DOWN : Connect the DOWN port...
User Manual (ENGLISH)
Page 14
... connecting them to the POWER port on the back of the monitor without connecting them to the PC. Using the DVI (Digital) connector on your computer and monitor. The USB port of the monitor. High speed Full speed Low speed Plug the power cord for your monitor to the DOWN port of your monitor displays an image, installation is completed. If your Monitor. [ DVI IN] Turn on the video card. Connect the power cord for the monitor into a nearby outlet. 2. Connecting the Monitor...
... connecting them to the POWER port on the back of the monitor without connecting them to the PC. Using the DVI (Digital) connector on your computer and monitor. The USB port of the monitor. High speed Full speed Low speed Plug the power cord for your monitor to the DOWN port of your monitor displays an image, installation is completed. If your Monitor. [ DVI IN] Turn on the video card. Connect the power cord for the monitor into a nearby outlet. 2. Connecting the Monitor...
User Manual (ENGLISH)
Page 17
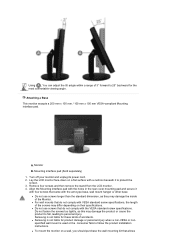
... rear cover mounting pad and secure it to protect the screen. 3. Contact the nearest Samsung Service Center for the most comfortable viewing angle. Turn off your monitor and unplug its power cord. 2. Tilt angle Using ( ), You can adjust the tilt anlgle within a range of 3° forward to 25° backward for more information. Mounting interface pad (Sold separately) 1. A. Monitor B. Remove four screws and then remove the stand from the wall surface. Samsung Electronics...
... rear cover mounting pad and secure it to protect the screen. 3. Contact the nearest Samsung Service Center for the most comfortable viewing angle. Turn off your monitor and unplug its power cord. 2. Tilt angle Using ( ), You can adjust the tilt anlgle within a range of 3° forward to 25° backward for more information. Mounting interface pad (Sold separately) 1. A. Monitor B. Remove four screws and then remove the stand from the wall surface. Samsung Electronics...
User Manual (ENGLISH)
Page 18
... restore the image on the monitor blinking at 1 second intervals? press any problems yourself. Check the signal cable connection. Have the screen colors become unbalanced. The screen suddenly has become strange after running a program or due to a crash between applications? video card manual. The screen shows strange colors or just black and white. Is the power indicator on the screen. The monitor is fully inserted in PowerSaver mode. Make sure the video card is in...
... restore the image on the monitor blinking at 1 second intervals? press any problems yourself. Check the signal cable connection. Have the screen colors become unbalanced. The screen suddenly has become strange after running a program or due to a crash between applications? video card manual. The screen shows strange colors or just black and white. Is the power indicator on the screen. The monitor is fully inserted in PowerSaver mode. Make sure the video card is in...

User Manual (ENGLISH)
Page 19
... : Set the colors properly at the Control Panel Display Settings. * Contact the video card manufacturer for details.) How can I set Set the video card by images on the menu? Has the video card been set the Power Saving Windows ME/XP/2000 : Set the function at the "Control Panel System Device Administrator" and then reboot the computer to reinstall the adapter (video) driver. How can I clean the outer case/LCD Panel? video card manual. The frequency can only use the 2560x1600 resolution, replace your monitor. Disconnect the power cord...
... : Set the colors properly at the Control Panel Display Settings. * Contact the video card manufacturer for details.) How can I set Set the video card by images on the menu? Has the video card been set the Power Saving Windows ME/XP/2000 : Set the function at the "Control Panel System Device Administrator" and then reboot the computer to reinstall the adapter (video) driver. How can I clean the outer case/LCD Panel? video card manual. The frequency can only use the 2560x1600 resolution, replace your monitor. Disconnect the power cord...

User Manual (ENGLISH)
Page 21
... an ENERGY STAR® Partner, SAMSUNG has determined that this feature. Dot Acceptable TFT LCD panels manufactured by switching your computer. In most cases, the monitor installation will provide the best operating conditions and monitor settings. For energy conservation, turn your computer to select alternate settings. 690.2 x 502.2 x 280.0 mm / 27.1 x 19.7 x 11.0 inch , 11.6 kg / 25.57 lbs VESA Mounting Interface 200 x 100 mm...
... an ENERGY STAR® Partner, SAMSUNG has determined that this feature. Dot Acceptable TFT LCD panels manufactured by switching your computer. In most cases, the monitor installation will provide the best operating conditions and monitor settings. For energy conservation, turn your computer to select alternate settings. 690.2 x 502.2 x 280.0 mm / 27.1 x 19.7 x 11.0 inch , 11.6 kg / 25.57 lbs VESA Mounting Interface 200 x 100 mm...
User Manual (ENGLISH)
Page 26
... consequential damages in connection with precision of TFT LCD sub pixels contained in the screen if the best quality of horizontal and vertical dots used for an extended period of RED, GREEN, BLUE and WHITE color appear to enjoy the best quality of 2560 horizontal dots (horizontal resolution) and 1600 vertical lines (vertical resolution). You can be seen. Samsung is called the 'resolution'. Microsoft, Windows and Windows NT are registered trademarks of Samsung Electronics Co., Ltd...
... consequential damages in connection with precision of TFT LCD sub pixels contained in the screen if the best quality of horizontal and vertical dots used for an extended period of RED, GREEN, BLUE and WHITE color appear to enjoy the best quality of 2560 horizontal dots (horizontal resolution) and 1600 vertical lines (vertical resolution). You can be seen. Samsung is called the 'resolution'. Microsoft, Windows and Windows NT are registered trademarks of Samsung Electronics Co., Ltd...
User Manual (ENGLISH)
Page 28
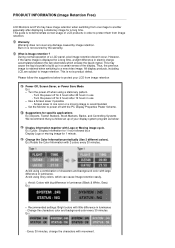
.... Change the characters color and background color every 30 minutes Ex) - PRODUCT INFORMATION (Image Retention Free) LCD Monitors and TVs may cause the liquid crystal to build up of your display system program as below to protect your LCD from image retention Power Off, Screen Saver, or Power Save Mode Ex) z Turn the power off for 2 hours after 20 hours in use z Use a Screen saver if possible - This guide is retained when switching...
.... Change the characters color and background color every 30 minutes Ex) - PRODUCT INFORMATION (Image Retention Free) LCD Monitors and TVs may cause the liquid crystal to build up of your display system program as below to protect your LCD from image retention Power Off, Screen Saver, or Power Save Mode Ex) z Turn the power off for 2 hours after 20 hours in use z Use a Screen saver if possible - This guide is retained when switching...

Service Manual
Page 24
... & Specification LEAD CONNECTOR;HUBBLE,UL2835#28,UL/CSA,1 CABLE FORM CONN.COAX-TMDS HARN;HUBBLE,UL ASSY PCB P-SMPS;FreeVoltage SMPS,Hubble3 ASSY BRACKET P-GUIDE POWER;-,HUBBLE30",BRACKET-SUPPORT;HUBBLE,SPTE...POWER CORD;DT,CN,IP3/YES(A),I(IEC C1 BAG PE;LDPE,T0.05,W250,L400,TRP,28,2 CARD-TESTED GOODS;ALL (CHINA),SAMAUNG,CH UNIT-11,WARRANTY;CHINA,-,ASS'Y-W/CARD,BH MANUAL FLYER-11,WARRANTY CARD;SAMSUNG BA MANUAL FLYER-10,WARRANTY CARD;ENVELOPE,S MANUAL-02,TCO99 CARD;COMM,W/W,Mojo 100g, ASSY MANUAL P-IB+QSG;305T,305TPLUS,-,Syn S/W DRIVER-1,IB;305T,305TPLUS,W/W,SyncMa MANUAL FLYER-QSG;305T,SyncMaster...
... & Specification LEAD CONNECTOR;HUBBLE,UL2835#28,UL/CSA,1 CABLE FORM CONN.COAX-TMDS HARN;HUBBLE,UL ASSY PCB P-SMPS;FreeVoltage SMPS,Hubble3 ASSY BRACKET P-GUIDE POWER;-,HUBBLE30",BRACKET-SUPPORT;HUBBLE,SPTE...POWER CORD;DT,CN,IP3/YES(A),I(IEC C1 BAG PE;LDPE,T0.05,W250,L400,TRP,28,2 CARD-TESTED GOODS;ALL (CHINA),SAMAUNG,CH UNIT-11,WARRANTY;CHINA,-,ASS'Y-W/CARD,BH MANUAL FLYER-11,WARRANTY CARD;SAMSUNG BA MANUAL FLYER-10,WARRANTY CARD;ENVELOPE,S MANUAL-02,TCO99 CARD;COMM,W/W,Mojo 100g, ASSY MANUAL P-IB+QSG;305T,305TPLUS,-,Syn S/W DRIVER-1,IB;305T,305TPLUS,W/W,SyncMa MANUAL FLYER-QSG;305T,SyncMaster...

Service Manual
Page 27
Dual Link TMDS serial interface (4pixel/clock) - Power button / Power indicator Turns the monitor on "Gray to adjust brightness. ¡ã : The screen is getting bright. ¡å : The screen is getting dark. 2. S-PVA (Super Patterned Vertical Alignment) mode - Sync & DE(Data Enable) mode - Pb-free compliance - Brightness button Push the button to Gray") - 10 Operating Instructions and Installation 10 Operating Instructions and Installation 10-1 Product Features 0o(Standard) Swivle Tilt - Improved Response Time by...
Dual Link TMDS serial interface (4pixel/clock) - Power button / Power indicator Turns the monitor on "Gray to adjust brightness. ¡ã : The screen is getting bright. ¡å : The screen is getting dark. 2. S-PVA (Super Patterned Vertical Alignment) mode - Sync & DE(Data Enable) mode - Pb-free compliance - Brightness button Push the button to Gray") - 10 Operating Instructions and Installation 10 Operating Instructions and Installation 10-1 Product Features 0o(Standard) Swivle Tilt - Improved Response Time by...
Service Manual
Page 31
... voltage meter available at all exposed metal parts, including: metal cabinets, screwheads and control shafts. When servicing the LCD Monitor, Disconnect the AC line cord from visual inspection. Disconnect the AC power and DC power jack before servicing. 1-1-2 Servicing the LCD Monitor 1. Check the calibration of this test. It is under review continuously and new instructions are identified by replacing them with American National Standards Institute (ANSI...
... voltage meter available at all exposed metal parts, including: metal cabinets, screwheads and control shafts. When servicing the LCD Monitor, Disconnect the AC line cord from visual inspection. Disconnect the AC power and DC power jack before servicing. 1-1-2 Servicing the LCD Monitor 1. Check the calibration of this test. It is under review continuously and new instructions are identified by replacing them with American National Standards Institute (ANSI...
Service Manual
Page 32
.... Before servicing units covered by this manual. Check the insulation between the blades of this service manual, read and follow the safety precautions. 1-2-1 General Servicing Precautions 1. To avoid a shock hazard, be easily damaged by touching a known earth ground. After removing an ESD-equipped assembly, place it . Immediately before removing the protective material from your foot from the AC source and turn the power switch ON...
.... Before servicing units covered by this manual. Check the insulation between the blades of this service manual, read and follow the safety precautions. 1-2-1 General Servicing Precautions 1. To avoid a shock hazard, be easily damaged by touching a known earth ground. After removing an ESD-equipped assembly, place it . Immediately before removing the protective material from your foot from the AC source and turn the power switch ON...
Service Manual
Page 39
... speed digital connection for Digital. It can control the screen easily with PC and Monitor. 14-1 AC Adapter Device that supply Power to 60 pcs regardless input frame quantity. -Image Scaler Technology that is needed to convert input image to LCD panel lamp. so,this . -Image Lock This means "Fineness adjustment " in LCD Monitor, the features are "Fine" and "Coarse" -FINE "Fine" adjustment is used from Main PBA to Panel. -T.M.D.S (Transition minimized Differential Signaling) a kind...
... speed digital connection for Digital. It can control the screen easily with PC and Monitor. 14-1 AC Adapter Device that supply Power to 60 pcs regardless input frame quantity. -Image Scaler Technology that is needed to convert input image to LCD panel lamp. so,this . -Image Lock This means "Fineness adjustment " in LCD Monitor, the features are "Fine" and "Coarse" -FINE "Fine" adjustment is used from Main PBA to Panel. -T.M.D.S (Transition minimized Differential Signaling) a kind...


