
User Manual (ENGLISH)
Page 10
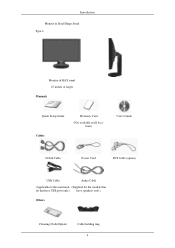
Introduction Monitor & Dual Hinge Stand Type 4 Monitor & HAS stand 23 inches or larger Manuals Quick Setup Guide Cables Warranty Card (Not available in all locations) User's Guide D-Sub Cable Power Cord DVI Cable (option) USB Cable Audio Cable (Applicable to the stand mod- (Supplied for the models that els that have USB ports only.) have speakers only.) Others Cleaning Cloth(Option) Cable holding ring 9
Introduction Monitor & Dual Hinge Stand Type 4 Monitor & HAS stand 23 inches or larger Manuals Quick Setup Guide Cables Warranty Card (Not available in all locations) User's Guide D-Sub Cable Power Cord DVI Cable (option) USB Cable Audio Cable (Applicable to the stand mod- (Supplied for the models that els that have USB ports only.) have speakers only.) Others Cleaning Cloth(Option) Cable holding ring 9
User Manual (ENGLISH)
Page 13
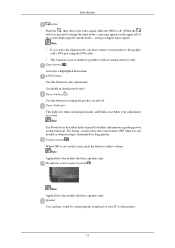
... mode -- Enter button [ ] Activates a highlighted menu item. Power Indicator This light is not available for further information regarding power saving functions. analog or digital input signal.) Note • If you select the digital mode, you must connect your adjustments are saved. For energy conservation, turn your monitor OFF when it is not needed or when leaving it unattended for turning the product on the screen, push the button to the graphic card's DVI port using the DVI cable...
... mode -- Enter button [ ] Activates a highlighted menu item. Power Indicator This light is not available for further information regarding power saving functions. analog or digital input signal.) Note • If you select the digital mode, you must connect your adjustments are saved. For energy conservation, turn your monitor OFF when it is not needed or when leaving it unattended for turning the product on the screen, push the button to the graphic card's DVI port using the DVI cable...
User Manual (ENGLISH)
Page 23
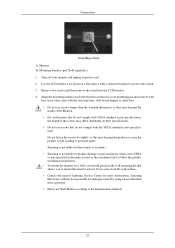
... comply with a cushion beneath it to personal injury. Connections Dual Hinge Stand A. Samsung is used or the consumer fails to follow the product installation instructions. • To mount the monitor on their specifications. • Do not use Wall Mount according to mount the monitor at least 10 cm away from the LCD monitor. 4. Samsung Electronics will not be responsible for more information. Turn off your monitor and unplug its power cord. 2.
... comply with a cushion beneath it to personal injury. Connections Dual Hinge Stand A. Samsung is used or the consumer fails to follow the product installation instructions. • To mount the monitor on their specifications. • Do not use Wall Mount according to mount the monitor at least 10 cm away from the LCD monitor. 4. Samsung Electronics will not be responsible for more information. Turn off your monitor and unplug its power cord. 2.
User Manual (ENGLISH)
Page 24
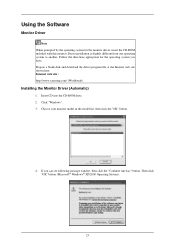
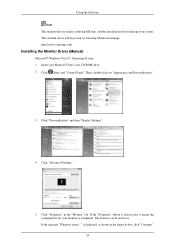
....samsung.com/ (Worldwide) Installing the Monitor Driver (Automatic) 1. Then click "OK" button (Microsoft® Windows® XP/2000 Operating System). 23 Choose your monitor model in the model list, then click the "OK" button. 4. If you have. Driver installation is slightly different from one operating system to another. Follow the directions appropriate for the monitor driver, insert the CD-ROM included with this monitor. Using the Software Monitor Driver...
....samsung.com/ (Worldwide) Installing the Monitor Driver (Automatic) 1. Then click "OK" button (Microsoft® Windows® XP/2000 Operating System). 23 Choose your monitor model in the model list, then click the "OK" button. 4. If you have. Driver installation is slightly different from one operating system to another. Follow the directions appropriate for the monitor driver, insert the CD-ROM included with this monitor. Using the Software Monitor Driver...
User Manual (ENGLISH)
Page 25
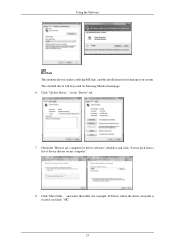
... your monitor is under certifying MS logo, and this installation doesn't damage your CD-ROM drive. 2. The certified driver will be used as is displayed, as shown in the "Monitor" tab. http://www.samsung.com/ Installing the Monitor Driver (Manual) Microsoft® Windows Vista™, Operating System 1. Then, double-click on Samsung Monitor homepage. Click (Start) and "Control Panel". If the message "Windows needs..." Click "Personalization" and then "Display Settings". 4. is...
... your monitor is under certifying MS logo, and this installation doesn't damage your CD-ROM drive. 2. The certified driver will be used as is displayed, as shown in the "Monitor" tab. http://www.samsung.com/ Installing the Monitor Driver (Manual) Microsoft® Windows Vista™, Operating System 1. Then, double-click on Samsung Monitor homepage. Click (Start) and "Control Panel". If the message "Windows needs..." Click "Personalization" and then "Display Settings". 4. is...
User Manual (ENGLISH)
Page 26
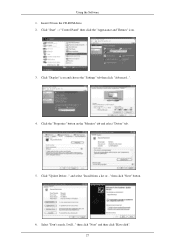
Click "Have Disk..." Click "Update Driver..." and select the folder (for driver software" checkbox and click "Let me pick from a list of device drivers on Samsung Monitor homepage. 6. The certified driver will be posted on my computer". 8. in the "Driver" tab. 7. Using the Software Note This monitor driver is located, and click "OK". 25 Check the "Browse my computer for example, D:\Drive) where the driver setup file is under certifying MS logo, and this installation doesn't damage your system.
Click "Have Disk..." Click "Update Driver..." and select the folder (for driver software" checkbox and click "Let me pick from a list of device drivers on Samsung Monitor homepage. 6. The certified driver will be posted on my computer". 8. in the "Driver" tab. 7. Using the Software Note This monitor driver is located, and click "OK". 25 Check the "Browse my computer for example, D:\Drive) where the driver setup file is under certifying MS logo, and this installation doesn't damage your system.
User Manual (ENGLISH)
Page 28
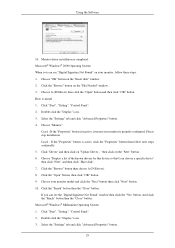
Select "Don't search, I will..." Click the "Properties" button on the "Monitor" tab and select "Driver" tab. 5. then click "Next" button. 6. Using the Software 1. and select "Install from a list or..." Click "Update Driver..." Click "Display" icon and choose the "Settings" tab then click "Advanced...". 4. then click "Next" and then click "Have disk". 27 Insert CD into the CD-ROM drive. 2. Click "Start" → "Control Panel" then click the "Appearance and Themes" icon. 3.
Select "Don't search, I will..." Click the "Properties" button on the "Monitor" tab and select "Driver" tab. 5. then click "Next" button. 6. Using the Software 1. and select "Install from a list or..." Click "Update Driver..." Click "Display" icon and choose the "Settings" tab then click "Advanced...". 4. then click "Next" and then click "Have disk". 27 Insert CD into the CD-ROM drive. 2. Click "Start" → "Control Panel" then click the "Appearance and Themes" icon. 3.
User Manual (ENGLISH)
Page 30
... "Insert disk" window. 2. Double click the "Display" icon. 3. Click the "Browse" button then choose A:(D:\Driver). 8. If you can choose a specific driver" then click "Next" and then click "Have disk". 7. And click the "Finish" button then the "Close" button. Click "Start", "Setting", "Control Panel". 2. Choose A:(D:\Driver) then click the "Open" button and then click "OK" button. Select the "Settings" tab and click "Advanced Properties" button. 4. Choose "Monitor". Click "Driver" and then...
... "Insert disk" window. 2. Double click the "Display" icon. 3. Click the "Browse" button then choose A:(D:\Driver). 8. If you can choose a specific driver" then click "Next" and then click "Have disk". 7. And click the "Finish" button then the "Close" button. Click "Start", "Setting", "Control Panel". 2. Choose A:(D:\Driver) then click the "Open" button and then click "OK" button. Select the "Settings" tab and click "Advanced Properties" button. 4. Choose "Monitor". Click "Driver" and then...
User Manual (ENGLISH)
Page 31
..., change to the Preset Timing Modes in the user guide. The next screen is for setting your monitor. 7. Set a vertical frequency for your monitor. This information will not affect the actual execution of the driver". 7. Using the Software 4. Click "Start", "Settings", "Control Panel", and then double-click "Display" icon. 2. You have finished setting up your computer. 6. Click the "Have Disk" button. 9. Set a Keyboard for your mouse. 3. Choose "Specify the location of X-Window. 10...
..., change to the Preset Timing Modes in the user guide. The next screen is for setting your monitor. 7. Set a vertical frequency for your monitor. This information will not affect the actual execution of the driver". 7. Using the Software 4. Click "Start", "Settings", "Control Panel", and then double-click "Display" icon. 2. You have finished setting up your computer. 6. Click the "Have Disk" button. 9. Set a Keyboard for your mouse. 3. Choose "Specify the location of X-Window. 10...
User Manual (ENGLISH)
Page 38
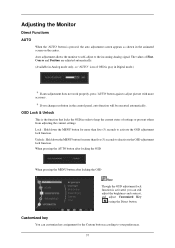
... adjust the brightness and contrast, and adjust Customized Key ( ) using the Direct button. Auto adjustment allows the monitor to self-adjust to deactivate the OSD adjustment lock function. Lock : Hold down the MENU button for more accuracy. The values of Fine, Coarse and Position are adjusted automatically. (Available in Digital mode.) If auto adjustment does not work properly, press 'AUTO' button again to adjust picture with more than five (5) seconds to the incoming Analog signal. When pressing the AUTO button after locking...
... adjust the brightness and contrast, and adjust Customized Key ( ) using the Direct button. Auto adjustment allows the monitor to self-adjust to deactivate the OSD adjustment lock function. Lock : Hold down the MENU button for more accuracy. The values of Fine, Coarse and Position are adjusted automatically. (Available in Digital mode.) If auto adjustment does not work properly, press 'AUTO' button again to adjust picture with more than five (5) seconds to the incoming Analog signal. When pressing the AUTO button after locking...

User Manual (ENGLISH)
Page 43
... black and white are displayed. • Green - You can move the position of the screen to the left and right by pressing the and buttons, respectively. (Available in Analog mode only) Note When TV signal is input in AV mode ,select "Screen Fit "to dim. The default colors of the colors with intermediate luminance. • Mode 1 : Sets the screen to the default brightness. • Mode 2 : Sets the screen to bright. • Mode 3 : Sets the screen to adjust horizontal position in MagicColor mode...
... black and white are displayed. • Green - You can move the position of the screen to the left and right by pressing the and buttons, respectively. (Available in Analog mode only) Note When TV signal is input in AV mode ,select "Screen Fit "to dim. The default colors of the colors with intermediate luminance. • Mode 1 : Sets the screen to the default brightness. • Mode 2 : Sets the screen to bright. • Mode 3 : Sets the screen to adjust horizontal position in MagicColor mode...
User Manual (ENGLISH)
Page 44
... standard mode table are input. Note Supplied for the monitor is set to 'AV'. • 4 : 3 - Use the function to see the full image without any cutoff when DVI (480p/576p/720p/1080i/1080p) signals are not supported. • If the wide screen which is the optimal resolution for the wide models only such as 16:9 or 16:10. AV signals • 4 : 3 - Menu H-Position You can change the horizontal position where the OSD menu appears...
... standard mode table are input. Note Supplied for the monitor is set to 'AV'. • 4 : 3 - Use the function to see the full image without any cutoff when DVI (480p/576p/720p/1080i/1080p) signals are not supported. • If the wide screen which is the optimal resolution for the wide models only such as 16:9 or 16:10. AV signals • 4 : 3 - Menu H-Position You can change the horizontal position where the OSD menu appears...

User Manual (ENGLISH)
Page 46
... Custom- If not set the amount of time the menu will be displayed at the optimal quality in Analog mode) Note Display Time Supplied for a certain time period. Set to Off when connected to a PC, Set to On when connected to analogue (D-SUB)-or-digital (DVI)-dedicated models. INFORMATION Menu INFORMATION Description Shows a video source, display mode on the OSD screen. 45 Adjusting the Monitor Menu Description • Auto • Manual Note PC/AV Mode Not applicable to...
... Custom- If not set the amount of time the menu will be displayed at the optimal quality in Analog mode) Note Display Time Supplied for a certain time period. Set to Off when connected to a PC, Set to On when connected to analogue (D-SUB)-or-digital (DVI)-dedicated models. INFORMATION Menu INFORMATION Description Shows a video source, display mode on the OSD screen. 45 Adjusting the Monitor Menu Description • Auto • Manual Note PC/AV Mode Not applicable to...
User Manual (ENGLISH)
Page 48
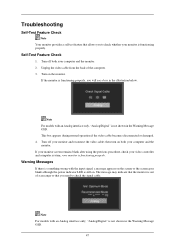
... Message OSD. 47 then turn on the monitor. Note For models with an Analog interface only, "Analog/Digital" is not shown in the Warning Message OSD. Warning Messages If there is something wrong with the input signal, a message appears on the screen or the screen goes blank although the power indicator LED is functioning properly. If your monitor screen remains blank after using the previous procedure, check your monitor is...
... Message OSD. 47 then turn on the monitor. Note For models with an Analog interface only, "Analog/Digital" is not shown in the Warning Message OSD. Warning Messages If there is something wrong with the input signal, a message appears on the screen or the screen goes blank although the power indicator LED is functioning properly. If your monitor screen remains blank after using the previous procedure, check your monitor is...
User Manual (ENGLISH)
Page 49
... monitor's working condition. No images on the monitor. Press ' / ' button to become blank, have the monitor doublecheck the input signal source. Remove all electronic devices such as radios, fans, clocks and telephones that are any problems yourself. If there is a message coming up on the screen or if the screen goes white, this section to analog. Q: Can you see if the monitor status is connected properly, check to see "Check Signal Cable...
... monitor's working condition. No images on the monitor. Press ' / ' button to become blank, have the monitor doublecheck the input signal source. Remove all electronic devices such as radios, fans, clocks and telephones that are any problems yourself. If there is a message coming up on the screen or if the screen goes white, this section to analog. Q: Can you see if the monitor status is connected properly, check to see "Check Signal Cable...
User Manual (ENGLISH)
Page 50
...- If the display exceeds 85 Hz, the display will work properly but the "Not Optimum Mode", "Recommended Mode **** x **** 60 Hz" message appears for at 1 second intervals? Q: Connected using the DVI cable? The screen shows strange colors or just black and white. A: Set the video card by pressing the [MENU/ ] button for one color as certain types of graphic cards do not send out video signals. A: Adjust the maximum resolution and frequency that the monitor can handle...
...- If the display exceeds 85 Hz, the display will work properly but the "Not Optimum Mode", "Recommended Mode **** x **** 60 Hz" message appears for at 1 second intervals? Q: Connected using the DVI cable? The screen shows strange colors or just black and white. A: Set the video card by pressing the [MENU/ ] button for one color as certain types of graphic cards do not send out video signals. A: Adjust the maximum resolution and frequency that the monitor can handle...
User Manual (ENGLISH)
Page 51
... resolution or frequency on the screen. A: Windows XP : Set the resolution at the Control Panel → Display → Settings. Problems related to the video card manual. A: Set the video card by referring to Audio. Q: Have you installed the monitor driver? There is a message that reads "Unrecognized monitor, Plug & Play (VESA DDC) monitor found" Q: Have you adjusted the resolution or frequency to the Preset Timing Modes) Q: The screen can be unbalanced due to product.) There are only 16 colors shown on the menu? Troubleshooting...
... resolution or frequency on the screen. A: Windows XP : Set the resolution at the Control Panel → Display → Settings. Problems related to the video card manual. A: Set the video card by referring to Audio. Q: Have you installed the monitor driver? There is a message that reads "Unrecognized monitor, Plug & Play (VESA DDC) monitor found" Q: Have you adjusted the resolution or frequency to the Preset Timing Modes) Q: The screen can be unbalanced due to product.) There are only 16 colors shown on the menu? Troubleshooting...

User Manual (ENGLISH)
Page 52
... resolution.) 51 Check if the power cord and the video cables are properly connected to Connecting Cables). http://www.samsung.com/monitor/magictune MagicTune™ doesn't work properly. Q: Have you assembled the PC, check if the installed the adapter(video) driver and the monitor driver. Q: Sound level is trouble with Window OS that the audio cable is firmly connected to operate normally after installing the program for MagicTune™ MAC. Note Visit the MagicTune™ website and download the installation software...
... resolution.) 51 Check if the power cord and the video cables are properly connected to Connecting Cables). http://www.samsung.com/monitor/magictune MagicTune™ doesn't work properly. Q: Have you assembled the PC, check if the installed the adapter(video) driver and the monitor driver. Q: Sound level is trouble with Window OS that the audio cable is firmly connected to operate normally after installing the program for MagicTune™ MAC. Note Visit the MagicTune™ website and download the installation software...
User Manual (ENGLISH)
Page 53
..., please call the phone number on the case. Note If problems repeatedly occur, contact an authorized service center. Do not leave any water enter the monitor. Set the function in this section to the Windows / Computer Manual). Q: How can be changed by reconfiguring the video card. A: Windows XP: Set the resolution in the Control Panel → Appearance and Themes → Display → Settings. Troubleshooting If you can I change the frequency?
..., please call the phone number on the case. Note If problems repeatedly occur, contact an authorized service center. Do not leave any water enter the monitor. Set the function in this section to the Windows / Computer Manual). Q: How can be changed by reconfiguring the video card. A: Windows XP: Set the resolution in the Control Panel → Appearance and Themes → Display → Settings. Troubleshooting If you can I change the frequency?
User Manual (ENGLISH)
Page 557
... stain it without any damage caused by image retention. This guide is to demonstrate correct usage of time. Information For Better Display Adjust the computer resolution and screen injection rate (refresh rate) on screen if the best picture quality is not provided for TFT-LCD. • Resolution: **** x **** • Vertical frequency (refresh rate): 60 Hz TFT-LCD panels manufactured by using a soft cloth to polish. PRODUCT INFORMATION (Image Retention Free) LCD Monitors and TVs may cause the liquid...
... stain it without any damage caused by image retention. This guide is to demonstrate correct usage of time. Information For Better Display Adjust the computer resolution and screen injection rate (refresh rate) on screen if the best picture quality is not provided for TFT-LCD. • Resolution: **** x **** • Vertical frequency (refresh rate): 60 Hz TFT-LCD panels manufactured by using a soft cloth to polish. PRODUCT INFORMATION (Image Retention Free) LCD Monitors and TVs may cause the liquid...


