2494HM Remove Stand - Samsung
2494HM Remove Stand
Related Manual Pages


Similar Questions


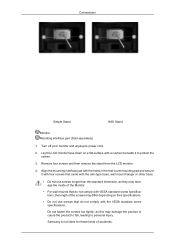
How To Remove The 2494hm Monitor Stand?
Please,How can I remove the stand of the Samsung 2494HM monitor?Thanks
Please,How can I remove the stand of the Samsung 2494HM monitor?Thanks
(Posted by Eduspiller 5 years ago)

