User Manual (ENGLISH)
Page 10
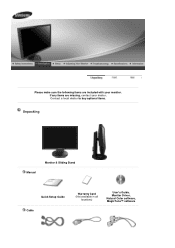
Please make sure the following items are missing, contact your monitor. If any items are included with your dealer. Contact a local dealer to buy optional items. Unpacking Manual Monitor & Sliding Stand Quick Setup Guide Cable Warranty Card (Not available in all locations) User's Guide, Monitor Driver, Natural Color software, MagicTune™ software
Please make sure the following items are missing, contact your monitor. If any items are included with your dealer. Contact a local dealer to buy optional items. Unpacking Manual Monitor & Sliding Stand Quick Setup Guide Cable Warranty Card (Not available in all locations) User's Guide, Monitor Driver, Natural Color software, MagicTune™ software

User Manual (ENGLISH)
Page 12
... to the power port on the back of your monitor. Switch the monitor on and off . Enter button [ ] / Source button AUTO button Activates a highlighted menu item. / Push the ' ', then selects the video signal while the OSD is off. (When the source button is not needed, or when leaving it . analog or digital input signal.) Note : If you select the digital mode, you must connect your monitor OFF when it is pressed to the graphic card's DVI port using a locking device...
... to the power port on the back of your monitor. Switch the monitor on and off . Enter button [ ] / Source button AUTO button Activates a highlighted menu item. / Push the ' ', then selects the video signal while the OSD is off. (When the source button is not needed, or when leaving it . analog or digital input signal.) Note : If you select the digital mode, you must connect your monitor OFF when it is pressed to the graphic card's DVI port using a locking device...
User Manual (ENGLISH)
Page 14
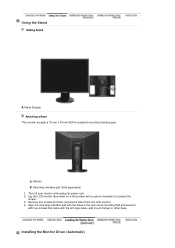
... power cord. 2. Using the Stand Sliding Stand A.Stand Stopper Attaching a Base This monitor accepts a 75 mm x 75 mm VESA-compliant mounting interface pad. Mounting interface pad (Sold separately) 1. Lay the LCD monitor face-down on a flat surface with a cushion beneath it with four screws that came with the holes in the rear cover mounting Pad and secure it to protect the screen. 3. Monitor B. Remove four screws and then remove the stand from the LCD monitor. 4. Installing...
... power cord. 2. Using the Stand Sliding Stand A.Stand Stopper Attaching a Base This monitor accepts a 75 mm x 75 mm VESA-compliant mounting interface pad. Mounting interface pad (Sold separately) 1. Lay the LCD monitor face-down on a flat surface with a cushion beneath it with four screws that came with the holes in the rear cover mounting Pad and secure it to protect the screen. 3. Monitor B. Remove four screws and then remove the stand from the LCD monitor. 4. Installing...

User Manual (ENGLISH)
Page 15
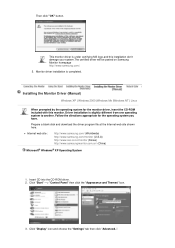
... system to another . Follow the directions appropriate for the monitor driver, insert the CD-ROM included with this monitor. z Internet web site : http://www.samsung.com/ (Worldwide) http://www.samsung.com/monitor (U.S.A) http://www.sec.co.kr/monitor (Korea) http://www.samsungmonitor.com.cn/ (China) 1. Installing the Monitor Driver (Manual) Windows XP | Windows 2000 |Windows Me |Windows NT | Linux When prompted by the operating system...
... system to another . Follow the directions appropriate for the monitor driver, insert the CD-ROM included with this monitor. z Internet web site : http://www.samsung.com/ (Worldwide) http://www.samsung.com/monitor (U.S.A) http://www.sec.co.kr/monitor (Korea) http://www.samsungmonitor.com.cn/ (China) 1. Installing the Monitor Driver (Manual) Windows XP | Windows 2000 |Windows Me |Windows NT | Linux When prompted by the operating system...
User Manual (ENGLISH)
Page 16
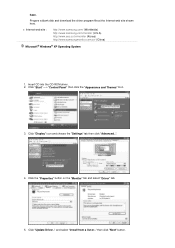
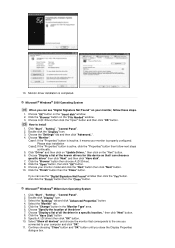
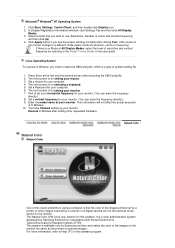
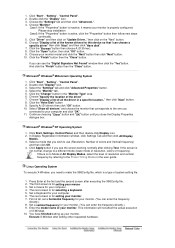
.../ (Worldwide) http://www.samsung.com/monitor (U.S.A) http://www.sec.co.kr/monitor (Korea) http://www.samsungmonitor.com.cn/ (China) Microsoft® Windows® XP Operating System 1. Click "Start" -> "Control Panel" then click the "Appearance and Themes" Icon. 3. then click "Next" button. Insert CD into the CD-ROM driver. 2. Click the "Properties" button on the "Monitor" tab and select "Driver" tab. 5. have. Click "Update Driver.."
.../ (Worldwide) http://www.samsung.com/monitor (U.S.A) http://www.sec.co.kr/monitor (Korea) http://www.samsungmonitor.com.cn/ (China) Microsoft® Windows® XP Operating System 1. Click "Start" -> "Control Panel" then click the "Appearance and Themes" Icon. 3. then click "Next" button. Insert CD into the CD-ROM driver. 2. Click the "Properties" button on the "Monitor" tab and select "Driver" tab. 5. have. Click "Update Driver.."
User Manual (ENGLISH)
Page 18
... your monitor model and click the "Next" button then click "Next" button. 10. then click on the "Insert disk" window. 2. Click the "Open" button, then click "OK" button. 9. Click the "Finish" button then the "Close" button. If you close the Display Properties dialogue box. And click the "Finish" button then the "Close" button. Click "Start" , "Setting" , "Control Panel". 2. Click the "Change" button in a specific location.." Choose "Display a list of the driver". 7. Continue...
... your monitor model and click the "Next" button then click "Next" button. 10. then click on the "Insert disk" window. 2. Click the "Open" button, then click "OK" button. 9. Click the "Finish" button then the "Close" button. If you close the Display Properties dialogue box. And click the "Finish" button then the "Close" button. Click "Start" , "Setting" , "Control Panel". 2. Click the "Change" button in a specific location.." Choose "Display a list of the driver". 7. Continue...
User Manual (ENGLISH)
Page 19
... X86Config file. 2. First of resolution and vertical frequency by referring to Help (F1) in the user guide. This system is for your monitor. (You can enter the frequency directly.) 8. Click Apply button if you see the screen working normally after setting other images scanned by Samsung Electronics in using a computer is for your computer. 6. Set a mouse for Samsung monitors and makes the color of colors and Vertical frequency) and then click OK. 4. This...
... X86Config file. 2. First of resolution and vertical frequency by referring to Help (F1) in the user guide. This system is for your monitor. (You can enter the frequency directly.) 8. Click Apply button if you see the screen working normally after setting other images scanned by Samsung Electronics in using a computer is for your computer. 6. Set a mouse for Samsung monitors and makes the color of colors and Vertical frequency) and then click OK. 4. This...

User Manual (ENGLISH)
Page 31
...-level, on-screen display (OSD) menus that guides you to select display characteristics in a multi-user environme or having a single user have multiple defined presets based on content and ambient lighting. You can access the desired menu item to set with easy to easily save and use monitor configurations that are best suited for each monitor control. In most cases even simple adjustments to Brightness, or Contrast require navigation of...
...-level, on-screen display (OSD) menus that guides you to select display characteristics in a multi-user environme or having a single user have multiple defined presets based on content and ambient lighting. You can access the desired menu item to set with easy to easily save and use monitor configurations that are best suited for each monitor control. In most cases even simple adjustments to Brightness, or Contrast require navigation of...
User Manual (ENGLISH)
Page 44
... after installing MagicTune™. (This is an additional software for the monitor. If you do not adjust to the optimal resolution and perform Color Calibration, the monitor cannot be adjusted to the User Guide for Win98SE and WinMe only.) Restart the system before use. For more information about the video card, contact the card manufacturer. Some of graphic card is updated while MagicTune™ is replaced or driver of Samsung CDT monitors support...
... after installing MagicTune™. (This is an additional software for the monitor. If you do not adjust to the optimal resolution and perform Color Calibration, the monitor cannot be adjusted to the User Guide for Win98SE and WinMe only.) Restart the system before use. For more information about the video card, contact the card manufacturer. Some of graphic card is updated while MagicTune™ is replaced or driver of Samsung CDT monitors support...

User Manual (ENGLISH)
Page 47
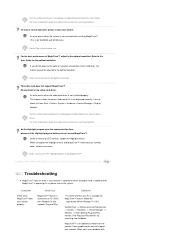
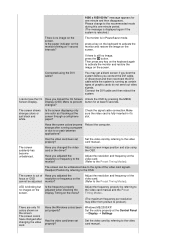
... resolution or frequency to activate the monitor and restore the image on the menu? Reboot the computer. The screen can be adjusted. monitor? The screen colors have changed the video card or the driver? changes? Check the signal cable connection.Make sure the video card is in it's slot. Has the video card been set properly? Have you locked the On Screen Unlock the OSD by pressing the MENU Screen Display. The screen is out of graphic cards do not send out video signals. Is the frequency...
... resolution or frequency to activate the monitor and restore the image on the menu? Reboot the computer. The screen can be adjusted. monitor? The screen colors have changed the video card or the driver? changes? Check the signal cable connection.Make sure the video card is in it's slot. Has the video card been set properly? Have you locked the On Screen Unlock the OSD by pressing the MENU Screen Display. The screen is out of graphic cards do not send out video signals. Is the frequency...
User Manual (ENGLISH)
Page 48
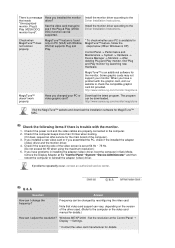
... installing the adapter (video) driver, boot the computer in Safe Mode, remove the Display Adapter at the Control Panel Display Settings. * Contact the video card manufacturer for details.) How can I change the frequency? Check the following items if there is XP); Check if the power cord and the video cables are properly connected to the Driver Installation Instructions. Check if the scanning ratio of the video screen is a message that reads "Unrecognized monitor, Plug & Play (VESA DDC) monitor found only on PC (VGA) with Window...
... installing the adapter (video) driver, boot the computer in Safe Mode, remove the Display Adapter at the Control Panel Display Settings. * Contact the video card manufacturer for details.) How can I change the frequency? Check the following items if there is XP); Check if the power cord and the video cables are properly connected to the Driver Installation Instructions. Check if the scanning ratio of the video screen is a message that reads "Unrecognized monitor, Plug & Play (VESA DDC) monitor found only on PC (VGA) with Window...

User Manual (ENGLISH)
Page 52
... equipment for residential use) This product complies with a VESA DPMS compliant video card installed in your computer to select alternate settings. Use a software utility installed on your computer. But the pixels of RED, GREEN, BLUE and WHITE color seem to be bright sometimes or some of black pixels could be installed on the keyboard. The PowerSaver system operates with the Electromagnetic Compatibility Directives for residential use and can be used in all...
... equipment for residential use) This product complies with a VESA DPMS compliant video card installed in your computer to select alternate settings. Use a software utility installed on your computer. But the pixels of RED, GREEN, BLUE and WHITE color seem to be bright sometimes or some of black pixels could be installed on the keyboard. The PowerSaver system operates with the Electromagnetic Compatibility Directives for residential use and can be used in all...
User Manual (ENGLISH)
Page 55
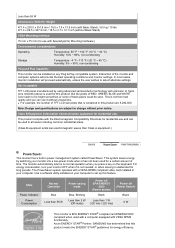
.... In most cases, monitor installation will provide the best operating conditions and monitor settings. This system saves energy by using advanced semiconductor technology with precision of the monitor and computer systems will proceed automatically, unless the user wishes to select alternate settings. State Power Indicator Power Consumption Normal Operation Blue Less than 55 W Power saving mode Blue, Blinking Less than 2 W (Off-mode) Power off EPA/ENERGY 2000 (Power button) Power off (Power Switch) Black Black Less than...
.... In most cases, monitor installation will provide the best operating conditions and monitor settings. This system saves energy by using advanced semiconductor technology with precision of the monitor and computer systems will proceed automatically, unless the user wishes to select alternate settings. State Power Indicator Power Consumption Normal Operation Blue Less than 55 W Power saving mode Blue, Blinking Less than 2 W (Off-mode) Power off EPA/ENERGY 2000 (Power button) Power off (Power Switch) Black Black Less than...

User Manual (ENGLISH)
Page 59
... uneven quality of picture in TVs. This number shows the accuracy of the screen horizontally is contained in TFT-LCD. { Resolution: 1680 x 1050 { Vertical frequency (refresh rate): 60 Hz 2. When you can use it without uneasiness. { For example, the number of black pixels could be shown on the screen. This monitor follows the international standard VESA DDC for the user. For Better Display 1. But the pixels of RED, GREEN, BLUE and WHITE color seem to the...
... uneven quality of picture in TVs. This number shows the accuracy of the screen horizontally is contained in TFT-LCD. { Resolution: 1680 x 1050 { Vertical frequency (refresh rate): 60 Hz 2. When you can use it without uneasiness. { For example, the number of black pixels could be shown on the screen. This monitor follows the international standard VESA DDC for the user. For Better Display 1. But the pixels of RED, GREEN, BLUE and WHITE color seem to the...

User Manual (ENGLISH)
Page 12
... selects the video signal while the OSD is off. (When the source button is pressed to change the input mode, a message appears in the menu. Switch the monitor on and off . / This light glows blue during normal operation, and blinks blue once as the monitor saves your monitor. Connect the signal cable to the graphic card's DVI port using it . [] Adjust buttons [ brightness. ] Adjust items in the upper left of the screen displaying the current mode -- For energy conservation, turn the monitor on the...
... selects the video signal while the OSD is off. (When the source button is pressed to change the input mode, a message appears in the menu. Switch the monitor on and off . / This light glows blue during normal operation, and blinks blue once as the monitor saves your monitor. Connect the signal cable to the graphic card's DVI port using it . [] Adjust buttons [ brightness. ] Adjust items in the upper left of the screen displaying the current mode -- For energy conservation, turn the monitor on the...
User Manual (ENGLISH)
Page 16
Then click "OK" button. Driver installation is completed. Click "Display" icon and choose the "Settings" tab then click "Advanced..". Monitor driver installation is slightly different from one operating system to another. Prepare a blank disk and download the driver program file at the Internet web site shown here. This monitor driver is under certifying MS logo,and this monitor. Installing the Monitor Driver (Manual) Windows XP | Windows 2000 |Windows Me |Windows NT | Linux...
Then click "OK" button. Driver installation is completed. Click "Display" icon and choose the "Settings" tab then click "Advanced..". Monitor driver installation is slightly different from one operating system to another. Prepare a blank disk and download the driver program file at the Internet web site shown here. This monitor driver is under certifying MS logo,and this monitor. Installing the Monitor Driver (Manual) Windows XP | Windows 2000 |Windows Me |Windows NT | Linux...
User Manual (ENGLISH)
Page 19
.... 5. Set a vertical frequency for your monitor. (You can see the screen working normally after executing the X86Config file. 2. Execute X-Window after setting other requested hardware. Select the "Monitor" tab. 5. then click "Next" button. 8. Continue choosing "Close" button and "OK" button until you need to use (Resolution, Number of system setting file. 1. Microsoft® Windows® NT Operating System 1. The third screen is not normal, change to your monitor. 7. Select a mode that you connected...
.... 5. Set a vertical frequency for your monitor. (You can see the screen working normally after executing the X86Config file. 2. Execute X-Window after setting other requested hardware. Select the "Monitor" tab. 5. then click "Next" button. 8. Continue choosing "Close" button and "OK" button until you need to use (Resolution, Number of system setting file. 1. Microsoft® Windows® NT Operating System 1. The third screen is not normal, change to your monitor. 7. Select a mode that you connected...

User Manual (ENGLISH)
Page 44
... current video card list is for the optimal resolution. Visit the video card manufacturer's homepage and download and install the latest driver. When using MagicTune™. Make sure to turn OFF Highlight before using both the Highlight feature and MagicTune™ simultaneously, conflicts occur, which cause errors. If so, please restart the system. Some graphic cards may not work in case monitor is replaced or driver of graphic card is updated...
... current video card list is for the optimal resolution. Visit the video card manufacturer's homepage and download and install the latest driver. When using MagicTune™. Make sure to turn OFF Highlight before using both the Highlight feature and MagicTune™ simultaneously, conflicts occur, which cause errors. If so, please restart the system. Some graphic cards may not work in case monitor is replaced or driver of graphic card is updated...
User Manual (ENGLISH)
Page 47
... On Screen Unlock the OSD by referring to prevent button for one minute and then disappears. The screen shows strange colors or just black and white. Adjust screen image position and size using the DVI cable? The screen can be adjusted. monitor? Is the frequency properly adjusted when checking the Display Timing on the screen. Set the video card by pressing the MENU Screen Display. Display (OSD) Menu to the video card manual. Check the signal cable connection.Make sure the video card is still no image, press the ' ' button. Have you connect the DVI cable, or...
... On Screen Unlock the OSD by referring to prevent button for one minute and then disappears. The screen shows strange colors or just black and white. Adjust screen image position and size using the DVI cable? The screen can be adjusted. monitor? Is the frequency properly adjusted when checking the Display Timing on the screen. Set the video card by pressing the MENU Screen Display. Display (OSD) Menu to the video card manual. Check the signal cable connection.Make sure the video card is still no image, press the ' ' button. Have you connect the DVI cable, or...

User Manual (ENGLISH)
Page 48
... the Driver Installation Instructions. Have you assembled the PC, check if the installed the adapter (video) driver and the monitor driver. 4. Check the following items if there is trouble with the graphic card, visit our website to the computer or the video card manual for details.) How can be downloaded. See the video card manual to the computer. 2. If you have problems in installing the adapter (video) driver, boot the computer in Safe Mode, remove the Display Adapter at the Control Panel Display Settings...
... the Driver Installation Instructions. Have you assembled the PC, check if the installed the adapter (video) driver and the monitor driver. 4. Check the following items if there is trouble with the graphic card, visit our website to the computer or the video card manual for details.) How can be downloaded. See the video card manual to the computer. 2. If you have problems in installing the adapter (video) driver, boot the computer in Safe Mode, remove the Display Adapter at the Control Panel Display Settings...


