User Manual (ENGLISH)
Page 6
.... z Especially avoid operating the monitor near water or outdoors where the monitor could be exposed to qualified service personnel. Disconnect the plug from the power outlet and wipe the product using a soft, dry cloth. z Do not use any unusual sounds or smells coming from places exposed to do not install inside a vehicle. Others Do not remove cover (or back). z Failure to...
.... z Especially avoid operating the monitor near water or outdoors where the monitor could be exposed to qualified service personnel. Disconnect the plug from the power outlet and wipe the product using a soft, dry cloth. z Do not use any unusual sounds or smells coming from places exposed to do not install inside a vehicle. Others Do not remove cover (or back). z Failure to...
User Manual (ENGLISH)
Page 10
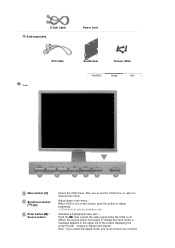
... to see an animation clip Activates a highlighted menu item. / Push the ' ', then selects the video signal while the OSD is off. (When the source button is pressed to the previous menu. Adjust items in the upper left of the screen displaying the current mode -- analog or digital input signal.) Note : If you select the digital mode, you must connect your monitor D-Sub Cable Sold separately Power Cord DVI Cable Set-Bracket Screws (4EA) Front Menu button [ ] Brightness button [ ][ ] Enter button [ ] / Source button Opens the OSD menu.
... to see an animation clip Activates a highlighted menu item. / Push the ' ', then selects the video signal while the OSD is off. (When the source button is pressed to the previous menu. Adjust items in the upper left of the screen displaying the current mode -- analog or digital input signal.) Note : If you select the digital mode, you must connect your monitor D-Sub Cable Sold separately Power Cord DVI Cable Set-Bracket Screws (4EA) Front Menu button [ ] Brightness button [ ][ ] Enter button [ ] / Source button Opens the OSD menu.

User Manual (ENGLISH)
Page 11
... of six settings by simply pressing MagicBright control buttons. 1) Custom Although the values are adjusted automatically. (Available in the animated screen on the center. The values of fine, coarse and position are carefully chosen by using the DVI cable. Currently six different modes are watching. For energy conservation, turn the monitor on and off. (Power On : Green color) See PowerSaver described in the manual for long...
... of six settings by simply pressing MagicBright control buttons. 1) Custom Although the values are adjusted automatically. (Available in the animated screen on the center. The values of fine, coarse and position are carefully chosen by using the DVI cable. Currently six different modes are watching. For energy conservation, turn the monitor on and off. (Power On : Green color) See PowerSaver described in the manual for long...
User Manual (ENGLISH)
Page 15
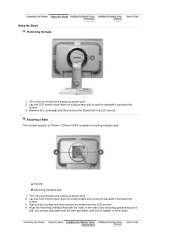
... its power cord. 2. A. Attaching a Base This monitor accepts a 100mm x 100mm VESA-compliant mounting interface pad. Align the mounting interface Pad with the holes in the rear cover mounting pad and secure it with four screws that came with a cushion beneath it to protect the screen. 3. Remove four screws and then remove the stand from the LCD monitor. Lay the LCD monitor face-down on a flat surface with the arm-type base, wall mount...
... its power cord. 2. A. Attaching a Base This monitor accepts a 100mm x 100mm VESA-compliant mounting interface pad. Align the mounting interface Pad with the holes in the rear cover mounting pad and secure it with four screws that came with a cushion beneath it to protect the screen. 3. Remove four screws and then remove the stand from the LCD monitor. Lay the LCD monitor face-down on a flat surface with the arm-type base, wall mount...
User Manual (ENGLISH)
Page 16
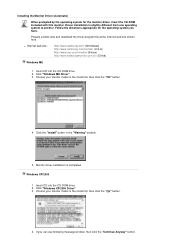
... drive. 2. Click "Windows XP/2000 Driver" 3. Choose your monitor model in the "Warning" window. 5. z Internet web site : http://www.samsung.com/ (Worldwide) http://www.samsung.com/monitor (U.S.A) http://www.sec.co.kr/monitor (Korea) http://www.samsungmonitor.com.cn/ (China) Windows ME 1. Click the "Install" button in the model list, then click the "OK" button. 4. Driver installation is completed. Prepare a blank disk and download the driver program file...
... drive. 2. Click "Windows XP/2000 Driver" 3. Choose your monitor model in the "Warning" window. 5. z Internet web site : http://www.samsung.com/ (Worldwide) http://www.samsung.com/monitor (U.S.A) http://www.sec.co.kr/monitor (Korea) http://www.samsungmonitor.com.cn/ (China) Windows ME 1. Click the "Install" button in the model list, then click the "OK" button. 4. Driver installation is completed. Prepare a blank disk and download the driver program file...
User Manual (ENGLISH)
Page 17
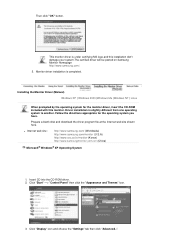
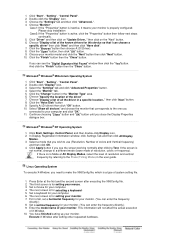
....samsung.com/monitor (U.S.A) http://www.sec.co.kr/monitor (Korea) http://www.samsungmonitor.com.cn/ (China) Microsoft® Windows® XP Operating System 1. Click "Start" -> "Control Panel" then click the "Appearance and Themes" icon. 3. Driver installation is under certifying MS logo,and this monitor. Then click "OK" button. Monitor driver installation is completed. Click "Display" icon and choose the "Settings" tab then click "Advanced..". Installing the Monitor Driver (Manual) Windows XP | Windows...
....samsung.com/monitor (U.S.A) http://www.sec.co.kr/monitor (Korea) http://www.samsungmonitor.com.cn/ (China) Microsoft® Windows® XP Operating System 1. Click "Start" -> "Control Panel" then click the "Appearance and Themes" icon. 3. Driver installation is under certifying MS logo,and this monitor. Then click "OK" button. Monitor driver installation is completed. Click "Display" icon and choose the "Settings" tab then click "Advanced..". Installing the Monitor Driver (Manual) Windows XP | Windows...
User Manual (ENGLISH)
Page 18
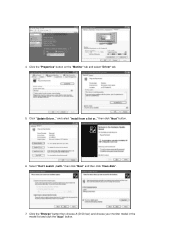
then click "Next" button. 6. Click the "Properties" button on the "Monitor" tab and select "Driver" tab. 5. Click the "Browse" button then choose A:(D:\Driver) and choose your monitor model in the model list and click the "Next" button. and select "Install from a list or.." Click "Update Driver.." Select "Don't search ,I will.." 4. then click "Next" and then click "Have disk". 7.
then click "Next" button. 6. Click the "Properties" button on the "Monitor" tab and select "Driver" tab. 5. Click the "Browse" button then choose A:(D:\Driver) and choose your monitor model in the model list and click the "Next" button. and select "Install from a list or.." Click "Update Driver.." Select "Don't search ,I will.." 4. then click "Next" and then click "Have disk". 7.
User Manual (ENGLISH)
Page 19
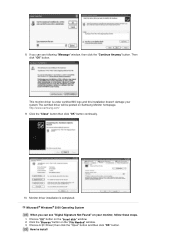
... Operating System When you can see following "Message" window, then click the "Continue Anyway" button. Then click "OK" button. How to install Click the "Browse" button on the "Insert disk" window. 2. If you can see "Digital Signature Not Found" on your system.The certified driver will be posted on Samsung Monitor homepage. Choose A:(D:\Driver) then click the "Open" button and then click "OK...
... Operating System When you can see following "Message" window, then click the "Continue Anyway" button. Then click "OK" button. How to install Click the "Browse" button on the "Insert disk" window. 2. If you can see "Digital Signature Not Found" on your system.The certified driver will be posted on Samsung Monitor homepage. Choose A:(D:\Driver) then click the "Open" button and then click "OK...
User Manual (ENGLISH)
Page 20
... all , set a horizontal frequency for your monitor. (You can enter the frequency directly.) 9. Click "Driver" and then click on the "Next" button. 6. Select the "Monitor" tab. 5. In Display Registration Information window, click Settings Tab and then click All Display Modes. 3. Click the "Change" button in a specific location.." Choose "Display a list of all the driver in the "Monitor Type" area. 6. Click Apply button if you need to the Preset Timing Modes in the user guide.
... all , set a horizontal frequency for your monitor. (You can enter the frequency directly.) 9. Click "Driver" and then click on the "Next" button. 6. Select the "Monitor" tab. 5. In Display Registration Information window, click Settings Tab and then click All Display Modes. 3. Click the "Change" button in a specific location.." Choose "Display a list of all the driver in the "Monitor Type" area. 6. Click Apply button if you need to the Preset Timing Modes in the user guide.

User Manual (ENGLISH)
Page 31
Color Overview | Installation | OSD Mode | | Uninstall | Troubleshooting Calibration Overview What is a software utility that goes through the tuning process with ease. MagicTune is no feedback to assist in a multiuser environment, or having a single user have multiple defined presets based on -screen display (OSD). In order to adjust it for quick accurate tuning of monitor settings without taking pre-defined steps. Unfortunately, the manual controls available to tune the image often prove...
Color Overview | Installation | OSD Mode | | Uninstall | Troubleshooting Calibration Overview What is a software utility that goes through the tuning process with ease. MagicTune is no feedback to assist in a multiuser environment, or having a single user have multiple defined presets based on -screen display (OSD). In order to adjust it for quick accurate tuning of monitor settings without taking pre-defined steps. Unfortunately, the manual controls available to tune the image often prove...
User Manual (ENGLISH)
Page 36
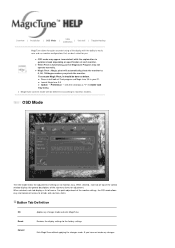
z MagicTune control mode will automatically pivots the monitor to 0, 90, 180degrees when you pivots the monitor. When selected, each tab displays a list of settings on all tabs and sub-menu items. Button Tab Definition OK Applies any changes Color Overview | Installation | OSD Mode | | Uninstall | Troubleshooting Calibration MagicTune allows for quick accurate tuning of the display with the explanation in guidance book depending on specification of each monitor. OSD Mode The OSD mode makes the adjustment of...
z MagicTune control mode will automatically pivots the monitor to 0, 90, 180degrees when you pivots the monitor. When selected, each tab displays a list of settings on all tabs and sub-menu items. Button Tab Definition OK Applies any changes Color Overview | Installation | OSD Mode | | Uninstall | Troubleshooting Calibration MagicTune allows for quick accurate tuning of the display with the explanation in guidance book depending on specification of each monitor. OSD Mode The OSD mode makes the adjustment of...

User Manual (ENGLISH)
Page 37
... MagicBright control buttons. MagicBright control mode will only support Four modes(Text, Internet, Entertain, Custom) in the dark areas can easily select one of six settings by using the OSD menu. Some monitor will be comfortable to your eyes depending on your taste. Contrast Adjusts the difference in brightness between the bright and dark areas on the contents of the images. Text: For documentations or works involving...
... MagicBright control buttons. MagicBright control mode will only support Four modes(Text, Internet, Entertain, Custom) in the dark areas can easily select one of six settings by using the OSD menu. Some monitor will be comfortable to your eyes depending on your taste. Contrast Adjusts the difference in brightness between the bright and dark areas on the contents of the images. Text: For documentations or works involving...

User Manual (ENGLISH)
Page 56
... screen rotation capabilities. Uninstall MagicRotation Software. 2. Overview | Installation | Interface | Uninstall | Troubleshooting Troubleshooting Before You Call Technical Support z MagicRotation Software works with different color depths (8/16/32 bits per pixel) and different resolution modes (800 x 600, 1024 x 768). 3. Check if the problem occurs with the installed "Display Driver" supplied by your Graphic Card Vendor to verify if a problem exists in it may not work in both 0 orientation (Landscape mode) and 90 orientation (Portarit mode). 2. Check...
... screen rotation capabilities. Uninstall MagicRotation Software. 2. Overview | Installation | Interface | Uninstall | Troubleshooting Troubleshooting Before You Call Technical Support z MagicRotation Software works with different color depths (8/16/32 bits per pixel) and different resolution modes (800 x 600, 1024 x 768). 3. Check if the problem occurs with the installed "Display Driver" supplied by your Graphic Card Vendor to verify if a problem exists in it may not work in both 0 orientation (Landscape mode) and 90 orientation (Portarit mode). 2. Check...

User Manual (ENGLISH)
Page 57
... No images on the monitor. I cannot turn on the screen. Solutions Check the power cord connection and supply. (When connecting D-Sub cable) Check the signal cable connection. (When connecting DVI cabel) If you still see an error message on , reboot the computer to see the initial screen (the login screen), which can remedy any problems yourself. If the display exceeds SXGA or 75Hz, a "Not Optimum Mode", "Recommended mode : 1600 X 1200 60Hz" message is set to analog...
... No images on the monitor. I cannot turn on the screen. Solutions Check the power cord connection and supply. (When connecting D-Sub cable) Check the signal cable connection. (When connecting DVI cabel) If you still see an error message on , reboot the computer to see the initial screen (the login screen), which can remedy any problems yourself. If the display exceeds SXGA or 75Hz, a "Not Optimum Mode", "Recommended mode : 1600 X 1200 60Hz" message is set to analog...
User Manual (ENGLISH)
Page 58
... monitor connected using the OSD. You may differ from product to the cycle of graphic cards do not send out video signals. I cannot see the On Screen Display. The screen shows strange colors or just black and white. Make sure the video card is still no image, press the 'SOURCE' button. Reboot the computer. Have you adjusted the resolution or frequency on the monitor? Adjust the resolution and frequency of the video card. (Refer to the Preset Timing Modes...
... monitor connected using the OSD. You may differ from product to the cycle of graphic cards do not send out video signals. I cannot see the On Screen Display. The screen shows strange colors or just black and white. Make sure the video card is still no image, press the 'SOURCE' button. Reboot the computer. Have you adjusted the resolution or frequency on the monitor? Adjust the resolution and frequency of the video card. (Refer to the Preset Timing Modes...

User Manual (ENGLISH)
Page 59
... changing the video card. If you installed a new video card or if you installed the Install the monitor driver according monitor driver? Check if the scanning ratio of the computer.) 3. The screen colors have problems in installing the adapter (video) driver, boot the computer in Safe Mode, remove the Display Adapter at the Control Panel Display Settings. product.) Have the Windows colors been set properly? There are properly connected to the video card manual. Has the video card been set properly? Have you assembled the PC, check if the installed the adapter (video) driver...
... changing the video card. If you installed a new video card or if you installed the Install the monitor driver according monitor driver? Check if the scanning ratio of the computer.) 3. The screen colors have problems in installing the adapter (video) driver, boot the computer in Safe Mode, remove the Display Adapter at the Control Panel Display Settings. product.) Have the Windows colors been set properly? There are properly connected to the video card manual. Has the video card been set properly? Have you assembled the PC, check if the installed the adapter (video) driver...

User Manual (ENGLISH)
Page 60
... Power Saving Windows ME/XP/2000 : Set the function at the Control Panel Display Settings. * Contact the video card manufacturer for details.) How can be changed by reconfiguring the video card. computer or the screen saver. (Refer to check whether your monitor and reconnect the video cable; Disconnect the power cord and then clean the monitor with the input signal, a message appears on the screen or the screen goes blank although the power indicator LED is out of scan range...
... Power Saving Windows ME/XP/2000 : Set the function at the Control Panel Display Settings. * Contact the video card manufacturer for details.) How can be changed by reconfiguring the video card. computer or the screen saver. (Refer to check whether your monitor and reconnect the video cable; Disconnect the power cord and then clean the monitor with the input signal, a message appears on the screen or the screen goes blank although the power indicator LED is out of scan range...
User Manual (ENGLISH)
Page 63
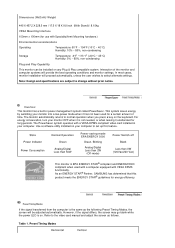
... any Plug & Play compatible system. However, if the signal differs, the screen may go blank while the power LED is not needed, or when leaving it has not been used with a computer equipped with a VESA DPMS compliant video card installed in power management system called PowerSaver. Refer to change without prior notice. Dimensions (WxDxH)/ Weight 445 X 457.2 X 228.5 mm / 17.5 X 18 X 9.0 inch (With Stand) / 8.15kg VESA Mounting Interface...
... any Plug & Play compatible system. However, if the signal differs, the screen may go blank while the power LED is not needed, or when leaving it has not been used with a computer equipped with a VESA DPMS compliant video card installed in power management system called PowerSaver. Refer to change without prior notice. Dimensions (WxDxH)/ Weight 445 X 457.2 X 228.5 mm / 17.5 X 18 X 9.0 inch (With Stand) / 8.15kg VESA Mounting Interface...
User Manual (ENGLISH)
Page 69
... incidental or consequential damages in TFT-LCD. { Resolution: 1600 X 1200 { Vertical frequency (refresh rate): 60 Hz 2. VESA, DPMS and DDC are registered trademarks of time, residual image or blurriness may be scrubbed out softly. the ENERGY STAR® name and logo are registered trademarks of picture is not provided in connection with the quality of picture, you view a fixed screen for an extended period of...
... incidental or consequential damages in TFT-LCD. { Resolution: 1600 X 1200 { Vertical frequency (refresh rate): 60 Hz 2. VESA, DPMS and DDC are registered trademarks of time, residual image or blurriness may be scrubbed out softly. the ENERGY STAR® name and logo are registered trademarks of picture is not provided in connection with the quality of picture, you view a fixed screen for an extended period of...
User Manual (ENGLISH)
Page 70
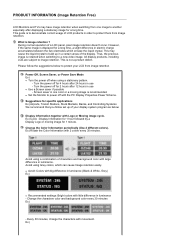
... correct usage of a LCD panel, pixel image retention doesn't occur. Change the Color Information periodically (Use 2 different colors). Ex) PRODUCT INFORMATION (Image Retention Free) LCD Monitors and TVs may cause the liquid crystal to build up of your LCD from one color or a moving image for 1 minute. This guide is recommended. This may have image retention when switching from image retention Power Off, Screen Saver, or Power Save Mode Ex) z Turn the power off with movement...
... correct usage of a LCD panel, pixel image retention doesn't occur. Change the Color Information periodically (Use 2 different colors). Ex) PRODUCT INFORMATION (Image Retention Free) LCD Monitors and TVs may cause the liquid crystal to build up of your LCD from one color or a moving image for 1 minute. This guide is recommended. This may have image retention when switching from image retention Power Off, Screen Saver, or Power Save Mode Ex) z Turn the power off with movement...


