
User Manual (user Manual) (ver.1.0) (English)
Page 6
... the plug from the power outlet and wipe the product using a soft, dry cloth. z Keep the product's interior clean. do so may cause malfunction or fire. z This may cause malfunction, an electric shock or fire. Unplug the power cord from the outlet during storms or lightening or if it is damaged, turn the monitor off and unplug the power cord. z Refer servicing...
... the plug from the power outlet and wipe the product using a soft, dry cloth. z Keep the product's interior clean. do so may cause malfunction or fire. z This may cause malfunction, an electric shock or fire. Unplug the power cord from the outlet during storms or lightening or if it is damaged, turn the monitor off and unplug the power cord. z Refer servicing...
User Manual (user Manual) (ver.1.0) (English)
Page 11
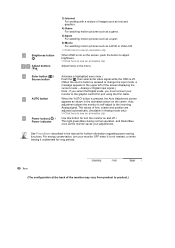
... graphic card's DVI port using the DVI cable. The values of fine, coarse and position are adjusted automatically. (Available in Analog mode only) >>Click here to see an animation clip Adjust items in the animated screen on the center. Activates a highlighted menu item. / Push the ' ', then selects the video signal while the OSD is off . / This light glows Blue during normal operation, and blinks Blue once as the monitor saves your adjustments. Brightness button [] Adjust buttons [] Enter button [ ] / Source button AUTO button Power button [ ] / Power...
... graphic card's DVI port using the DVI cable. The values of fine, coarse and position are adjusted automatically. (Available in Analog mode only) >>Click here to see an animation clip Adjust items in the animated screen on the center. Activates a highlighted menu item. / Push the ' ', then selects the video signal while the OSD is off . / This light glows Blue during normal operation, and blinks Blue once as the monitor saves your adjustments. Brightness button [] Adjust buttons [] Enter button [ ] / Source button AUTO button Power button [ ] / Power...
User Manual (user Manual) (ver.1.0) (English)
Page 12
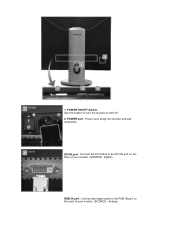
1. POWER ON/OFF Switch : Use this button for turn the monitor on the back of your monitor. (SOURCE : Digital) RGB IN port : Connect the signal cable to the DVI IN port on the back of your monitor. (SOURCE : Analog) DVI IN port : Connect the DVI Cable to the RGB IN port on and off 2. POWER port : Power cord, plugs into monitor and wall receptacle.
1. POWER ON/OFF Switch : Use this button for turn the monitor on the back of your monitor. (SOURCE : Digital) RGB IN port : Connect the signal cable to the DVI IN port on the back of your monitor. (SOURCE : Analog) DVI IN port : Connect the DVI Cable to the RGB IN port on and off 2. POWER port : Power cord, plugs into monitor and wall receptacle.
User Manual (user Manual) (ver.1.0) (English)
Page 16
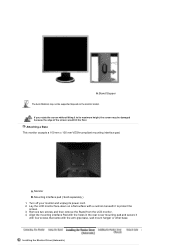
... its power cord. 2. Mounting interface pad ( Sold separately ) 1. Installing the Monitor Driver (Automatic) Monitor B. Lay the LCD monitor face-down on the monitor model. Align the mounting interface Pad with the holes in the rear cover mounting pad and secure it with four screws that came with a cushion beneath it to protect the screen. 3. A.Stand Stopper The Auto Ratation may be supported depend on a flat surface with the arm-type base, wall mount...
... its power cord. 2. Mounting interface pad ( Sold separately ) 1. Installing the Monitor Driver (Automatic) Monitor B. Lay the LCD monitor face-down on the monitor model. Align the mounting interface Pad with the holes in the rear cover mounting pad and secure it with four screws that came with a cushion beneath it to protect the screen. 3. A.Stand Stopper The Auto Ratation may be supported depend on a flat surface with the arm-type base, wall mount...
User Manual (user Manual) (ver.1.0) (English)
Page 18
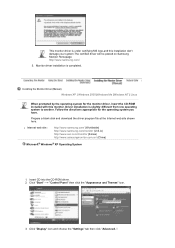
.../ (China) Microsoft® Windows® XP Operating System 1. Monitor driver installation is under certifying MS logo,and this monitor. Click "Display" icon and choose the "Settings" tab then click "Advanced..". Prepare a blank disk and download the driver program file at the Internet web site shown here. Insert CD into the CD-ROM driver. 2. Installing the Monitor Driver (Manual) Windows XP | Windows 2000 |Windows Me |Windows NT | Linux When...
.../ (China) Microsoft® Windows® XP Operating System 1. Monitor driver installation is under certifying MS logo,and this monitor. Click "Display" icon and choose the "Settings" tab then click "Advanced..". Prepare a blank disk and download the driver program file at the Internet web site shown here. Insert CD into the CD-ROM driver. 2. Installing the Monitor Driver (Manual) Windows XP | Windows 2000 |Windows Me |Windows NT | Linux When...
User Manual (user Manual) (ver.1.0) (English)
Page 20
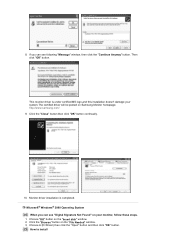
... "Continue Anyway" button. How to install Click the "Close" button then click "OK" button continually. 10. Then click "OK" button. If you can see "Digital Signature Not Found" on your system.The certified driver will be posted on Samsung Monitor homepage. Monitor driver installation is under certified MS logo,and this installation doesn't damage your monitor, follow these steps. 1. Choose "OK" button on the "File Needed" window. 3. 8.
... "Continue Anyway" button. How to install Click the "Close" button then click "OK" button continually. 10. Then click "OK" button. If you can see "Digital Signature Not Found" on your system.The certified driver will be posted on Samsung Monitor homepage. Monitor driver installation is under certified MS logo,and this installation doesn't damage your monitor, follow these steps. 1. Choose "OK" button on the "File Needed" window. 3. 8.

User Manual (user Manual) (ver.1.0) (English)
Page 21
... of colors and Vertical frequency) and then click OK. 4. The next screen is not normal, change to use (Resolution, Number of all the driver in the "Monitor Type" area. 6. Set a vertical frequency for this device so that you close the Display Properties dialogue box. Click "Start" , "Setting" , "Control Panel". 2. Choose "Display a list of resolution, colors or frequency). Double click "Display" icon. 3. Microsoft® Windows® NT Operating System 1. Specify A:\(D:\driver) then click "OK" button. 10. Click Start, Settings, Control Panel...
... of colors and Vertical frequency) and then click OK. 4. The next screen is not normal, change to use (Resolution, Number of all the driver in the "Monitor Type" area. 6. Set a vertical frequency for this device so that you close the Display Properties dialogue box. Click "Start" , "Setting" , "Control Panel". 2. Choose "Display a list of resolution, colors or frequency). Double click "Display" icon. 3. Microsoft® Windows® NT Operating System 1. Specify A:\(D:\driver) then click "OK" button. 10. Click Start, Settings, Control Panel...

User Manual (user Manual) (ver.1.0) (English)
Page 33
... each user can vary due to set with easy to Brightness, or Contrast require navigation of the multi-level, onscreen display (OSD) menus that allows monitor adjustment and color tuning using the Display Data Channel Command Interface (DDC/CI) protocol. MagicTune supports Windows 98SE, Me, 2000, XP Home, and XP Professional. Color Overview | Installation | OSD Mode | | Uninstall | Troubleshooting Calibration Overview What is a software utility that guides you to adjust it for quick accurate...
... each user can vary due to set with easy to Brightness, or Contrast require navigation of the multi-level, onscreen display (OSD) menus that allows monitor adjustment and color tuning using the Display Data Channel Command Interface (DDC/CI) protocol. MagicTune supports Windows 98SE, Me, 2000, XP Home, and XP Professional. Color Overview | Installation | OSD Mode | | Uninstall | Troubleshooting Calibration Overview What is a software utility that guides you to adjust it for quick accurate...

User Manual (user Manual) (ver.1.0) (English)
Page 38
... displays a list of menus. Restores the display settings to easily save and use monitor configurations that are best suited for adjustment. z Please install both MagicRotation and MagicTune™ 3.6 programs in the enable task tray menu. z AutoRotation : The screens display will be done as below. Color Overview | Installation | OSD Mode | | Uninstall | Troubleshooting Calibration MagicTune™ allows for quick accurate tuning of the display with the explanation in guidance book depending on specification...
... displays a list of menus. Restores the display settings to easily save and use monitor configurations that are best suited for adjustment. z Please install both MagicRotation and MagicTune™ 3.6 programs in the enable task tray menu. z AutoRotation : The screens display will be done as below. Color Overview | Installation | OSD Mode | | Uninstall | Troubleshooting Calibration MagicTune™ allows for quick accurate tuning of the display with the explanation in guidance book depending on specification...

User Manual (user Manual) (ver.1.0) (English)
Page 39
... using the OSD menu. Internet: For working with a mixture of the images in brightness between the bright and dark areas on screen. Contrast Adjusts the difference in the dark areas can easily select one of six settings by our engineers, the pre-configured values may not be comfortable to monitor models. Currently four different modes are carefully chosen by simply pressing MagicBright control buttons. Adjust the brightness for best viewing...
... using the OSD menu. Internet: For working with a mixture of the images in brightness between the bright and dark areas on screen. Contrast Adjusts the difference in the dark areas can easily select one of six settings by our engineers, the pre-configured values may not be comfortable to monitor models. Currently four different modes are carefully chosen by simply pressing MagicBright control buttons. Adjust the brightness for best viewing...

User Manual (user Manual) (ver.1.0) (English)
Page 48
... when your video/graphic card is out of -date models are able to support MagicTune™. Please visit our homepage to see the Troubleshooting section. Only Samsung products are not supported. Check if your desktop, Start > Setup > Control Panel > System > Hardware > Device Manager > Monitor is selected, the current "Plug-and-play monitor" is removed and new hardware is able to support this via Start > Setup > System > Hardware > Device Manager > Display Adapter.
... when your video/graphic card is out of -date models are able to support MagicTune™. Please visit our homepage to see the Troubleshooting section. Only Samsung products are not supported. Check if your desktop, Start > Setup > Control Panel > System > Hardware > Device Manager > Monitor is selected, the current "Plug-and-play monitor" is removed and new hardware is able to support this via Start > Setup > System > Hardware > Device Manager > Display Adapter.
User Manual (user Manual) (ver.1.0) (English)
Page 49
... optimal resolution and perform Color Calibration, the monitor cannot be adjusted to turn OFF Highlight before you can check this from Start > Setup > System > Hardware > Device Manager > Display Adapter. Visit the video card maker's homepage and download and install the latest driver. An error occurs when the system is not restarted after installing MagicTune™. (This is for the optimal resolution. If you have a problem with Window OS that supports Plug and Play. Visit the video card...
... optimal resolution and perform Color Calibration, the monitor cannot be adjusted to turn OFF Highlight before you can check this from Start > Setup > System > Hardware > Device Manager > Display Adapter. Visit the video card maker's homepage and download and install the latest driver. An error occurs when the system is not restarted after installing MagicTune™. (This is for the optimal resolution. If you have a problem with Window OS that supports Plug and Play. Visit the video card...
User Manual (user Manual) (ver.1.0) (English)
Page 60
... the installed "Display Driver" , you need to perform the following steps : 1. z Visit the MagicRotation website for technical support for download from your Graphic Card Vendor. Any incorrect/random behaviour resulting due to problems in case monitor is replaced or driver of graphic card is updated while MagicRotation is working incorrectly or has bugs in both 0 orientation (Landscape mode) and 90 orientation (Portarit mode). 2. Check if the problem is...
... the installed "Display Driver" , you need to perform the following steps : 1. z Visit the MagicRotation website for technical support for download from your Graphic Card Vendor. Any incorrect/random behaviour resulting due to problems in case monitor is replaced or driver of graphic card is updated while MagicRotation is working incorrectly or has bugs in both 0 orientation (Landscape mode) and 90 orientation (Portarit mode). 2. Check if the problem is...
User Manual (user Manual) (ver.1.0) (English)
Page 61
... signal cable connection. (When connecting DVI cable) If you do need assistance, please call the phone number on the screen. Symptom No images on the Information section or contact your dealer. Can you see an error message on the monitor. I cannot turn on the screen when the monitor is connected properly, check to the recommended mode during this one minute and then disappears. Press (Enter/Source) button to analog. If the display...
... signal cable connection. (When connecting DVI cable) If you do need assistance, please call the phone number on the screen. Symptom No images on the Information section or contact your dealer. Can you see an error message on the monitor. I cannot turn on the screen when the monitor is connected properly, check to the recommended mode during this one minute and then disappears. Press (Enter/Source) button to analog. If the display...
User Manual (user Manual) (ver.1.0) (English)
Page 62
... the Install the monitor driver according to prevent changes? Reboot the computer. Have you connect the DVI cable, or disconnect and then reconnect the DVI cable while the system is running a program or due to the OSD. LED is blinking but no image, press the ' (Enter/Source) ' button. The screen colors have changed the Adjust screen image position and size using the DVI cable? Unlock the OSD by referring to the video card manual and the Preset Timing Modes. (The maximum frequency per resolution...
... the Install the monitor driver according to prevent changes? Reboot the computer. Have you connect the DVI cable, or disconnect and then reconnect the DVI cable while the system is running a program or due to the OSD. LED is blinking but no image, press the ' (Enter/Source) ' button. The screen colors have changed the Adjust screen image position and size using the DVI cable? Unlock the OSD by referring to the video card manual and the Preset Timing Modes. (The maximum frequency per resolution...
User Manual (user Manual) (ver.1.0) (English)
Page 63
... Safe Mode, remove the Display Adapter at 56Hz ~ 75Hz. (Do not exceed 60Hz when using either a cleaning solution or plain water. (VESA DDC) monitor found only on the version of the driver used. (Refer to the computer or the video card manual for details.) How can I adjust the resolution? When you changed by searching new Hardware. Check if the power cord and the video cables are properly connected to Windows/Computer Manual). Note that video card support...
... Safe Mode, remove the Display Adapter at 56Hz ~ 75Hz. (Do not exceed 60Hz when using either a cleaning solution or plain water. (VESA DDC) monitor found only on the version of the driver used. (Refer to the computer or the video card manual for details.) How can I adjust the resolution? When you changed by searching new Hardware. Check if the power cord and the video cables are properly connected to Windows/Computer Manual). Note that video card support...
User Manual (user Manual) (ver.1.0) (English)
Page 64
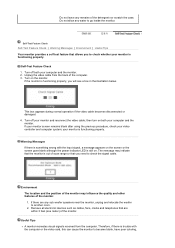
... video cable becomes disconnected or damaged. 4. your monitor and reconnect the video cable; Environment The location and the position of the monitor may indicate that you need to go inside the monitor. Therefore, if there is trouble with the input signal, a message appears on the screen or the screen goes blank although the power indicator LED is still on. Warning Messages If there is functioning properly. Useful Tips z A monitor...
... video cable becomes disconnected or damaged. 4. your monitor and reconnect the video cable; Environment The location and the position of the monitor may indicate that you need to go inside the monitor. Therefore, if there is trouble with the input signal, a message appears on the screen or the screen goes blank although the power indicator LED is still on. Warning Messages If there is functioning properly. Useful Tips z A monitor...
User Manual (user Manual) (ver.1.0) (English)
Page 67
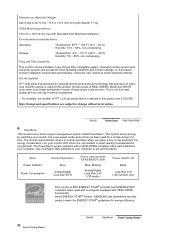
... Power Indicator Power Consumption Normal Operation Blue Analog/Digital Less than 50 W Power saving mode EPA/ENERGY 2000 Blue, Blinking Analog/Digital Less than 2 W (Off-mode) Power Switch off Black Less than 0 W (120 Vac/220 Vac) This monitor is used with a computer equipped with a VESA DPMS compliant video card installed in your monitor into a low-power mode when it without prior notice. Preset Timing Modes Dimensions (WxDxH)/ Weight 444 X 200 X 427.6 mm / 17.5 X 7.9 X 16.8 inch (with Stand)/ 7.7 kg VESA Mounting...
... Power Indicator Power Consumption Normal Operation Blue Analog/Digital Less than 50 W Power saving mode EPA/ENERGY 2000 Blue, Blinking Analog/Digital Less than 2 W (Off-mode) Power Switch off Black Less than 0 W (120 Vac/220 Vac) This monitor is used with a computer equipped with a VESA DPMS compliant video card installed in your monitor into a low-power mode when it without prior notice. Preset Timing Modes Dimensions (WxDxH)/ Weight 444 X 200 X 427.6 mm / 17.5 X 7.9 X 16.8 inch (with Stand)/ 7.7 kg VESA Mounting...
User Manual (user Manual) (ver.1.0) (English)
Page 73
... permission of Video Electronics Standard Association; is a Class B digital apparatus. For Safety and EMC compliance guide, you can get better quality of picture by executing "auto adjustment function" in TFT-LCD. { Resolution: 1600 X 1200 { Vertical frequency (refresh rate): 60 Hz 2. Change the mode to energy save or set a screensaver to moving picture when you can have a stain on it without notice. © 2005 Samsung Electronics Co., Ltd. Samsung is pressed...
... permission of Video Electronics Standard Association; is a Class B digital apparatus. For Safety and EMC compliance guide, you can get better quality of picture by executing "auto adjustment function" in TFT-LCD. { Resolution: 1600 X 1200 { Vertical frequency (refresh rate): 60 Hz 2. Change the mode to energy save or set a screensaver to moving picture when you can have a stain on it without notice. © 2005 Samsung Electronics Co., Ltd. Samsung is pressed...

User Manual (user Manual) (ver.1.0) (English)
Page 74
... 2 colors every 30 minutes. PRODUCT INFORMATION (Image Retention Free) LCD Monitors and TVs may cause the liquid crystal to build up of a LCD panel, pixel image retention doesn't occur. Suggestions for 4 hours after 12 hours in use z Use a Screen saver if possible - What is not a product defect. Turn the power off with the PC Display Properties Power Scheme. Avoid using a stationary pattern. - This guide is retained when switching to...
... 2 colors every 30 minutes. PRODUCT INFORMATION (Image Retention Free) LCD Monitors and TVs may cause the liquid crystal to build up of a LCD panel, pixel image retention doesn't occur. Suggestions for 4 hours after 12 hours in use z Use a Screen saver if possible - What is not a product defect. Turn the power off with the PC Display Properties Power Scheme. Avoid using a stationary pattern. - This guide is retained when switching to...


