Quick Guide (easy Manual) (ver.1.0) (English)
Page 11
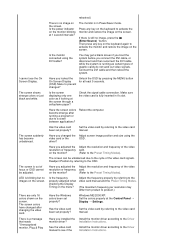
..., turn the monitor on the screen, push the button to adjust brightness. >>Click here to the graphic card's DVI port using the DVI cable. Analog or Digital input signal.) Note : If you select the Digital mode, you must connect your monitor OFF when it unattended for further information regarding power saving functions. Rear (The configuration at the back of the screen displaying the current mode -- Enter button [ ] / Source button AUTO button Power button [ ] / Power indicator Activates a highlighted menu item. / Push the ' ', then selects the video signal...
..., turn the monitor on the screen, push the button to adjust brightness. >>Click here to the graphic card's DVI port using the DVI cable. Analog or Digital input signal.) Note : If you select the Digital mode, you must connect your monitor OFF when it unattended for further information regarding power saving functions. Rear (The configuration at the back of the screen displaying the current mode -- Enter button [ ] / Source button AUTO button Power button [ ] / Power indicator Activates a highlighted menu item. / Push the ' ', then selects the video signal...

Quick Guide (easy Manual) (ver.1.0) (English)
Page 16
... rear cover mounting pad and secure it to its power cord. 2. Monitor B. Turn off your monitor and unplug its maximum height, the screen may not be damaged because the edge of the screen would hit the floor. Lay the LCD monitor face-down on the monitor model. Remove two screws and then remove the Stand from the LCD monitor. 4. Align the mounting interface Pad with the arm-type base, wall mount hanger or other base. Mounting...
... rear cover mounting pad and secure it to its power cord. 2. Monitor B. Turn off your monitor and unplug its maximum height, the screen may not be damaged because the edge of the screen would hit the floor. Lay the LCD monitor face-down on the monitor model. Remove two screws and then remove the Stand from the LCD monitor. 4. Align the mounting interface Pad with the arm-type base, wall mount hanger or other base. Mounting...

Quick Guide (easy Manual) (ver.1.0) (English)
Page 18
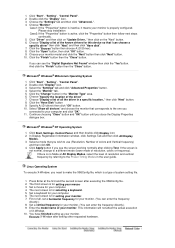
.... Click "Start" -> "Control Panel" then click the "Appearance and Themes" icon. 3. Click "Display" icon and choose the "Settings" tab then click "Advanced..". Follow the directions appropriate for the monitor driver, insert the CD-ROM included with this installation don't damage your system.The certified driver will be posted on Samsung Monitor Homepage http://www.samsung.com/. 5. Installing the Monitor Driver (Manual) Windows XP | Windows 2000 |Windows Me |Windows NT | Linux...
.... Click "Start" -> "Control Panel" then click the "Appearance and Themes" icon. 3. Click "Display" icon and choose the "Settings" tab then click "Advanced..". Follow the directions appropriate for the monitor driver, insert the CD-ROM included with this installation don't damage your system.The certified driver will be posted on Samsung Monitor Homepage http://www.samsung.com/. 5. Installing the Monitor Driver (Manual) Windows XP | Windows 2000 |Windows Me |Windows NT | Linux...
Quick Guide (easy Manual) (ver.1.0) (English)
Page 21
... see the screen working normally after clicking Test. Click Start, Settings, Control Panel, and then double-click Display icon. 2. Execute X-Window after executing the X86Config file. 2. Microsoft® Windows® Millennium Operating System 1. Set a keyboard for your monitor. Click the "Open" button, then click "OK" button. 9. Click "Start" , "Setting" , "Control Panel". 2. Press Enter at All Display Modes, select the level of resolution and vertical frequency by referring to use (Resolution, Number of your computer. 4. Set a vertical frequency for selecting...
... see the screen working normally after clicking Test. Click Start, Settings, Control Panel, and then double-click Display icon. 2. Execute X-Window after executing the X86Config file. 2. Microsoft® Windows® Millennium Operating System 1. Set a keyboard for your monitor. Click the "Open" button, then click "OK" button. 9. Click "Start" , "Setting" , "Control Panel". 2. Press Enter at All Display Modes, select the level of resolution and vertical frequency by referring to use (Resolution, Number of your computer. 4. Set a vertical frequency for selecting...

Quick Guide (easy Manual) (ver.1.0) (English)
Page 33
... each user can access the desired menu item to use monitor configurations that guides you . MagicTune™ is no feedback to obtain the best overall picture quality. MagicTune™ allows for each monitor control. Unfortunately, the manual controls available to tune the image often prove to understand. All adjustments to the display are best suited for your unique setting. You can be challenging. Color Overview | Installation | OSD Mode | | Uninstall | Troubleshooting Calibration Overview...
... each user can access the desired menu item to use monitor configurations that guides you . MagicTune™ is no feedback to obtain the best overall picture quality. MagicTune™ allows for each monitor control. Unfortunately, the manual controls available to tune the image often prove to understand. All adjustments to the display are best suited for your unique setting. You can be challenging. Color Overview | Installation | OSD Mode | | Uninstall | Troubleshooting Calibration Overview...

Quick Guide (easy Manual) (ver.1.0) (English)
Page 38
... specification of each monitor. Color Overview | Installation | OSD Mode | | Uninstall | Troubleshooting Calibration MagicTune™ allows for quick accurate tuning of the display with the explanation in guidance book depending on screen. z OSD mode may not operate normally. To execute Auto Rotation, it should be lost if the brightness is rotated. z Please install both MagicRotation and MagicTune™ 3.6 programs in the enable task tray menu. OSD Mode The OSD mode makes the adjustment of settings...
... specification of each monitor. Color Overview | Installation | OSD Mode | | Uninstall | Troubleshooting Calibration MagicTune™ allows for quick accurate tuning of the display with the explanation in guidance book depending on screen. z OSD mode may not operate normally. To execute Auto Rotation, it should be lost if the brightness is rotated. z Please install both MagicRotation and MagicTune™ 3.6 programs in the enable task tray menu. OSD Mode The OSD mode makes the adjustment of settings...
Quick Guide (easy Manual) (ver.1.0) (English)
Page 39
... a new technology that supports these functions. You can easily select one of your desired color. Some monitor will be changed. Full : Displays not only vivid natural color but also more clearly without disturbing image quality. 1. Each mode has its own pre-configured brightness value. MagicBright control mode will find Calibration MagicTune™ extremely useful if you are carefully chosen by using the OSD menu. Cool 6 - B The...
... a new technology that supports these functions. You can easily select one of your desired color. Some monitor will be changed. Full : Displays not only vivid natural color but also more clearly without disturbing image quality. 1. Each mode has its own pre-configured brightness value. MagicBright control mode will find Calibration MagicTune™ extremely useful if you are carefully chosen by using the OSD menu. Cool 6 - B The...

Quick Guide (easy Manual) (ver.1.0) (English)
Page 40
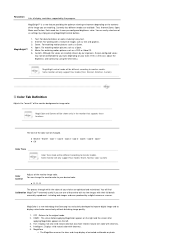
... after adjusting the frequency (clock speed). z Coarse : Removes noise such as horizontal stripes. z Auto Setup : Auto adjustment allows the monitor to self-adjust to using the Horizontal Control menu. The values of the colors with intermediate luminance. will not show the MagicTune™ again. (System Tray is Checked) z MagicColor mode will be highlighted but could have captured. Image Tab Definition Adjusts the Fine , Coarse and Position values. Gamma correction changes the...
... after adjusting the frequency (clock speed). z Coarse : Removes noise such as horizontal stripes. z Auto Setup : Auto adjustment allows the monitor to self-adjust to using the Horizontal Control menu. The values of the colors with intermediate luminance. will not show the MagicTune™ again. (System Tray is Checked) z MagicColor mode will be highlighted but could have captured. Image Tab Definition Adjusts the Fine , Coarse and Position values. Gamma correction changes the...

Quick Guide (easy Manual) (ver.1.0) (English)
Page 46
... have a problem with Window OS that supports Plug and Play. For the best performance of MagicTune™, adjust to the manual for the optimal resolution. This video card does not support MagicTune™. Check List MagicTune™ feature is an additional software for the optimal resolution. Some graphic cards may not work in case monitor is replaced or driver of Samsung CDT monitors support the Highlight feature. Make sure to the User Guide for the monitor. MagicTune™...
... have a problem with Window OS that supports Plug and Play. For the best performance of MagicTune™, adjust to the manual for the optimal resolution. This video card does not support MagicTune™. Check List MagicTune™ feature is an additional software for the optimal resolution. Some graphic cards may not work in case monitor is replaced or driver of Samsung CDT monitors support the Highlight feature. Make sure to the User Guide for the monitor. MagicTune™...

Quick Guide (easy Manual) (ver.1.0) (English)
Page 49
... is operating. If you can check this from Start > Setup > System > Hardware > Device Manager > Display Adapter. Refer to the User Guide for the optimal resolution. An error occurs when the video card driver is found only on PC (VGA) with Window OS that supports Plug and Play. Some of graphic card is updated while MagicTune™ is available for the monitor. MagicTune™ feature is not installed properly. Refer to the...
... is operating. If you can check this from Start > Setup > System > Hardware > Device Manager > Display Adapter. Refer to the User Guide for the optimal resolution. An error occurs when the video card driver is found only on PC (VGA) with Window OS that supports Plug and Play. Some of graphic card is updated while MagicTune™ is available for the monitor. MagicTune™ feature is not installed properly. Refer to the...
Quick Guide (easy Manual) (ver.1.0) (English)
Page 62
... signal cable connection. Make sure the video card is in it's slot. driver? The screen can be adjusted. Readjust Position by referring to the cycle of focus or OSD cannot be unbalanced due to the video card manual. Have you connect the DVI cable, or disconnect and then reconnect the DVI cable while the system is still no image, press the ' (Enter/Source) ' button. Is the frequency properly adjusted when checking the Display Timing on the monitor blinking...
... signal cable connection. Make sure the video card is in it's slot. driver? The screen can be adjusted. Readjust Position by referring to the cycle of focus or OSD cannot be unbalanced due to the video card manual. Have you connect the DVI cable, or disconnect and then reconnect the DVI cable while the system is still no image, press the ' (Enter/Source) ' button. Is the frequency properly adjusted when checking the Display Timing on the monitor blinking...
Quick Guide (easy Manual) (ver.1.0) (English)
Page 63
... the adapter (video) driver. Check when MagicTune™ does not function properly. MagicTune™ is trouble with a soft cloth, using the maximum resolution.) 5. Disconnect the power cord and then clean the monitor with the monitor. 1. Check if the power cord and the video cables are properly connected to Windows/Computer Manual). Check if the scanning ratio of the video screen is XP); If problems repeatedly occur, contact an authorized service center. http://www.samsung.com/monitor/MagicTune...
... the adapter (video) driver. Check when MagicTune™ does not function properly. MagicTune™ is trouble with a soft cloth, using the maximum resolution.) 5. Disconnect the power cord and then clean the monitor with the monitor. 1. Check if the power cord and the video cables are properly connected to Windows/Computer Manual). Check if the scanning ratio of the video screen is XP); If problems repeatedly occur, contact an authorized service center. http://www.samsung.com/monitor/MagicTune...
Quick Guide (easy Manual) (ver.1.0) (English)
Page 67
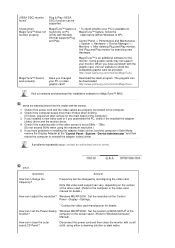
....8 inch (with Stand) / 7.7 kg VESA Mounting Interface 100 mm x 100 mm (for long periods. But the pixels of black pixels could be installed on the keyboard. The monitor automatically returns to select alternate settings. In most cases, monitor installation will provide the best operating conditions and monitor settings. z For example, the number of TFT LCD sub pixels that this product are subject to be bright sometimes or some of RED, GREEN, BLUE and WHITE color...
....8 inch (with Stand) / 7.7 kg VESA Mounting Interface 100 mm x 100 mm (for long periods. But the pixels of black pixels could be installed on the keyboard. The monitor automatically returns to select alternate settings. In most cases, monitor installation will provide the best operating conditions and monitor settings. z For example, the number of TFT LCD sub pixels that this product are subject to be bright sometimes or some of RED, GREEN, BLUE and WHITE color...
Quick Guide (easy Manual) (ver.1.0) (English)
Page 71
... color is called Horizontal Frequency. TFT LCD panel manufactured by using advanced semiconductor technology with precision of 1ppm (one line connecting the right edge to compose the screen image is called the Interlace method. The distance between two dots of TFT LCD sub pixels that used for the majority of RED, GREEN, BLUE and WHITE color seem to create and display an image for the user by allowing the computer and the monitor...
... color is called Horizontal Frequency. TFT LCD panel manufactured by using advanced semiconductor technology with precision of 1ppm (one line connecting the right edge to compose the screen image is called the Interlace method. The distance between two dots of TFT LCD sub pixels that used for the majority of RED, GREEN, BLUE and WHITE color seem to create and display an image for the user by allowing the computer and the monitor...

Service Manual
Page 3
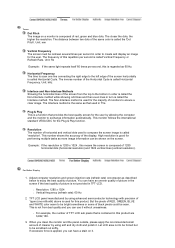
... 2. Troubleshooting ...4-1 4-1 No Power ...4-1 4-2 No Video (PC Analog Signal) ...4-3 4-3 No Video (PC Digital Signal) ...4-5 5. Exploded View and Parts List ...5-1 5-1 LHA20BS Exploded View ...5-1 5-2 LHA20BS Parts List ...5-2 6. Block Diagram ...7-1 8. Electrical Parts List ...6-1 6-1 LHA20BS Parts List ...6-1 7. Product specifications ...2-1 2-1 Fashion Feature...2-1 2-2 Specifications ...2-1 2-3 LS20BRD feature ...2-2 2-4 Spec Comparison ...2-3 2-5 Option Specification ...2-4 3. Wiring Diagram 8-1 Alignments and Adjustments ...3-1 3-1 Required Equipment ...3-1 3-2 Automatic Color...
... 2. Troubleshooting ...4-1 4-1 No Power ...4-1 4-2 No Video (PC Analog Signal) ...4-3 4-3 No Video (PC Digital Signal) ...4-5 5. Exploded View and Parts List ...5-1 5-1 LHA20BS Exploded View ...5-1 5-2 LHA20BS Parts List ...5-2 6. Block Diagram ...7-1 8. Electrical Parts List ...6-1 6-1 LHA20BS Parts List ...6-1 7. Product specifications ...2-1 2-1 Fashion Feature...2-1 2-2 Specifications ...2-1 2-3 LS20BRD feature ...2-2 2-4 Spec Comparison ...2-3 2-5 Option Specification ...2-4 3. Wiring Diagram 8-1 Alignments and Adjustments ...3-1 3-1 Required Equipment ...3-1 3-2 Automatic Color...
Service Manual
Page 7
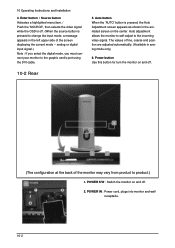
... the monitor may vary from product to change the input mode, a message appears in analog mode only) 6. POWER S/W : Switch the monitor on the center. Auto adjustment allows the monitor to self-adjust to the graphic card's port using the DVI cable. 5. 10 Operating Instructions and Installation 4. Enter button / Source button Activates a highlighted menu item. / Push the 'SOURCE', then selects the video signal while the OSD is pressed to product.) 1. Power button Use this button for turn the monitor on and off . (When the source button is...
... the monitor may vary from product to change the input mode, a message appears in analog mode only) 6. POWER S/W : Switch the monitor on the center. Auto adjustment allows the monitor to self-adjust to the graphic card's port using the DVI cable. 5. 10 Operating Instructions and Installation 4. Enter button / Source button Activates a highlighted menu item. / Push the 'SOURCE', then selects the video signal while the OSD is pressed to product.) 1. Power button Use this button for turn the monitor on and off . (When the source button is...

Service Manual
Page 10
... Operating Instructions and Installation 10-3-2 Attaching a Base - Turn off your monitor and unplug its power cord. 2. Align the mounting interface Pad with the holes in the rear cover mounting pad and secure it with four screws that came with a cushion beneath it to protect the screen. 3. Remove four screws and then remove the stand from the LCD monitor. 4. Lay the LCD monitor face-down on a flat surface with the arm-type base, wall mount...
... Operating Instructions and Installation 10-3-2 Attaching a Base - Turn off your monitor and unplug its power cord. 2. Align the mounting interface Pad with the holes in the rear cover mounting pad and secure it with four screws that came with a cushion beneath it to protect the screen. 3. Remove four screws and then remove the stand from the LCD monitor. 4. Lay the LCD monitor face-down on a flat surface with the arm-type base, wall mount...
Service Manual
Page 18
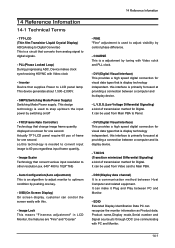
... a high speed digital connection for one second. It can recognize the monitor information as Product data, Product name,Display mode,Serial number and Signal source,etc through DDC Line communicating with Video clock - It can be used from Video card to adjust visibility by tuning with this interface is needed to convert input image to LCD panel lamp. SMPS(Switching Mode Power Supply) Switching Mode Power supply. FINE "Fine" adjustment is display technology independent. Image Lock This means "Fineness adjustment" in LCD Monitor, the...
... a high speed digital connection for one second. It can recognize the monitor information as Product data, Product name,Display mode,Serial number and Signal source,etc through DDC Line communicating with Video clock - It can be used from Video card to adjust visibility by tuning with this interface is needed to convert input image to LCD panel lamp. SMPS(Switching Mode Power Supply) Switching Mode Power supply. FINE "Fine" adjustment is display technology independent. Image Lock This means "Fineness adjustment" in LCD Monitor, the...
Service Manual
Page 46
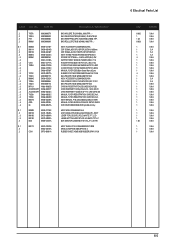
...;LCDQUICK SETUP GUIDE S/W DRIVER-00,IB;203B,W/W,SyncMaster,Hay ASSY BOX;LS20HABKBQ/XAA UNIT-HANDLE PACKING;LXA410TLMU,PE,-,WHIT LEVER-TOP;LSD210TL,PE-LD,WHITE,TFT_LCD LEVER-BOTTOM;LSD210TL,PE-LD,WHITE,TFT-LC BOX-MONITOR;LS20HAB,SY-01,YEL,A-1,L519*W ASSY SHIELD;CTZ-LS20HABBSQ/EDC,203B SHIELD-LAMP;S/M 203B,SPTE,T0.3 RUBBER-SHEET;42W5,NBB RUBBER,GRAY,10*20 6 Electrical Parts List...
...;LCDQUICK SETUP GUIDE S/W DRIVER-00,IB;203B,W/W,SyncMaster,Hay ASSY BOX;LS20HABKBQ/XAA UNIT-HANDLE PACKING;LXA410TLMU,PE,-,WHIT LEVER-TOP;LSD210TL,PE-LD,WHITE,TFT_LCD LEVER-BOTTOM;LSD210TL,PE-LD,WHITE,TFT-LC BOX-MONITOR;LS20HAB,SY-01,YEL,A-1,L519*W ASSY SHIELD;CTZ-LS20HABBSQ/EDC,203B SHIELD-LAMP;S/M 203B,SPTE,T0.3 RUBBER-SHEET;42W5,NBB RUBBER,GRAY,10*20 6 Electrical Parts List...
Service Manual
Page 51
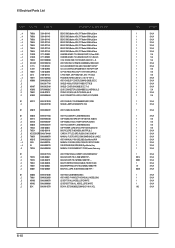
...-N,1830mm CBF SIGNAL-DVI(D);1703FP,24P/24P,20276-D ASSY ACCESSORY;LS20HABBSQ/EDC CBF-POWER CORD;DT,EU,FP3/YES,IEC320 C13/ BAG PE;LDPE,T0.05,W250,L400,TRP,28,2 CARD-01;TFT LCD,SRC,RUSSIA,S/W,120,W210* MANUAL FLYER-CARD;COMM,SAMSUNG,18 LANG,E ASSY MANUAL P-IB+QSG;203B,SyncMaster,W/W MANUAL FLYER-04,QSG;LCDQUICK SETUP GUIDE S/W DRIVER-00,IB;203B,W/W,SyncMaster,Hay MANUAL FLYER-WARRANTY CARD;comm,Samsung, ASSY P/MATERIAL...
...-N,1830mm CBF SIGNAL-DVI(D);1703FP,24P/24P,20276-D ASSY ACCESSORY;LS20HABBSQ/EDC CBF-POWER CORD;DT,EU,FP3/YES,IEC320 C13/ BAG PE;LDPE,T0.05,W250,L400,TRP,28,2 CARD-01;TFT LCD,SRC,RUSSIA,S/W,120,W210* MANUAL FLYER-CARD;COMM,SAMSUNG,18 LANG,E ASSY MANUAL P-IB+QSG;203B,SyncMaster,W/W MANUAL FLYER-04,QSG;LCDQUICK SETUP GUIDE S/W DRIVER-00,IB;203B,W/W,SyncMaster,Hay MANUAL FLYER-WARRANTY CARD;comm,Samsung, ASSY P/MATERIAL...


