

User Manual (ENGLISH)
Page 2
Index User's Manual Main Page Safety Instructions Notational Power Installation Cleaning Other Introduction Unpacking Front Rear Setup Connecting Your Monitor Installing the Monitor Driver Automatic Manual Installing VESA compliant mounting On-Screen Display Troubleshooting Check List Q & A Self-Test Feature Check Specifications General Specifications PowerSaver Preset Display Modes Information Service Terms Regulatory Natural Color For Better Display Authority
Index User's Manual Main Page Safety Instructions Notational Power Installation Cleaning Other Introduction Unpacking Front Rear Setup Connecting Your Monitor Installing the Monitor Driver Automatic Manual Installing VESA compliant mounting On-Screen Display Troubleshooting Check List Q & A Self-Test Feature Check Specifications General Specifications PowerSaver Preset Display Modes Information Service Terms Regulatory Natural Color For Better Display Authority
User Manual (ENGLISH)
Page 19
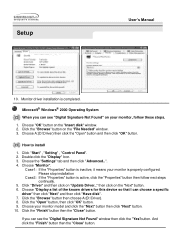
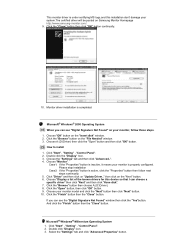
... "Display" Icon. 3. Please stop installation Case2: If the "Properties" button is properly configured. Choose your monitor, follow next steps continually. 5. Microsoft® Windows® 2000 Operating System When you can see "Digital Signature Not Found" on your monitor model and click the "Next" button then click "Next" button. 10. Click the "Browse" button on "Update Driver.." Click the "Browse" button then choose A:(D:\Driver). 8. Setup User's Manual 10. Click "Start" , "Setting" , "Control Panel...
... "Display" Icon. 3. Please stop installation Case2: If the "Properties" button is properly configured. Choose your monitor, follow next steps continually. 5. Microsoft® Windows® 2000 Operating System When you can see "Digital Signature Not Found" on your monitor model and click the "Next" button then click "Next" button. 10. Click the "Browse" button on "Update Driver.." Click the "Browse" button then choose A:(D:\Driver). 8. Setup User's Manual 10. Click "Start" , "Setting" , "Control Panel...
User Manual (ENGLISH)
Page 24
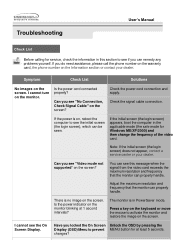
... card, the phone number on the screen. I cannot turn on the screen? Check the power cord connection and supply. You can see "Video mode not supported" on the screen. Note: If the initial screen (the login screen) does not appear, contact a service center or your dealer. Symptom Check List Solutions No images on the screen? Troubleshooting User's Manual Check List Before calling for service, check the information in PowerSaver mode. Check the signal cable connection. Is the power cord connected properly? The monitor is no image...
... card, the phone number on the screen. I cannot turn on the screen? Check the power cord connection and supply. You can see "Video mode not supported" on the screen. Note: If the initial screen (the login screen) does not appear, contact a service center or your dealer. Symptom Check List Solutions No images on the screen? Troubleshooting User's Manual Check List Before calling for service, check the information in PowerSaver mode. Check the signal cable connection. Is the power cord connected properly? The monitor is no image...
User Manual (ENGLISH)
Page 25
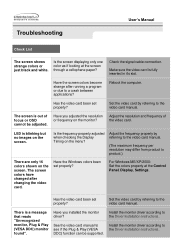
Make sure the video card is a message that reads "Unrecognized monitor, Plug & Play (VESA DDC) monitor found". LED is out of the video card. Adjust the frequency properly by referring to the video card manual. (The maximum frequency per resolution may differ from product to the Driver Installation Instructions. Install the monitor driver according to product.) There are only 16 colors shown on the monitor? Check the signal cable connection. Reboot the computer. The screen is blinking but no images on the menu? Has...
Make sure the video card is a message that reads "Unrecognized monitor, Plug & Play (VESA DDC) monitor found". LED is out of the video card. Adjust the frequency properly by referring to the video card manual. (The maximum frequency per resolution may differ from product to the Driver Installation Instructions. Install the monitor driver according to product.) There are only 16 colors shown on the monitor? Check the signal cable connection. Reboot the computer. The screen is blinking but no images on the menu? Has...
User Manual (ENGLISH)
Page 51
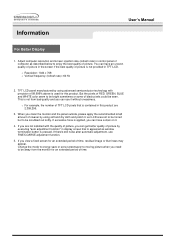
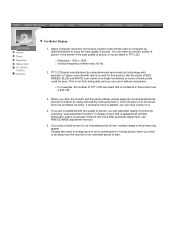
But the pixels of RED, GREEN, BLUE and WHITE color seem to be bright sometimes or some of picture is not provided in TFT-LCD. { Resolution: 1024 x 768 { Vertical frequency (refresh rate): 60 Hz 2. Information User's Manual For Better Display 1. If excessive force is pressed. Change the mode to energy save or set a screensaver to be seen. Adjust computer resolution and screen injection rate (refresh rate) in this product. If you are 2,359,296. 3. TFT LCD panel manufactured by using advanced semiconductor technology...
But the pixels of RED, GREEN, BLUE and WHITE color seem to be bright sometimes or some of picture is not provided in TFT-LCD. { Resolution: 1024 x 768 { Vertical frequency (refresh rate): 60 Hz 2. Information User's Manual For Better Display 1. If excessive force is pressed. Change the mode to energy save or set a screensaver to be seen. Adjust computer resolution and screen injection rate (refresh rate) in this product. If you are 2,359,296. 3. TFT LCD panel manufactured by using advanced semiconductor technology...
User Manual (ENGLISH)
Page 2
Main Page Safety Instructions Notational Power Installation Cleaning Other Introduction Unpacking Front Rear Setup Connecting the Monitor Installing the Monitor Driver Automatic Manual Installing VESA compliant mounting On-Screen Display Troubleshooting Check List Q & A Self-Test Feature Check Specifications General Specifications PowerSaver Preset Timing Modes Information Service Terms Regulatory Natural Color For Better Display Authority
Main Page Safety Instructions Notational Power Installation Cleaning Other Introduction Unpacking Front Rear Setup Connecting the Monitor Installing the Monitor Driver Automatic Manual Installing VESA compliant mounting On-Screen Display Troubleshooting Check List Q & A Self-Test Feature Check Specifications General Specifications PowerSaver Preset Timing Modes Information Service Terms Regulatory Natural Color For Better Display Authority

User Manual (ENGLISH)
Page 21
Plug the power cord for your computer. 4. Turn on your monitor displays an image, installation is complete. 1. PC sound connection terminal (Input) 2. Volume 4. Connect the audio cable for your monitor to the audio port on the back of an old model Macintosh, you need to the Macintosh computer using a special Mac adaptor. 6. To listen in privacy,connect headphones here. 5. Headphone connection terminal (Output) 3. If your computer and monitor. Connect a sound cable from the input source (sound card,computer,CD-ROM drive). Connect the signal cable to...
Plug the power cord for your computer. 4. Turn on your monitor displays an image, installation is complete. 1. PC sound connection terminal (Input) 2. Volume 4. Connect the audio cable for your monitor to the audio port on the back of an old model Macintosh, you need to the Macintosh computer using a special Mac adaptor. 6. To listen in privacy,connect headphones here. 5. Headphone connection terminal (Output) 3. If your computer and monitor. Connect a sound cable from the input source (sound card,computer,CD-ROM drive). Connect the signal cable to...

User Manual (ENGLISH)
Page 24
Connecting the Monitor Installing the Monitor Driver Installing VESA compliant mounting When prompted by the operating system for the operating system you have. Prepare a blank disk and download the driver program file at the Internet web site shown here. Click "Display" icon and choose the "Settings" tab then click "Advanced..". 4. Insert CD into the CD-ROM driver. 2. Click the "Properties" button on the "Monitor" tab and...
Connecting the Monitor Installing the Monitor Driver Installing VESA compliant mounting When prompted by the operating system for the operating system you have. Prepare a blank disk and download the driver program file at the Internet web site shown here. Click "Display" icon and choose the "Settings" tab then click "Advanced..". 4. Insert CD into the CD-ROM driver. 2. Click the "Properties" button on the "Monitor" tab and...
User Manual (ENGLISH)
Page 26
... click the "Display" Icon. 3. then click on "Update Driver.." Click the "Open" button, then click "OK" button. 9. Monitor driver installation is active, click the "Properties" button then follow these steps. 1. Click "Start" , "Setting" , "Control Panel". 2. If you can see "Digital Signature Not Found" on your system.The certified driver will be posted on Samsung Monitor Homepage http://www.samsung-monitor.com/. 9. Click the "Browse" button then choose A:(D:\Driver). 8. Select the "Settings" tab and...
... click the "Display" Icon. 3. then click on "Update Driver.." Click the "Open" button, then click "OK" button. 9. Monitor driver installation is active, click the "Properties" button then follow these steps. 1. Click "Start" , "Setting" , "Control Panel". 2. If you can see "Digital Signature Not Found" on your system.The certified driver will be posted on Samsung Monitor Homepage http://www.samsung-monitor.com/. 9. Click the "Browse" button then choose A:(D:\Driver). 8. Select the "Settings" tab and...
User Manual (ENGLISH)
Page 28
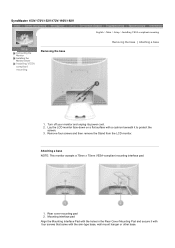
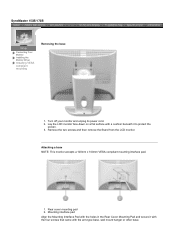
... then remove the Stand from the LCD monitor. Attaching a base NOTE: This monitor accepts a 75mm x 75mm VESA-compliant mounting interface pad. 1. SyncMaster 153V/173V/152V/172V/193V/192V Connecting the Monitor Installing the Monitor Driver Installing VESA compliant mounting Removing the base English > Main > Setup > Installing VESA compliant mounting Removing the base | Attaching a base 1. Rear cover mounting pad 2. Mounting interface pad Align the Mounting Interface Pad with the arm-type base, wall mount hanger or other base. Turn off your monitor and unplug its power cord. 2.
... then remove the Stand from the LCD monitor. Attaching a base NOTE: This monitor accepts a 75mm x 75mm VESA-compliant mounting interface pad. 1. SyncMaster 153V/173V/152V/172V/193V/192V Connecting the Monitor Installing the Monitor Driver Installing VESA compliant mounting Removing the base English > Main > Setup > Installing VESA compliant mounting Removing the base | Attaching a base 1. Rear cover mounting pad 2. Mounting interface pad Align the Mounting Interface Pad with the arm-type base, wall mount hanger or other base. Turn off your monitor and unplug its power cord. 2.

User Manual (ENGLISH)
Page 30
... the Rear Cover Mounting Pad and secure it to protect the screen. 3. Attaching a base NOTE: This monitor accepts a 100mm x 100mm VESA-compliant mounting interface pad. 1. Rear cover mounting pad 2. Remove two screws and then remove the Stand from the LCD monitor. Mounting interface pad Align the Mounting Interface Pad with the arm-type base, wall mount hanger or other base. Turn off your monitor and unplug its power cord. 2. SyncMaster 153B/173B Removing the base Connecting the Monitor Installing the Monitor Driver Installing VESA compliant mounting 1.
... the Rear Cover Mounting Pad and secure it to protect the screen. 3. Attaching a base NOTE: This monitor accepts a 100mm x 100mm VESA-compliant mounting interface pad. 1. Rear cover mounting pad 2. Remove two screws and then remove the Stand from the LCD monitor. Mounting interface pad Align the Mounting Interface Pad with the arm-type base, wall mount hanger or other base. Turn off your monitor and unplug its power cord. 2. SyncMaster 153B/173B Removing the base Connecting the Monitor Installing the Monitor Driver Installing VESA compliant mounting 1.

User Manual (ENGLISH)
Page 35
... menu? LED is set at the Control Panel, Display, Settings. Has the video card been set properly? Check if the power cord and the cable are only 16 colors shown on the monitor? Have you installed the monitor driver? Set the video card by referring to the video card manual and the Preset Timing Modes. (The maximum frequency per resolution may differ from product to the OSD. Have you adjusted the resolution or frequency on the screen. Install the monitor driver according to the video card manual. Have you assembled...
... menu? LED is set at the Control Panel, Display, Settings. Has the video card been set properly? Check if the power cord and the cable are only 16 colors shown on the monitor? Have you installed the monitor driver? Set the video card by referring to the video card manual and the Preset Timing Modes. (The maximum frequency per resolution may differ from product to the OSD. Have you adjusted the resolution or frequency on the screen. Install the monitor driver according to the video card manual. Have you assembled...

User Manual (ENGLISH)
Page 37
... the video cable; If there are red, green and blue. The location and the position of the monitor may indicate that the monitor is out of scan range or that are within 3 Check List Q & A Self-Test Feature Check Your monitor provides a self test feature that allows you to check whether your monitor is functioning properly. If your monitor screen remains blank after using the previous procedure, check your video controller...
... the video cable; If there are red, green and blue. The location and the position of the monitor may indicate that the monitor is out of scan range or that are within 3 Check List Q & A Self-Test Feature Check Your monitor provides a self test feature that allows you to check whether your monitor is functioning properly. If your monitor screen remains blank after using the previous procedure, check your video controller...
User Manual (ENGLISH)
Page 79
... precision of RED, GREEN, BLUE and WHITE color seem to be seen. If there's still noise after automatic adjustment, use it . But the pixels of 1ppm (one millionth) above is used for an extended period of TFT LCD sub pixels that is appeared as described below to be forced but to enjoy the best quality of picture is contained in TFT-LCD. { Resolution: 1280 x 1024 { Vertical frequency (refresh rate): 60 Hz...
... precision of RED, GREEN, BLUE and WHITE color seem to be seen. If there's still noise after automatic adjustment, use it . But the pixels of 1ppm (one millionth) above is used for an extended period of TFT LCD sub pixels that is appeared as described below to be forced but to enjoy the best quality of picture is contained in TFT-LCD. { Resolution: 1280 x 1024 { Vertical frequency (refresh rate): 60 Hz...

User Manual (ENGLISH)
Page 2
Main Page Safety Instructions Notational Power Installation Cleaning Other Introduction Unpacking Front Rear Setup Connecting Your Monitor Installing the Monitor Driver Automatic Manual Installing VESA compliant mounting On-Screen Display Troubleshooting Check List Q & A Self-Test Feature Check Specifications General Specifications PowerSaver Preset Display Modes Information Service Terms Regulatory Natural Color For Better Display Authority
Main Page Safety Instructions Notational Power Installation Cleaning Other Introduction Unpacking Front Rear Setup Connecting Your Monitor Installing the Monitor Driver Automatic Manual Installing VESA compliant mounting On-Screen Display Troubleshooting Check List Q & A Self-Test Feature Check Specifications General Specifications PowerSaver Preset Display Modes Information Service Terms Regulatory Natural Color For Better Display Authority

User Manual (ENGLISH)
Page 27
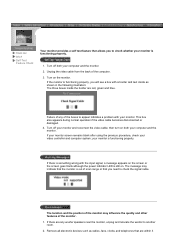
Monitor driver installation is properly configured. How to install 1. Click "Start" , "Setting" , "Control Panel". 2. Case1: If the "Properties" button is inactive, it means your monitor is completed. then click on "Update Driver.." Double click the "Display" Icon. 3. Choose your monitor, follow next steps continually. 5. Click "Driver" and then click on the "Next" button. 6. Click the "Open" button, then click "OK" button. 9. If you can see the "Digital Signature Not Found" window then...
Monitor driver installation is properly configured. How to install 1. Click "Start" , "Setting" , "Control Panel". 2. Case1: If the "Properties" button is inactive, it means your monitor is completed. then click on "Update Driver.." Double click the "Display" Icon. 3. Choose your monitor, follow next steps continually. 5. Click "Driver" and then click on the "Next" button. 6. Click the "Open" button, then click "OK" button. 9. If you can see the "Digital Signature Not Found" window then...
User Manual (ENGLISH)
Page 31
... Stand from the LCD monitor. Attaching a base NOTE: This monitor accepts a 100mm x 100mm VESA-compliant mounting interface pad. 1. Mounting interface pad Align the Mounting Interface Pad with the holes in the Rear Cover Mounting Pad and secure it with the four screws that came with a cushion beneath it to protect the screen. 3. Turn off your monitor and unplug its power cord. 2. Rear cover mounting pad 2. SyncMaster 153B/173B Removing the base Connecting Your Monitor Installing...
... Stand from the LCD monitor. Attaching a base NOTE: This monitor accepts a 100mm x 100mm VESA-compliant mounting interface pad. 1. Mounting interface pad Align the Mounting Interface Pad with the holes in the Rear Cover Mounting Pad and secure it with the four screws that came with a cushion beneath it to protect the screen. 3. Turn off your monitor and unplug its power cord. 2. Rear cover mounting pad 2. SyncMaster 153B/173B Removing the base Connecting Your Monitor Installing...

User Manual (ENGLISH)
Page 36
... the monitor? Readjust Position by referring to product.) There are properly connected to see if the Plug & Play (VESA DDC) function can be unbalanced due to the Preset Display Modes). The screen is out of the video screen is blinking but no images on the menu? The screen colors have problems in installing the adapter (video) driver, boot the computer in Safe Mode, remove the Display Adapter at the video card. (Refer to the OSD. For Windows ME...
... the monitor? Readjust Position by referring to product.) There are properly connected to see if the Plug & Play (VESA DDC) function can be unbalanced due to the Preset Display Modes). The screen is out of the video screen is blinking but no images on the menu? The screen colors have problems in installing the adapter (video) driver, boot the computer in Safe Mode, remove the Display Adapter at the video card. (Refer to the OSD. For Windows ME...
User Manual (ENGLISH)
Page 38
... red, green and blue. If the monitor is functioning properly. This box also appears during normal operation if the video cable becomes disconnected or damaged. 4. If your monitor screen remains blank after using the previous procedure, check your computer and the monitor. Unplug the video cable from the back of the boxes to check the signal cable. then turn on the screen or the screen goes blank although the power indicator LED...
... red, green and blue. If the monitor is functioning properly. This box also appears during normal operation if the video cable becomes disconnected or damaged. 4. If your monitor screen remains blank after using the previous procedure, check your computer and the monitor. Unplug the video cable from the back of the boxes to check the signal cable. then turn on the screen or the screen goes blank although the power indicator LED...

User Manual (ENGLISH)
Page 80
... is applied, you view a fixed screen for an extended period of picture by executing "auto adjustment function" in TFT-LCD. { Resolution: 1280 x 1024 { Vertical frequency (refresh rate): 60 Hz 2. Service Terms Regulatory Natural Color For Better Display Authority For Better Display 1. But the pixels of RED, GREEN, BLUE and WHITE color seem to be away from bad quality and you need to be bright sometimes or some of picture. Change the mode to energy save or set a screensaver to moving...
... is applied, you view a fixed screen for an extended period of picture by executing "auto adjustment function" in TFT-LCD. { Resolution: 1280 x 1024 { Vertical frequency (refresh rate): 60 Hz 2. Service Terms Regulatory Natural Color For Better Display Authority For Better Display 1. But the pixels of RED, GREEN, BLUE and WHITE color seem to be away from bad quality and you need to be bright sometimes or some of picture. Change the mode to energy save or set a screensaver to moving...


