
User Manual (user Manual) (ver.1.0) (English)
Page 2
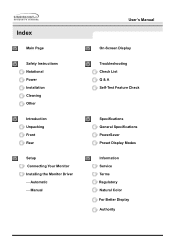
Manual User's Manual On-Screen Display Troubleshooting Check List Q & A Self-Test Feature Check Specifications General Specifications PowerSaver Preset Display Modes Information Service Terms Regulatory Natural Color For Better Display Authority Index Main Page Safety Instructions Notational Power Installation Cleaning Other Introduction Unpacking Front Rear Setup Connecting Your Monitor Installing the Monitor Driver - Automatic -
Manual User's Manual On-Screen Display Troubleshooting Check List Q & A Self-Test Feature Check Specifications General Specifications PowerSaver Preset Display Modes Information Service Terms Regulatory Natural Color For Better Display Authority Index Main Page Safety Instructions Notational Power Installation Cleaning Other Introduction Unpacking Front Rear Setup Connecting Your Monitor Installing the Monitor Driver - Automatic -

User Manual (user Manual) (ver.1.0) (English)
Page 11
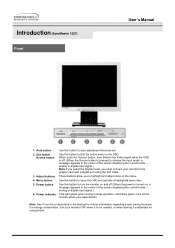
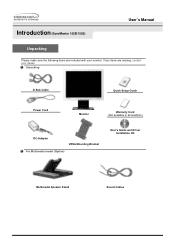
Introduction (SyncMaster 152B) User's Manual Unpacking Please make sure the following items are missing, contact your monitor. If any items are included with your dealer. Unpacking D-Sub Cable Quick Setup Guide Power Cord Monitor Warranty Card (Not available in all locations) DC-Adapter VESA Mounting Bracket For Multimedia model (Option) User's Guide and Driver Installation CD Multimedia Speaker Stand Sound Cables
Introduction (SyncMaster 152B) User's Manual Unpacking Please make sure the following items are missing, contact your monitor. If any items are included with your dealer. Unpacking D-Sub Cable Quick Setup Guide Power Cord Monitor Warranty Card (Not available in all locations) DC-Adapter VESA Mounting Bracket For Multimedia model (Option) User's Guide and Driver Installation CD Multimedia Speaker Stand Sound Cables
User Manual (user Manual) (ver.1.0) (English)
Page 14
... open the OSD and activate a highlighted menu item. Use this button to the graphic card with a digital port using the DVI cable. Note: See PowerSaver described in the center of the screen displaying the current mode -analog or digital input signal.) This light glows green during normal operation, and blinks green once as the monitor saves your monitor OFF when it is not needed, or when leaving it unattended for further information regarding power saving functions. Introduction (SyncMaster 152T) Front User's Manual 1. Power button 6. Use...
... open the OSD and activate a highlighted menu item. Use this button to the graphic card with a digital port using the DVI cable. Note: See PowerSaver described in the center of the screen displaying the current mode -analog or digital input signal.) This light glows green during normal operation, and blinks green once as the monitor saves your monitor OFF when it is not needed, or when leaving it unattended for further information regarding power saving functions. Introduction (SyncMaster 152T) Front User's Manual 1. Power button 6. Use...
User Manual (user Manual) (ver.1.0) (English)
Page 18
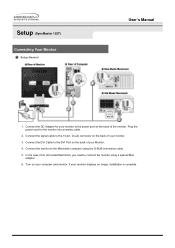
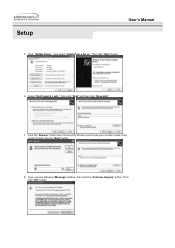
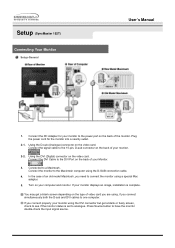
Plug the power cord for your monitor to the power port on the back of an old model Macintosh, you need to the 15-pin, D-sub connector on your monitor. 3. Turn on the back of the monitor. Setup (SyncMaster 152T) Connecting Your Monitor Setup-General User's Manual 1. Connect the signal cable to connect the monitor using the D-SUB connection cable. 5. Connect the monitor to the DVI Port on the back of your computer and monitor. Connect the DVI Cable to the Macintosh computer using a special Mac adaptor. 6. In the...
Plug the power cord for your monitor to the power port on the back of an old model Macintosh, you need to the 15-pin, D-sub connector on your monitor. 3. Turn on the back of the monitor. Setup (SyncMaster 152T) Connecting Your Monitor Setup-General User's Manual 1. Connect the signal cable to connect the monitor using the D-SUB connection cable. 5. Connect the monitor to the DVI Port on the back of your computer and monitor. Connect the DVI Cable to the Macintosh computer using a special Mac adaptor. 6. In the...
User Manual (user Manual) (ver.1.0) (English)
Page 23
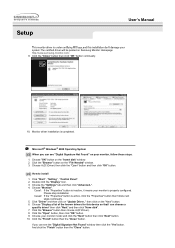
... disk and download the driver program file at the Internet web site shown here. Insert CD into the CD-ROM driver. 2. Click "Start" -> "Control Panel" then click the "Appearance and Themes" Icon. 3. Click "Display" icon and choose the "Settings" tab then click "Advanced..". 4. Click the "Properties" button on the "Monitor" tab and select "Driver" tab. z Internet web site : http://www.samsung-monitor.com...
... disk and download the driver program file at the Internet web site shown here. Insert CD into the CD-ROM driver. 2. Click "Start" -> "Control Panel" then click the "Appearance and Themes" Icon. 3. Click "Display" icon and choose the "Settings" tab then click "Advanced..". 4. Click the "Properties" button on the "Monitor" tab and select "Driver" tab. z Internet web site : http://www.samsung-monitor.com...
User Manual (user Manual) (ver.1.0) (English)
Page 24
Click "Update Driver.." then click "Next" button. 6. Click the "Browse" button then choose A:(D:\Driver) and choose your monitor model in the model list and click the "Next" button. 8. then click "Next" and then click "Have disk". 7. Then click "OK" button. and select "Install from a list or.." Select "Don't search ,I will.." If you can see following "Message" window, then click the "Continue Anyway" button. Setup User's Manual 5.
Click "Update Driver.." then click "Next" button. 6. Click the "Browse" button then choose A:(D:\Driver) and choose your monitor model in the model list and click the "Next" button. 8. then click "Next" and then click "Have disk". 7. Then click "OK" button. and select "Install from a list or.." Select "Don't search ,I will.." If you can see following "Message" window, then click the "Continue Anyway" button. Setup User's Manual 5.
User Manual (user Manual) (ver.1.0) (English)
Page 25
...://www.samsung-monitor.com/. 9. Please stop installation Case2: If the "Properties" button is active, click the "Properties" button then follow these steps. 1. Choose A:(D:\Driver) then click the "Open" button and then click "OK" button. Click "Start" , "Setting" , "Control Panel". 2. Case1: If the "Properties" button is inactive, it means your monitor model and click the "Next" button then click "Next" button. 10. Click the "Browse" button then choose A:(D:\Driver). 8. Setup User's Manual This monitor driver is...
...://www.samsung-monitor.com/. 9. Please stop installation Case2: If the "Properties" button is active, click the "Properties" button then follow these steps. 1. Choose A:(D:\Driver) then click the "Open" button and then click "OK" button. Click "Start" , "Setting" , "Control Panel". 2. Case1: If the "Properties" button is inactive, it means your monitor model and click the "Next" button then click "Next" button. 10. Click the "Browse" button then choose A:(D:\Driver). 8. Setup User's Manual This monitor driver is...
User Manual (user Manual) (ver.1.0) (English)
Page 26
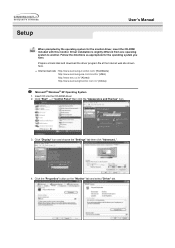
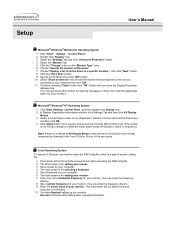
... file. 2. You have finished setting up your monitor. 7. Select the "Settings" tab and click "Advanced Properties" button. 4. Setup User's Manual Microsoft® Windows® Millennium Operating System 1. Click Start, Settings, Control Panel, and then double-click Display icon. 2. Note: If there is for your computer. 4. Press Enter at All Display Modes, select the level of resolution and vertical frequency by referring to a different mode (lower mode of all , set a horizontal frequency for setting your monitor.
... file. 2. You have finished setting up your monitor. 7. Select the "Settings" tab and click "Advanced Properties" button. 4. Setup User's Manual Microsoft® Windows® Millennium Operating System 1. Click Start, Settings, Control Panel, and then double-click Display icon. 2. Note: If there is for your computer. 4. Press Enter at All Display Modes, select the level of resolution and vertical frequency by referring to a different mode (lower mode of all , set a horizontal frequency for setting your monitor.
User Manual (user Manual) (ver.1.0) (English)
Page 39
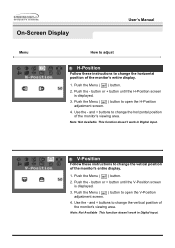
... Menu ( ) button to open the H-Position adjustment screen. 4. Use the - Push the Menu ( ) button. 2. button or + button until the H-Position screen is displayed. 3. Push the - V-Position Follow these instructions to change the horizontal position of the monitor's viewing area. button or + button until the V-Position screen is displayed. 3. Note: Not Available This function doesn't work in Digital input. and + buttons to change the vertical position of the monitor's entire display. 1. Push the Menu ( ) button. 2. Push the - On-Screen Display User's Manual Menu...
... Menu ( ) button to open the H-Position adjustment screen. 4. Use the - Push the Menu ( ) button. 2. button or + button until the H-Position screen is displayed. 3. Push the - V-Position Follow these instructions to change the horizontal position of the monitor's viewing area. button or + button until the V-Position screen is displayed. 3. Note: Not Available This function doesn't work in Digital input. and + buttons to change the vertical position of the monitor's entire display. 1. Push the Menu ( ) button. 2. Push the - On-Screen Display User's Manual Menu...

User Manual (user Manual) (ver.1.0) (English)
Page 47
... to the Driver Installation Instructions. Install the monitor driver according to the video card manual. Adjust screen image position and size using the OSD. See the video card manual to see if the Plug & Play (VESA DDC) function can be supported. The screen suddenly has become strange after changing the video card. Have you adjusted the resolution or frequency to product.) There are only 16 colors shown on the screen. The screen can be unbalanced due to the Preset Display Modes). the menu? There is...
... to the Driver Installation Instructions. Install the monitor driver according to the video card manual. Adjust screen image position and size using the OSD. See the video card manual to see if the Plug & Play (VESA DDC) function can be supported. The screen suddenly has become strange after changing the video card. Have you adjusted the resolution or frequency to product.) There are only 16 colors shown on the screen. The screen can be unbalanced due to the Preset Display Modes). the menu? There is...
User Manual (user Manual) (ver.1.0) (English)
Page 48
... main board of the video screen is trouble with the monitor. 1. If you installed a new video card or if you have problems in installing the adapter (video) driver, boot the computer in Safe Mode, remove the Display Adapter at 75Hz or 85Hz. (Do not exceed 60Hz when using the maximum resolution.) 5. Check if the scanning ratio of the computer.) 3. Check if the power cord and the cable are properly connected to reinstall the adapter (video) driver. If you assembled...
... main board of the video screen is trouble with the monitor. 1. If you installed a new video card or if you have problems in installing the adapter (video) driver, boot the computer in Safe Mode, remove the Display Adapter at 75Hz or 85Hz. (Do not exceed 60Hz when using the maximum resolution.) 5. Check if the scanning ratio of the computer.) 3. Check if the power cord and the cable are properly connected to reinstall the adapter (video) driver. If you assembled...
User Manual (user Manual) (ver.1.0) (English)
Page 50
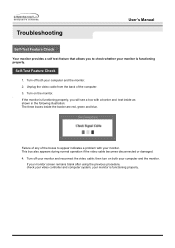
... border are red, green and blue. If your monitor screen remains blank after using the previous procedure, check your computer and the monitor. This box also appears during normal operation if the video cable becomes disconnected or damaged. 4. Self-Test Feature Check 1. Turn off your monitor and reconnect the video cable; If the monitor is functioning properly. Turn off both your video controller and computer system; then turn on the...
... border are red, green and blue. If your monitor screen remains blank after using the previous procedure, check your computer and the monitor. This box also appears during normal operation if the video cable becomes disconnected or damaged. 4. Self-Test Feature Check 1. Turn off your monitor and reconnect the video cable; If the monitor is functioning properly. Turn off both your video controller and computer system; then turn on the...
User Manual (user Manual) (ver.1.0) (English)
Page 68
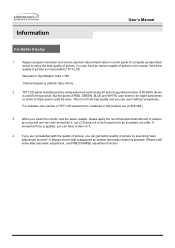
... cloth and polish it without uneasiness. Information User's Manual For Better Display 1 Adjust computer resolution and screen injection rate (refresh rate) in control panel of computer as window termination button is pressed. Resolution: SyncMaster 1024 x 768 Vertical frequency (refresh rate): 60 Hz 2 TFT LCD panel manufactured by executing "auto adjustment function" in display screen that is applied, you can have an uneven quality of picture in TFT-LCD. For example, the number of TFT LCD pixels that is appeared as described below to...
... cloth and polish it without uneasiness. Information User's Manual For Better Display 1 Adjust computer resolution and screen injection rate (refresh rate) in control panel of computer as window termination button is pressed. Resolution: SyncMaster 1024 x 768 Vertical frequency (refresh rate): 60 Hz 2 TFT LCD panel manufactured by executing "auto adjustment function" in display screen that is applied, you can have an uneven quality of picture in TFT-LCD. For example, the number of TFT LCD pixels that is appeared as described below to...

User Manual (user Manual) (ver.1.0) (English)
Page 2
Automatic - Manual User's Manual On-Screen Display Troubleshooting Check List Q & A Self-Test Feature Check Specifications General Specifications PowerSaver Preset Display Modes Information Service Terms Regulatory Natural Color For Better Display Authority Index Main Page Safety Instructions Notational Power Installation Cleaning Other Introduction Unpacking Front Rear Setup Connecting Your Monitor Installing the Monitor Driver -
Automatic - Manual User's Manual On-Screen Display Troubleshooting Check List Q & A Self-Test Feature Check Specifications General Specifications PowerSaver Preset Display Modes Information Service Terms Regulatory Natural Color For Better Display Authority Index Main Page Safety Instructions Notational Power Installation Cleaning Other Introduction Unpacking Front Rear Setup Connecting Your Monitor Installing the Monitor Driver -
User Manual (user Manual) (ver.1.0) (English)
Page 11
Introduction (SyncMaster 152B/152S) User's Manual Unpacking Please make sure the following items are missing, contact your monitor. Unpacking D-Sub Cable Quick Setup Guide Power Cord Monitor Warranty Card (Not available in all locations) DC-Adapter VESA Mounting Bracket For Multimedia model (Option) User's Guide and Driver Installation CD Multimedia Speaker Stand Sound Cables If any items are included with your dealer.
Introduction (SyncMaster 152B/152S) User's Manual Unpacking Please make sure the following items are missing, contact your monitor. Unpacking D-Sub Cable Quick Setup Guide Power Cord Monitor Warranty Card (Not available in all locations) DC-Adapter VESA Mounting Bracket For Multimedia model (Option) User's Guide and Driver Installation CD Multimedia Speaker Stand Sound Cables If any items are included with your dealer.
User Manual (user Manual) (ver.1.0) (English)
Page 18
... need to connect the monitor using , if you are using a special Mac adaptor. 5. Turn on the video card. Press Source button to a Macintosh. Connect the DC Adapter for the monitor into a nearby outlet. 2-1. Connect the monitor to the Macintosh computer using the DVI connector but get a blank screen depending on the video card. Connected to have the monitor double-check the input signal source. In the case of the monitor. If your computer and monitor. Using the DVI (Digital) connector on your monitor displays an image, installation is set...
... need to connect the monitor using , if you are using a special Mac adaptor. 5. Turn on the video card. Press Source button to a Macintosh. Connect the DC Adapter for the monitor into a nearby outlet. 2-1. Connect the monitor to the Macintosh computer using the DVI connector but get a blank screen depending on the video card. Connected to have the monitor double-check the input signal source. In the case of the monitor. If your computer and monitor. Using the DVI (Digital) connector on your monitor displays an image, installation is set...

User Manual (user Manual) (ver.1.0) (English)
Page 25
... on the "File Needed" window. 3. If you can see the "Digital Signature Not Found" window then click the "Yes"button. And click the "Finish" button then the "Close" button. Click the "Open" button, then click "OK" button. 9. Choose A:(D:\Driver) then click the "Open" button and then click "OK" button. Setup User's Manual This monitor driver is under certifying MS logo,and this device so that I can choose a specific driver" then click...
... on the "File Needed" window. 3. If you can see the "Digital Signature Not Found" window then click the "Yes"button. And click the "Finish" button then the "Close" button. Click the "Open" button, then click "OK" button. 9. Choose A:(D:\Driver) then click the "Open" button and then click "OK" button. Setup User's Manual This monitor driver is under certifying MS logo,and this device so that I can choose a specific driver" then click...
User Manual (user Manual) (ver.1.0) (English)
Page 29
...to the Driver Installation Instructions. Have the Windows colors been set properly? (The maximum frequency per resolution may differ from product to the monitor? Install the monitor driver according to the video card manual. The screen colors have changed the video card Adjust screen image position and size or the driver? Set the video card by pressing the Display (OSD) Menu to prevent MENU button for at the screen through a cellophane paper? Make sure the video card is a message that reads "Unrecognized monitor, Plug & Play (VESA DDC) monitor found". Troubleshooting User...
...to the Driver Installation Instructions. Have the Windows colors been set properly? (The maximum frequency per resolution may differ from product to the monitor? Install the monitor driver according to the video card manual. The screen colors have changed the video card Adjust screen image position and size or the driver? Set the video card by pressing the Display (OSD) Menu to prevent MENU button for at the screen through a cellophane paper? Make sure the video card is a message that reads "Unrecognized monitor, Plug & Play (VESA DDC) monitor found". Troubleshooting User...

User Manual (user Manual) (ver.1.0) (English)
Page 30
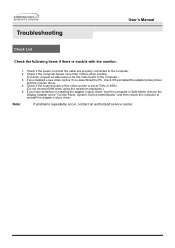
... exceed 60Hz when using the maximum resolution.) 5. Check if the scanning ratio of the computer.) 3. Troubleshooting User's Manual Check List Check the following items if there is set at the "Control Panel, System, Device Administrator" and then reboot the computer to the computer. 2. Check if the power cord and the cable are properly connected to reinstall the adapter (video) driver. If you assembled the PC, check if the installed the adapter(video) driver and the monitor driver. 4.
... exceed 60Hz when using the maximum resolution.) 5. Check if the scanning ratio of the computer.) 3. Troubleshooting User's Manual Check List Check the following items if there is set at the "Control Panel, System, Device Administrator" and then reboot the computer to the computer. 2. Check if the power cord and the cable are properly connected to reinstall the adapter (video) driver. If you assembled the PC, check if the installed the adapter(video) driver and the monitor driver. 4.
User Manual (user Manual) (ver.1.0) (English)
Page 52
..., the number of TFT LCD pixels that is appeared as described below to be away from bad quality and you clean the monitor and the panel outside, please apply the recommended small amount of cleaner by executing "auto adjustment function" in display screen that is contained in this product. Information User's Manual For Better Display 1 Adjust computer resolution and screen injection rate (refresh rate) in control panel of computer as window termination button is...
..., the number of TFT LCD pixels that is appeared as described below to be away from bad quality and you clean the monitor and the panel outside, please apply the recommended small amount of cleaner by executing "auto adjustment function" in display screen that is contained in this product. Information User's Manual For Better Display 1 Adjust computer resolution and screen injection rate (refresh rate) in control panel of computer as window termination button is...


