

User Manual (user Manual) (ver.1.0) (English)
Page 11
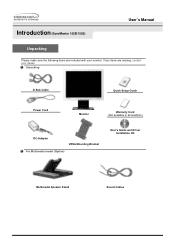
Introduction (SyncMaster 152B) User's Manual Unpacking Please make sure the following items are missing, contact your monitor. Unpacking D-Sub Cable Quick Setup Guide Power Cord Monitor Warranty Card (Not available in all locations) DC-Adapter VESA Mounting Bracket For Multimedia model (Option) User's Guide and Driver Installation CD Multimedia Speaker Stand Sound Cables If any items are included with your dealer.
Introduction (SyncMaster 152B) User's Manual Unpacking Please make sure the following items are missing, contact your monitor. Unpacking D-Sub Cable Quick Setup Guide Power Cord Monitor Warranty Card (Not available in all locations) DC-Adapter VESA Mounting Bracket For Multimedia model (Option) User's Guide and Driver Installation CD Multimedia Speaker Stand Sound Cables If any items are included with your dealer.

User Manual (user Manual) (ver.1.0) (English)
Page 12
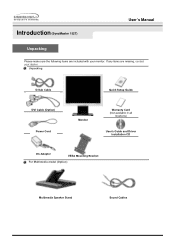
Unpacking D-Sub Cable Quick Setup Guide DVI Cable (Option) Power Cord Monitor Warranty Card (Not available in all locations) User's Guide and Driver Installation CD DC-Adapter VESA Mounting Bracket For Multimedia model (Option) SOG cable KIT(Option) Multimedia Speaker Stand Sound Cables Introduction (SyncMaster 152T) User's Manual Unpacking Please make sure the following items are missing, contact your monitor. If any items are included with your dealer.
Unpacking D-Sub Cable Quick Setup Guide DVI Cable (Option) Power Cord Monitor Warranty Card (Not available in all locations) User's Guide and Driver Installation CD DC-Adapter VESA Mounting Bracket For Multimedia model (Option) SOG cable KIT(Option) Multimedia Speaker Stand Sound Cables Introduction (SyncMaster 152T) User's Manual Unpacking Please make sure the following items are missing, contact your monitor. If any items are included with your dealer.
User Manual (user Manual) (ver.1.0) (English)
Page 15
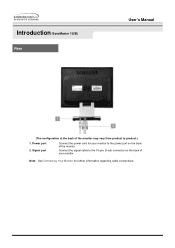
Note: See Connecting Your Monitor for your monitor. Connect the signal cable to the 15-pin, D-sub connector on the back of your monitor to the power port on the back of the monitor may vary from product to product.) 1. Power port 2. Introduction (SyncMaster 152B) Rear User's Manual (The configuration at the back of the monitor. Signal port Connect the power cord for further information regarding cable connections.
Note: See Connecting Your Monitor for your monitor. Connect the signal cable to the 15-pin, D-sub connector on the back of your monitor to the power port on the back of the monitor may vary from product to product.) 1. Power port 2. Introduction (SyncMaster 152B) Rear User's Manual (The configuration at the back of the monitor. Signal port Connect the power cord for further information regarding cable connections.
User Manual (user Manual) (ver.1.0) (English)
Page 16
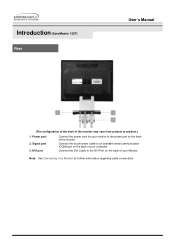
Signal port 3. DVI port Connect the power cord for further information regarding cable connections. Introduction (SyncMaster 152T) Rear User's Manual (The configuration at the back of your computer. Power port 2. Note: See Connecting Your Monitor for your monitor to the power port on the back of the monitor. Connect the DVI Cable to product.) 1. Connect the touchscreen cable to an available serial communication (COM) port on the back of the monitor may vary from product to the DVI Port on the back of your Monitor.
Signal port 3. DVI port Connect the power cord for further information regarding cable connections. Introduction (SyncMaster 152T) Rear User's Manual (The configuration at the back of your computer. Power port 2. Note: See Connecting Your Monitor for your monitor to the power port on the back of the monitor. Connect the DVI Cable to product.) 1. Connect the touchscreen cable to an available serial communication (COM) port on the back of the monitor may vary from product to the DVI Port on the back of your Monitor.
User Manual (user Manual) (ver.1.0) (English)
Page 17
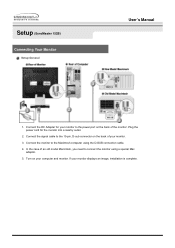
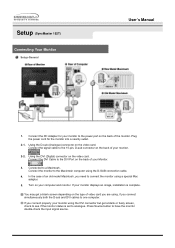
Plug the power cord for your monitor to the 15-pin, D-sub connector on the back of your monitor displays an image, installation is complete. Turn on the back ... monitor using the D-SUB connection cable. 4. If your monitor. 3. Connect the DC Adapter for the monitor into a nearby outlet. 2. Connect the signal cable to the power port on your computer and monitor. Setup (SyncMaster 152B) Connecting Your Monitor Setup-General User's Manual 1.
Plug the power cord for your monitor to the 15-pin, D-sub connector on the back of your monitor displays an image, installation is complete. Turn on the back ... monitor using the D-SUB connection cable. 4. If your monitor. 3. Connect the DC Adapter for the monitor into a nearby outlet. 2. Connect the signal cable to the power port on your computer and monitor. Setup (SyncMaster 152B) Connecting Your Monitor Setup-General User's Manual 1.

User Manual (user Manual) (ver.1.0) (English)
Page 18
... the 15-pin, D-sub connector on the back of your monitor displays an image, installation is complete. In the case of the monitor. Plug the power cord for your Monitor. 4. Connect the monitor to connect the monitor using the D-SUB connection cable. 5. Connect the DC Adapter for the monitor into a nearby outlet...
... the 15-pin, D-sub connector on the back of your monitor displays an image, installation is complete. In the case of the monitor. Plug the power cord for your Monitor. 4. Connect the monitor to connect the monitor using the D-SUB connection cable. 5. Connect the DC Adapter for the monitor into a nearby outlet...
User Manual (user Manual) (ver.1.0) (English)
Page 46
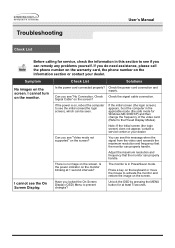
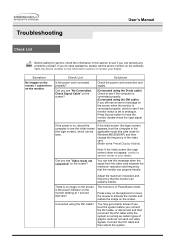
... Preset Display Modes) Note: If the initial screen (the login screen) does not appear, contact a service center or your dealer. Check List Solutions Is the power cord connected properly? Can you see "Video mode not supported" on the screen? If the initial screen (the login screen) appears, boot the computer in the... information in this message when the signal from the video card exceeds the maximum resolution and frequency that the monitor can properly handle. Check the power cord connection and supply. Adjust the maximum resolution and frequency that the monitor can properly handle.
... Preset Display Modes) Note: If the initial screen (the login screen) does not appear, contact a service center or your dealer. Check List Solutions Is the power cord connected properly? Can you see "Video mode not supported" on the screen? If the initial screen (the login screen) appears, boot the computer in the... information in this message when the signal from the video card exceeds the maximum resolution and frequency that the monitor can properly handle. Check the power cord connection and supply. Adjust the maximum resolution and frequency that the monitor can properly handle.
User Manual (user Manual) (ver.1.0) (English)
Page 48
... the computer in Safe Mode, remove the Display Adapter at 75Hz or 85Hz. (Do not exceed 60Hz when using the maximum resolution.) 5. Check if the power cord and the cable are properly connected to reinstall the adapter (video) driver. Troubleshooting User's Manual Check List Check the following items if there is set...
... the computer in Safe Mode, remove the Display Adapter at 75Hz or 85Hz. (Do not exceed 60Hz when using the maximum resolution.) 5. Check if the power cord and the cable are properly connected to reinstall the adapter (video) driver. Troubleshooting User's Manual Check List Check the following items if there is set...

User Manual (user Manual) (ver.1.0) (English)
Page 49
How can I change the frequency? How can I adjust the resolution? Disconnect the power cord and then clean the monitor with a soft cloth, using either a cleaning solution or plain water. Windows ME/2000/XP: Set the function at the Control ... any remains of the detergent nor scratch the case. How can I clean the outer case/LCD Panel? Troubleshooting User's Manual Q&A Question How can I set the Power Saving function? * Contact the video card manufacturer for details.) Windows ME/2000/XP: Set the resolution at BIOS-SETUP of the computer or the screen...
How can I change the frequency? How can I adjust the resolution? Disconnect the power cord and then clean the monitor with a soft cloth, using either a cleaning solution or plain water. Windows ME/2000/XP: Set the function at the Control ... any remains of the detergent nor scratch the case. How can I clean the outer case/LCD Panel? Troubleshooting User's Manual Q&A Question How can I set the Power Saving function? * Contact the video card manufacturer for details.) Windows ME/2000/XP: Set the resolution at BIOS-SETUP of the computer or the screen...
User Manual (user Manual) (ver.1.0) (English)
Page 61
...SAMSUNG ELECTRONICS CO., LTD America QA Lab of the FCC Rules. It is encouraged to try to correct the interference by the Federal Communications Commission. Provided with this is a detachable power supply cord with the limits for the product. For 240 Volt applications use only UL Listed detachable power cord... radio/television technician for help. You may cause radio interference. For 120 Volt applications, use only UL Listed Detachable power supply cord with NEMA configuration 5-15P type (parallel blades) plug cap. z Consult the dealer or an experienced radio/TV technician...
...SAMSUNG ELECTRONICS CO., LTD America QA Lab of the FCC Rules. It is encouraged to try to correct the interference by the Federal Communications Commission. Provided with this is a detachable power supply cord with the limits for the product. For 240 Volt applications use only UL Listed detachable power cord... radio/television technician for help. You may cause radio interference. For 120 Volt applications, use only UL Listed Detachable power supply cord with NEMA configuration 5-15P type (parallel blades) plug cap. z Consult the dealer or an experienced radio/TV technician...
User Manual (user Manual) (ver.1.0) (English)
Page 11
Unpacking D-Sub Cable Quick Setup Guide Power Cord Monitor Warranty Card (Not available in all locations) DC-Adapter VESA Mounting Bracket For Multimedia model (Option) User's Guide and Driver Installation CD Multimedia Speaker Stand Sound Cables Introduction (SyncMaster 152B/152S) User's Manual Unpacking Please make sure the following items are missing, contact your monitor. If any items are included with your dealer.
Unpacking D-Sub Cable Quick Setup Guide Power Cord Monitor Warranty Card (Not available in all locations) DC-Adapter VESA Mounting Bracket For Multimedia model (Option) User's Guide and Driver Installation CD Multimedia Speaker Stand Sound Cables Introduction (SyncMaster 152B/152S) User's Manual Unpacking Please make sure the following items are missing, contact your monitor. If any items are included with your dealer.
User Manual (user Manual) (ver.1.0) (English)
Page 12
Introduction (SyncMaster 152T) User's Manual Unpacking Please make sure the following items are missing, contact your monitor. If any items are included with your dealer. Unpacking D-Sub Cable Quick Setup Guide DVI Cable (Option) Power Cord Monitor Warranty Card (Not available in all locations) User's Guide and Driver Installation CD DC-Adapter VESA Mounting Bracket For Multimedia model (Option) Multimedia Speaker Stand Sound Cables
Introduction (SyncMaster 152T) User's Manual Unpacking Please make sure the following items are missing, contact your monitor. If any items are included with your dealer. Unpacking D-Sub Cable Quick Setup Guide DVI Cable (Option) Power Cord Monitor Warranty Card (Not available in all locations) User's Guide and Driver Installation CD DC-Adapter VESA Mounting Bracket For Multimedia model (Option) Multimedia Speaker Stand Sound Cables

User Manual (user Manual) (ver.1.0) (English)
Page 15
Introduction (SyncMaster 152B/152S) Rear User's Manual (The configuration at the back of your monitor to the power port on the back of the monitor may vary from product to the 15-pin, D-sub connector on the back of the monitor. Note: See Connecting Your Monitor for your monitor. Connect the signal cable to product.) 1. Signal port Connect the power cord for further information regarding cable connections. Power port 2.
Introduction (SyncMaster 152B/152S) Rear User's Manual (The configuration at the back of your monitor to the power port on the back of the monitor may vary from product to the 15-pin, D-sub connector on the back of the monitor. Note: See Connecting Your Monitor for your monitor. Connect the signal cable to product.) 1. Signal port Connect the power cord for further information regarding cable connections. Power port 2.

User Manual (user Manual) (ver.1.0) (English)
Page 16
Note: See Connecting Your Monitor for your computer. Signal port 3. Power port 2. Connect the touchscreen cable to an available serial communication (COM) port on the back of your monitor to product.) 1. DVI port Connect the power cord for further information regarding cable connections. Introduction (SyncMaster 152T) Rear User's Manual (The configuration at the back of the monitor. Connect the DVI Cable to the DVI Port on the back of the monitor may vary from product to the power port on the back of your Monitor.
Note: See Connecting Your Monitor for your computer. Signal port 3. Power port 2. Connect the touchscreen cable to an available serial communication (COM) port on the back of your monitor to product.) 1. DVI port Connect the power cord for further information regarding cable connections. Introduction (SyncMaster 152T) Rear User's Manual (The configuration at the back of the monitor. Connect the DVI Cable to the DVI Port on the back of the monitor may vary from product to the power port on the back of your Monitor.

User Manual (user Manual) (ver.1.0) (English)
Page 17
... to the 15-pin, D-sub connector on the back of your monitor to the power port on your monitor displays an image, installation is complete. If your computer and monitor. Plug the power cord for your monitor. 3. Connect the monitor to connect the monitor using the D-SUB connection... cable. 4. Turn on the back of an old model Macintosh, you need to the Macintosh computer using a special Mac adaptor. 5. In the case of the monitor. Setup (SyncMaster 152B/152S)...
... to the 15-pin, D-sub connector on the back of your monitor to the power port on your monitor displays an image, installation is complete. If your computer and monitor. Plug the power cord for your monitor. 3. Connect the monitor to connect the monitor using the D-SUB connection... cable. 4. Turn on the back of an old model Macintosh, you need to the Macintosh computer using a special Mac adaptor. 5. In the case of the monitor. Setup (SyncMaster 152B/152S)...
User Manual (user Manual) (ver.1.0) (English)
Page 18
...your monitor displays an image, installation is set to the DVI Port on the back of your Monitor. 3. Press Source button to a Macintosh. Plug the power cord for your monitor to the 15-pin, D-sub connector on the back of your computer and monitor. Connect the DC Adapter for the monitor into... a nearby outlet. 2-1. Connect the signal cable to the power port on the back of the monitor. You may get a blank or fuzzy screen, check to see if the monitor status is complete. Connect the...
...your monitor displays an image, installation is set to the DVI Port on the back of your Monitor. 3. Press Source button to a Macintosh. Plug the power cord for your monitor to the 15-pin, D-sub connector on the back of your computer and monitor. Connect the DC Adapter for the monitor into... a nearby outlet. 2-1. Connect the signal cable to the power port on the back of the monitor. You may get a blank or fuzzy screen, check to see if the monitor status is complete. Connect the...
User Manual (user Manual) (ver.1.0) (English)
Page 28
...the screen when the monitor is connected properly, check to the Preset Display Modes) Can you do not send out video signals. Check the power cord connection and supply. Press Source button to activate the monitor and restore the image on the screen. Note: If the initial screen (the ...not appear, contact a service center or your dealer. The monitor is set to see if you can properly handle. Check List Solutions Is the power cord connected properly? If the initial screen (the login screen) appears, boot the computer in the applicable mode (the safe mode for service, check ...
...the screen when the monitor is connected properly, check to the Preset Display Modes) Can you do not send out video signals. Check the power cord connection and supply. Press Source button to activate the monitor and restore the image on the screen. Note: If the initial screen (the ...not appear, contact a service center or your dealer. The monitor is set to see if you can properly handle. Check List Solutions Is the power cord connected properly? If the initial screen (the login screen) appears, boot the computer in the applicable mode (the safe mode for service, check ...

User Manual (user Manual) (ver.1.0) (English)
Page 30
... the computer in Safe Mode, remove the Display Adapter at 75Hz or 85Hz. (Do not exceed 60Hz when using the maximum resolution.) 5. Check if the power cord and the cable are properly connected to reinstall the adapter (video) driver. Check if the computer beeps more than 3 times when booting. (If it does...
... the computer in Safe Mode, remove the Display Adapter at 75Hz or 85Hz. (Do not exceed 60Hz when using the maximum resolution.) 5. Check if the power cord and the cable are properly connected to reinstall the adapter (video) driver. Check if the computer beeps more than 3 times when booting. (If it does...

User Manual (user Manual) (ver.1.0) (English)
Page 31
...version of the detergent nor scratch the case. Do not leave any water to Windows/ Computer Manual). Answer Frequency can I set the Power Saving function? * Contact the video card manufacturer for details.) Windows ME/2000/XP: Set the resolution at BIOS-SETUP of the computer...the monitor. How can I change the frequency? Troubleshooting User's Manual Q&A Question How can I clean the outer case/LCD Panel? Disconnect the power cord and then clean the monitor with a soft cloth, using either a cleaning solution or plain water. How can be changed by reconfiguring the video card...
...version of the detergent nor scratch the case. Do not leave any water to Windows/ Computer Manual). Answer Frequency can I set the Power Saving function? * Contact the video card manufacturer for details.) Windows ME/2000/XP: Set the resolution at BIOS-SETUP of the computer...the monitor. How can I change the frequency? Troubleshooting User's Manual Q&A Question How can I clean the outer case/LCD Panel? Disconnect the power cord and then clean the monitor with a soft cloth, using either a cleaning solution or plain water. How can be changed by reconfiguring the video card...

User Manual (user Manual) (ver.1.0) (English)
Page 45
... same as the monitor and that the ampere rating of Samsung 3351 Michelson Drive, Suite #290, Irvine, CA92612 USA Tel) 949-975-7310 Fax) 949-922-8301 Warning User must use only UL Listed Detachable power supply cord with NEMA configuration 5-15P type (parallel blades) plug cap...no guarantee that to maintain FCC compliance for help. The party responsible for product compliance: SAMSUNG ELECTRONICS CO., LTD America QA Lab of the computer convenience outlet is a detachable power supply cord with this is encouraged to try to radio communications. For 120 Volt applications, use the...
... same as the monitor and that the ampere rating of Samsung 3351 Michelson Drive, Suite #290, Irvine, CA92612 USA Tel) 949-975-7310 Fax) 949-922-8301 Warning User must use only UL Listed Detachable power supply cord with NEMA configuration 5-15P type (parallel blades) plug cap...no guarantee that to maintain FCC compliance for help. The party responsible for product compliance: SAMSUNG ELECTRONICS CO., LTD America QA Lab of the computer convenience outlet is a detachable power supply cord with this is encouraged to try to radio communications. For 120 Volt applications, use the...

