
User Manual (user Manual) (English)
Page 2
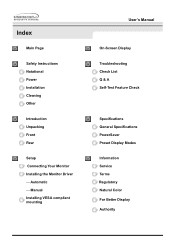
Index Main Page Safety Instructions Notational Power Installation Cleaning Other Introduction Unpacking Front Rear Setup Connecting Your Monitor Installing the Monitor Driver - Automatic - Manual Installing VESA compliant mounting User's Manual On-Screen Display Troubleshooting Check List Q & A Self-Test Feature Check Specifications General Specifications PowerSaver Preset Display Modes Information Service Terms Regulatory Natural Color For Better Display Authority
Index Main Page Safety Instructions Notational Power Installation Cleaning Other Introduction Unpacking Front Rear Setup Connecting Your Monitor Installing the Monitor Driver - Automatic - Manual Installing VESA compliant mounting User's Manual On-Screen Display Troubleshooting Check List Q & A Self-Test Feature Check Specifications General Specifications PowerSaver Preset Display Modes Information Service Terms Regulatory Natural Color For Better Display Authority
User Manual (user Manual) (English)
Page 6
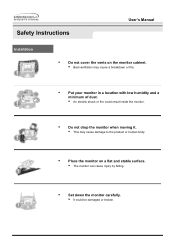
...8226; Bad ventilation may cause a breakdown or fire. • Put your monitor in a location with low humidity and a minimum of dust. • An electric shock or fire could result inside the monitor. • Do not drop the monitor when moving it. • This may cause damage to the product or ...human body. • Place the monitor on a flat and stable surface. • The monitor can cause injury by falling. • Set down...
...8226; Bad ventilation may cause a breakdown or fire. • Put your monitor in a location with low humidity and a minimum of dust. • An electric shock or fire could result inside the monitor. • Do not drop the monitor when moving it. • This may cause damage to the product or ...human body. • Place the monitor on a flat and stable surface. • The monitor can cause injury by falling. • Set down...
User Manual (user Manual) (English)
Page 7
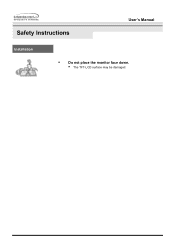
Safety Instructions User's Manual Installation • Do not place the monitor face down. • The TFT-LCD surface may be damaged.
Safety Instructions User's Manual Installation • Do not place the monitor face down. • The TFT-LCD surface may be damaged.
User Manual (user Manual) (English)
Page 8
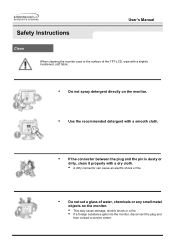
... or the surface of the TFT-LCD, wipe with a slightly moistened, soft fabric. • Do not spray detergent directly on the monitor. • Use the recommended detergent with a smooth cloth. • If the connector between the plug and the pin is dusty or dirty, clean it properly .... • A dirty connector can cause an electric shock or fire • Do not set a glass of water, chemicals or any small metal objects on the monitor. • This may cause damage, electric shock or a fire. • If a foreign substance gets into the...
... or the surface of the TFT-LCD, wipe with a slightly moistened, soft fabric. • Do not spray detergent directly on the monitor. • Use the recommended detergent with a smooth cloth. • If the connector between the plug and the pin is dusty or dirty, clean it properly .... • A dirty connector can cause an electric shock or fire • Do not set a glass of water, chemicals or any small metal objects on the monitor. • This may cause damage, electric shock or a fire. • If a foreign substance gets into the...
User Manual (user Manual) (English)
Page 9
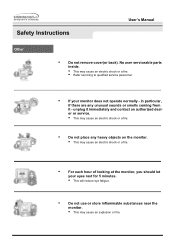
... This may cause an explosion or fire. in particular, if there are any heavy objects on the monitor. • This may cause an electric shock or a fire. • For each hour of looking at the monitor, you should let your eyes rest for 5 minutes. • This will reduce eye fatigue. &#...8226; Do not use or store inflammable substances near the monitor. • This may cause an electric shock or a fire. • Refer...
... This may cause an explosion or fire. in particular, if there are any heavy objects on the monitor. • This may cause an electric shock or a fire. • For each hour of looking at the monitor, you should let your eyes rest for 5 minutes. • This will reduce eye fatigue. &#...8226; Do not use or store inflammable substances near the monitor. • This may cause an electric shock or a fire. • Refer...
User Manual (user Manual) (English)
Page 10
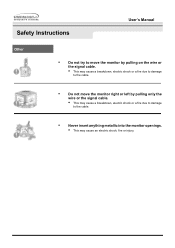
Safety Instructions User's Manual Other • Do not try to move the monitor by pulling on the wire or the signal cable. • This may cause a breakdown, electric shock or a fire due to damage to the cable. • Do not move the monitor right or left by pulling only the wire or the signal cable. • This may cause a breakdown, electric shock or a fire due to damage to the cable. • Never insert anything metallic into the monitor openings. • This may cause an electric shock, fire or injury.
Safety Instructions User's Manual Other • Do not try to move the monitor by pulling on the wire or the signal cable. • This may cause a breakdown, electric shock or a fire due to damage to the cable. • Do not move the monitor right or left by pulling only the wire or the signal cable. • This may cause a breakdown, electric shock or a fire due to damage to the cable. • Never insert anything metallic into the monitor openings. • This may cause an electric shock, fire or injury.
User Manual (user Manual) (English)
Page 11
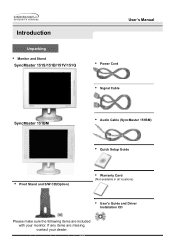
Introduction Unparking • Monitor and Stand SyncMaster 151S/151B/151V/151Q User's Manual • Power Cord • Signal Cable SyncMaster 151BM • Audio Cable (SyncMaster 151BM) • Quick Setup ... and Driver Installation CD Please make sure the following items are included (Swoimtheyomuor mdeolnsitoinr.cIlfuadney iatesmtasnadreamttiasscihnge,d. ) Please makecosnutarcet tyhoeurfdoellaolewr.ing items are missing, contact your monitor. If any items are included with your dealer.11jk
Introduction Unparking • Monitor and Stand SyncMaster 151S/151B/151V/151Q User's Manual • Power Cord • Signal Cable SyncMaster 151BM • Audio Cable (SyncMaster 151BM) • Quick Setup ... and Driver Installation CD Please make sure the following items are included (Swoimtheyomuor mdeolnsitoinr.cIlfuadney iatesmtasnadreamttiasscihnge,d. ) Please makecosnutarcet tyhoeurfdoellaolewr.ing items are missing, contact your monitor. If any items are included with your dealer.11jk

User Manual (user Manual) (English)
Page 12
Introduction User's Manual Unparking SyncMaster 151N/150N/152N/153N Please make sure the following items are missing, contact your monitor. Monitor and Stand Power Cord Signal Cable Quick Setup Guide Pivot Stand and S/W CD(Option) Warranty Card (Not available in all locations) User's Guide and Driver Installation CD If any items are included with your dealer.
Introduction User's Manual Unparking SyncMaster 151N/150N/152N/153N Please make sure the following items are missing, contact your monitor. Monitor and Stand Power Cord Signal Cable Quick Setup Guide Pivot Stand and S/W CD(Option) Warranty Card (Not available in all locations) User's Guide and Driver Installation CD If any items are included with your dealer.

User Manual (user Manual) (English)
Page 13
...or the OSD. 3,4. Menu button : Use this button to open the OSD and activate a highlighted menu item. 6. For energy conservation, turn the monitor on and off. 7. Power button : Use this button to auto adjustment direct access. 2. Note : See PowerSaver described in the menu. 5. ...Power indicator : This light glows green during normal operation, and blinks green once as the monitor saves your monitor OFF when it is not needed, or when leaving it unattended for further information regarding power saving functions. Adjust buttons : These ...
...or the OSD. 3,4. Menu button : Use this button to open the OSD and activate a highlighted menu item. 6. For energy conservation, turn the monitor on and off. 7. Power button : Use this button to auto adjustment direct access. 2. Note : See PowerSaver described in the menu. 5. ...Power indicator : This light glows green during normal operation, and blinks green once as the monitor saves your monitor OFF when it is not needed, or when leaving it unattended for further information regarding power saving functions. Adjust buttons : These ...

User Manual (user Manual) (English)
Page 14
Adjust buttons 4. Power button 6. Use this button to Exit the active menu or the OSD. For energy conservation, turn the monitor on and off. Introduction Front SyncMaster 151N/150N/152N/153N User's Manual 1. Auto button 2. Use this button to turn your adjustments. This light glows green during normal ...operation, and blinks green once as the monitor saves your monitor OFF when it is not needed, or when leaving it ...
Adjust buttons 4. Power button 6. Use this button to Exit the active menu or the OSD. For energy conservation, turn the monitor on and off. Introduction Front SyncMaster 151N/150N/152N/153N User's Manual 1. Auto button 2. Use this button to turn your adjustments. This light glows green during normal ...operation, and blinks green once as the monitor saves your monitor OFF when it is not needed, or when leaving it ...
User Manual (user Manual) (English)
Page 15
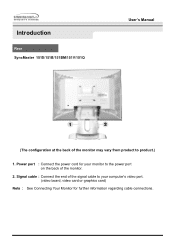
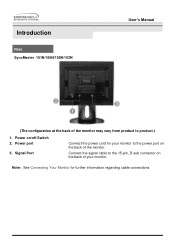
Introduction Rear SyncMaster 151S/151B/151BM/151V/151Q User's Manual (The configuration at the back of the monitor. 2. Power port : Connect the power cord for your computer's video port. (video board, video card or graphics card) Note : See Connecting Your Monitor for further information regarding cable connections. Signal cable : Connect the end of the signal cable to your monitor to the power port on the back of the monitor may vary from product to product.) 1.
Introduction Rear SyncMaster 151S/151B/151BM/151V/151Q User's Manual (The configuration at the back of the monitor. 2. Power port : Connect the power cord for your computer's video port. (video board, video card or graphics card) Note : See Connecting Your Monitor for further information regarding cable connections. Signal cable : Connect the end of the signal cable to your monitor to the power port on the back of the monitor may vary from product to product.) 1.
User Manual (user Manual) (English)
Page 16
Power port 3. Signal Port Connect the power cord for further information regarding cable connections. Note: See Connecting Your Monitor for your monitor. Introduction Rear SyncMaster 151N/150N/152N/153N User's Manual (The configuration at the back of your monitor to product.) 1. Power on the back of the monitor. Connect the signal cable to the 15-pin, D-sub connector on the back of the monitor may vary from product to the power port on /off Switch 2.
Power port 3. Signal Port Connect the power cord for further information regarding cable connections. Note: See Connecting Your Monitor for your monitor. Introduction Rear SyncMaster 151N/150N/152N/153N User's Manual (The configuration at the back of your monitor to product.) 1. Power on the back of the monitor. Connect the signal cable to the 15-pin, D-sub connector on the back of the monitor may vary from product to the power port on /off Switch 2.

User Manual (user Manual) (English)
Page 17
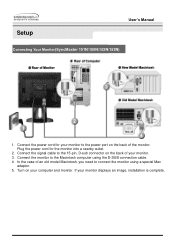
...cable to the Macintosh computer using a special Mac adaptor. 5. Connect the monitor to the 15-pin, D-sub connector on the back of your monitor to connect the monitor using the D-SUB connection cable. 4. In the case of the monitor. Turn on the back of an old model Macintosh, you need to... the power port on your monitor displays an image, installation is complete. If your...
...cable to the Macintosh computer using a special Mac adaptor. 5. Connect the monitor to the 15-pin, D-sub connector on the back of your monitor to connect the monitor using the D-SUB connection cable. 4. In the case of the monitor. Turn on the back of an old model Macintosh, you need to... the power port on your monitor displays an image, installation is complete. If your...
User Manual (user Manual) (English)
Page 18
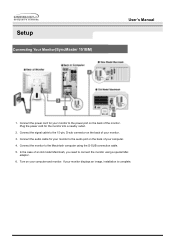
... computer. 4. Connect the audio cable for the monitor into a nearby outlet. 2. Connect the monitor to connect the monitor using the D-SUB connection cable. 5. In the case of your monitor to the power port on the back of the monitor. Turn on the back of an old model Macintosh..., you need to the Macintosh computer using a special Mac adaptor. 6. Setup Connecting Your Monitor(SyncMaster 151BM) User's Manual 1. If your computer and monitor. Plug the power cord for your monitor. 3. Connect the ...
... computer. 4. Connect the audio cable for the monitor into a nearby outlet. 2. Connect the monitor to connect the monitor using the D-SUB connection cable. 5. In the case of your monitor to the power port on the back of the monitor. Turn on the back of an old model Macintosh..., you need to the Macintosh computer using a special Mac adaptor. 6. Setup Connecting Your Monitor(SyncMaster 151BM) User's Manual 1. If your computer and monitor. Plug the power cord for your monitor. 3. Connect the ...
User Manual (user Manual) (English)
Page 19
...the back of your computer and monitor. Turn on the back of an old model Macintosh, you need to the power port on your monitor. 3. If your monitor to connect the monitor using the D-SUB connection cable. 4. Connect the power cord for the monitor into a nearby outlet. 2. Plug... the power cord for your monitor displays an image, installation is complete. Setup User's...
...the back of your computer and monitor. Turn on the back of an old model Macintosh, you need to the power port on your monitor. 3. If your monitor to connect the monitor using the D-SUB connection cable. 4. Connect the power cord for the monitor into a nearby outlet. 2. Plug... the power cord for your monitor displays an image, installation is complete. Setup User's...
User Manual (user Manual) (English)
Page 20
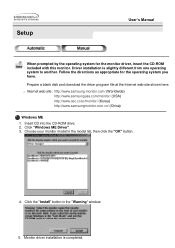
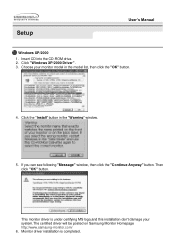
... from one operating system to another. Follow the directions as appropriate for the monitor driver, insert the CD-ROM included with this monitor. Internet web site : http://www.samsung-monitor.com/ (Worldwide) http://www.samsungusa.com/monitor/ (USA) http://www.sec.co.kr/monitor/ (Korea) http://www.samsungmonitor.com.cn/ (China) Windows ME 1. Driver installation is... the model list, then click the "OK" button. 4. Setup User's Manual When prompted by the operating system for the operating system you have. Choose your monitor model in the "Warning" window. 5.
... from one operating system to another. Follow the directions as appropriate for the monitor driver, insert the CD-ROM included with this monitor. Internet web site : http://www.samsung-monitor.com/ (Worldwide) http://www.samsungusa.com/monitor/ (USA) http://www.sec.co.kr/monitor/ (Korea) http://www.samsungmonitor.com.cn/ (China) Windows ME 1. Driver installation is... the model list, then click the "OK" button. 4. Setup User's Manual When prompted by the operating system for the operating system you have. Choose your monitor model in the "Warning" window. 5.
User Manual (user Manual) (English)
Page 21
...". 3. Choose your system.The certified driver will be posted on Samsung Monitor Homepage http://www.samsung-monitor.com/ 6. If you can see following "Message" window, then click the "Continue Anyway" button. Monitor driver installation is under certifying MS logo,and this installation don't damage your monitor model in the "Warning" window. 5. Then click "OK" button. Insert...
...". 3. Choose your system.The certified driver will be posted on Samsung Monitor Homepage http://www.samsung-monitor.com/ 6. If you can see following "Message" window, then click the "Continue Anyway" button. Monitor driver installation is under certifying MS logo,and this installation don't damage your monitor model in the "Warning" window. 5. Then click "OK" button. Insert...
User Manual (user Manual) (English)
Page 22
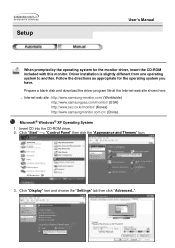
Internet web site : http://www.samsung-monitor.com/ (Worldwide) http://www.samsungusa.com/monitor/ (USA) http://www.sec.co.kr/monitor/ (Korea) http://www.samsungmonitor.com.cn/ (China) Microsoft® Windows® XP Operating System 1. Driver installation is slightly different from one operating system ... file at the Internet web site shown here. ? Insert CD into the CD-ROM driver. 2. Follow the directions as appropriate for the monitor driver, insert the CD-ROM included with this monitor. Setup User's Manual When prompted by the operating system for the operating system you have.
Internet web site : http://www.samsung-monitor.com/ (Worldwide) http://www.samsungusa.com/monitor/ (USA) http://www.sec.co.kr/monitor/ (Korea) http://www.samsungmonitor.com.cn/ (China) Microsoft® Windows® XP Operating System 1. Driver installation is slightly different from one operating system ... file at the Internet web site shown here. ? Insert CD into the CD-ROM driver. 2. Follow the directions as appropriate for the monitor driver, insert the CD-ROM included with this monitor. Setup User's Manual When prompted by the operating system for the operating system you have.
User Manual (user Manual) (English)
Page 23
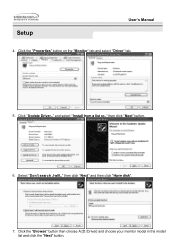
Click "Update Driver.." Select "Don't search ,I will.." Setup User's Manual 4. and select "Install from a list or.." then click "Next" button. 6. then click "Next" and then click "Have disk". 7. Click the "Properties" button on the "Monitor" tab and select "Driver" tab. 5. Click the "Browse" button then choose A:(D:\Driver) and choose your monitor model in the model list and click the "Next" button.
Click "Update Driver.." Select "Don't search ,I will.." Setup User's Manual 4. and select "Install from a list or.." then click "Next" button. 6. then click "Next" and then click "Have disk". 7. Click the "Properties" button on the "Monitor" tab and select "Driver" tab. 5. Click the "Browse" button then choose A:(D:\Driver) and choose your monitor model in the model list and click the "Next" button.
User Manual (user Manual) (English)
Page 24
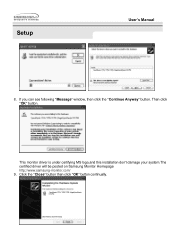
If you can see following "Message" window, then click the "Continue Anyway" button. Click the "Close" button then click "OK" button continually. Then click "OK" button. This monitor driver is under certifying MS logo,and this installation don't damage your system.The certified driver will be posted on Samsung Monitor Homepage http://www.samsung-monitor.com/ 9. Setup User's Manual 8.
If you can see following "Message" window, then click the "Continue Anyway" button. Click the "Close" button then click "OK" button continually. Then click "OK" button. This monitor driver is under certifying MS logo,and this installation don't damage your system.The certified driver will be posted on Samsung Monitor Homepage http://www.samsung-monitor.com/ 9. Setup User's Manual 8.


