

User Manual (user Manual) (English)
Page 12
Introduction User's Manual Unparking SyncMaster 151N/150N/152N/153N Please make sure the following items are missing, contact your monitor. Monitor and Stand Power Cord Signal Cable Quick Setup Guide Pivot Stand and S/W CD(Option) Warranty Card (Not available in all locations) User's Guide and Driver Installation CD If any items are included with your dealer.
Introduction User's Manual Unparking SyncMaster 151N/150N/152N/153N Please make sure the following items are missing, contact your monitor. Monitor and Stand Power Cord Signal Cable Quick Setup Guide Pivot Stand and S/W CD(Option) Warranty Card (Not available in all locations) User's Guide and Driver Installation CD If any items are included with your dealer.

User Manual (user Manual) (English)
Page 14
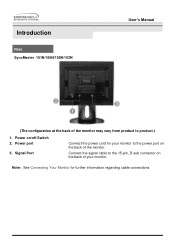
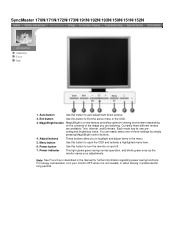
... This light glows green during normal operation, and blinks green once as the monitor saves your monitor OFF when it is not needed, or when leaving it unattended for further information regarding power saving functions. Introduction Front SyncMaster 151N/150N/152N/153N User's Manual 1. Menu button 5. These buttons allow you to ... button 6. Use this button to turn your adjustments. Auto button 2. Note: See PowerSaver described in the menu. For energy conservation, turn the monitor on and off. Power indicator Use this button to auto adjustment direct access.
... This light glows green during normal operation, and blinks green once as the monitor saves your monitor OFF when it is not needed, or when leaving it unattended for further information regarding power saving functions. Introduction Front SyncMaster 151N/150N/152N/153N User's Manual 1. Menu button 5. These buttons allow you to ... button 6. Use this button to turn your adjustments. Auto button 2. Note: See PowerSaver described in the menu. For energy conservation, turn the monitor on and off. Power indicator Use this button to auto adjustment direct access.
User Manual (user Manual) (English)
Page 16
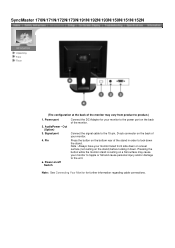
Connect the signal cable to the 15-pin, D-sub connector on the back of the monitor. Power on/off Switch 2. Signal Port Connect the power cord for further information regarding cable connections. Introduction Rear SyncMaster 151N/150N/152N/153N User's Manual (The configuration at the back of the monitor may vary from product to the power port on the back of your monitor. Power port 3. Note: See Connecting Your Monitor for your monitor to product.) 1.
Connect the signal cable to the 15-pin, D-sub connector on the back of the monitor. Power on/off Switch 2. Signal Port Connect the power cord for further information regarding cable connections. Introduction Rear SyncMaster 151N/150N/152N/153N User's Manual (The configuration at the back of the monitor may vary from product to the power port on the back of your monitor. Power port 3. Note: See Connecting Your Monitor for your monitor to product.) 1.
User Manual (user Manual) (English)
Page 19
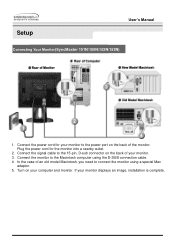
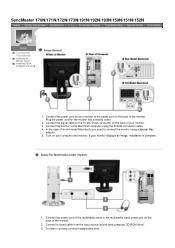
If your computer and monitor. Plug the power cord for your monitor. 3. Connect the monitor to connect the monitor using the D-SUB connection cable. 4. In the case of your monitor to the power port on the back of the monitor. Turn on the back of an old model Macintosh, you need to ...the Macintosh computer using a special Mac adaptor. 5. Connect the signal cable to the 15-pin, D-sub connector on your monitor displays an image, installation is complete. Setup User's Manual Connecting Your Monitor(SyncMaster 151N/150N/152N/153N) 1. Connect the power cord for the...
If your computer and monitor. Plug the power cord for your monitor. 3. Connect the monitor to connect the monitor using the D-SUB connection cable. 4. In the case of your monitor to the power port on the back of the monitor. Turn on the back of an old model Macintosh, you need to ...the Macintosh computer using a special Mac adaptor. 5. Connect the signal cable to the 15-pin, D-sub connector on your monitor displays an image, installation is complete. Setup User's Manual Connecting Your Monitor(SyncMaster 151N/150N/152N/153N) 1. Connect the power cord for the...
User Manual (user Manual) (English)
Page 30
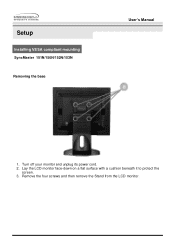
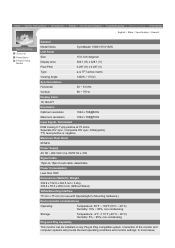
Setup Installing VESA compliant mounting SyncMaster 151N/150N/152N/153N Removing the base User's Manual 1. Lay the LCD monitor face-down on a flat surface with a cushion beneath it to protect the screen. 3. Turn off your monitor and unplug its power cord. 2. Remove the four screws and then remove the Stand from the LCD monitor.
Setup Installing VESA compliant mounting SyncMaster 151N/150N/152N/153N Removing the base User's Manual 1. Lay the LCD monitor face-down on a flat surface with a cushion beneath it to protect the screen. 3. Turn off your monitor and unplug its power cord. 2. Remove the four screws and then remove the Stand from the LCD monitor.
User Manual (user Manual) (English)
Page 50
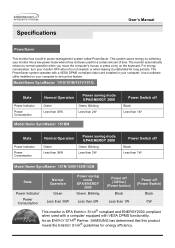
...36W Power saving mode EPA/ENERGY 2000 Green, Blinking Less than 2W Power Switch off Black Less than 1W Model Name SyncMaster 151N/150N/152N/153N State Power Indicator Power Consumption Normal Operation Green Less than 30W Power saving mode EPA/ENERGY 2000 Green, Blinking Less... on the keyboard. As an ENERGY STAR® Partner, SAMSUNG has determined that this feature. This system saves energy by switching your computer. The PowerSaver system operates with VESA DPMS functionality. For energy conservation, turn your monitor OFF when it has not been used with a computer equipped...
...36W Power saving mode EPA/ENERGY 2000 Green, Blinking Less than 2W Power Switch off Black Less than 1W Model Name SyncMaster 151N/150N/152N/153N State Power Indicator Power Consumption Normal Operation Green Less than 30W Power saving mode EPA/ENERGY 2000 Green, Blinking Less... on the keyboard. As an ENERGY STAR® Partner, SAMSUNG has determined that this feature. This system saves energy by switching your computer. The PowerSaver system operates with VESA DPMS functionality. For energy conservation, turn your monitor OFF when it has not been used with a computer equipped...

User Manual (user Manual) (English)
Page 12
SyncMaster 170N/171N/172N/173N/191N/192N/193N/150N/151N/152N Unpacking Front Rear Monitor and Stand Power Cord Signal Cable Please make sure the following items are missing, contact your monitor. If any items are included with your dealer. Quick Setup Guide Warranty Card (Not available in all locations) For Multimedia model (Option) User's Guide and Driver Installation CD Pivot S/W CD(Option) Multimedia Speaker Stand Sound Cable
SyncMaster 170N/171N/172N/173N/191N/192N/193N/150N/151N/152N Unpacking Front Rear Monitor and Stand Power Cord Signal Cable Please make sure the following items are missing, contact your monitor. If any items are included with your dealer. Quick Setup Guide Warranty Card (Not available in all locations) For Multimedia model (Option) User's Guide and Driver Installation CD Pivot S/W CD(Option) Multimedia Speaker Stand Sound Cable
User Manual (user Manual) (English)
Page 14
...menu item. 6. SyncMaster 170N/171N/172N/173N/191N/192N/193N/150N/151N/152N Unpacking Front Rear 1. Power indicator This light glows green during normal operation, and blinks green once as the monitor saves your monitor OFF when it unattended for further information regarding power saving functions....Auto button Use this button to highlight and adjust items in the manual for long periods. For energy conservation, turn the monitor on the contents of three settings by simply pressing MagicBright control buttons. 4. Currently three different modes are watching. Note: See...
...menu item. 6. SyncMaster 170N/171N/172N/173N/191N/192N/193N/150N/151N/152N Unpacking Front Rear 1. Power indicator This light glows green during normal operation, and blinks green once as the monitor saves your monitor OFF when it unattended for further information regarding power saving functions....Auto button Use this button to highlight and adjust items in the manual for long periods. For energy conservation, turn the monitor on the contents of three settings by simply pressing MagicBright control buttons. 4. Currently three different modes are watching. Note: See...
User Manual (user Manual) (English)
Page 16
.../191N/192N/193N/150N/151N/152N Unpacking Front Rear (The configuration at the back of the stand in order to lock down . Press the button on the stand) before locking it down the stand. Power port 2. Out (Option) 3. Note : Always have your monitor faced front side down... Connect the signal cable to the 15-pin, D-sub connector on the back of your monitor to product.) 1. Note: See Connecting Your Monitor for your monitor. Pin a. Pressing the button while the monitor stand is resting on /off Switch Connect the DC Adapter for further information regarding cable connections....
.../191N/192N/193N/150N/151N/152N Unpacking Front Rear (The configuration at the back of the stand in order to lock down . Press the button on the stand) before locking it down the stand. Power port 2. Out (Option) 3. Note : Always have your monitor faced front side down... Connect the signal cable to the 15-pin, D-sub connector on the back of your monitor to product.) 1. Note: See Connecting Your Monitor for your monitor. Pin a. Pressing the button while the monitor stand is resting on /off Switch Connect the DC Adapter for further information regarding cable connections....
User Manual (user Manual) (English)
Page 19
...model Macintosh, you need to the multimedia stand power port on the back of your monitor to the power port on the back of the multimedia stand to connect the monitor using the D-SUB connection cable. 4. Setup-For Multimedia model (Option) 1. Connect ...the power cord for your monitor. 3. If your computer and monitor. Connect the monitor to the 15-pin, D-sub connector on your monitor displays an image, installation is complete. SyncMaster 170N/171N/172N/173N/191N/192N/193N/150N/151N/152N Connecting Your Monitor Installing the Monitor Driver Installing VESA compliant ...
...model Macintosh, you need to the multimedia stand power port on the back of your monitor to the power port on the back of the multimedia stand to connect the monitor using the D-SUB connection cable. 4. Setup-For Multimedia model (Option) 1. Connect ...the power cord for your monitor. 3. If your computer and monitor. Connect the monitor to the 15-pin, D-sub connector on your monitor displays an image, installation is complete. SyncMaster 170N/171N/172N/173N/191N/192N/193N/150N/151N/152N Connecting Your Monitor Installing the Monitor Driver Installing VESA compliant ...

User Manual (user Manual) (English)
Page 43
...Reboot the computer. I cannot see the On Screen Display. There is fully inserted in it's slot. The monitor is on the screen. SyncMaster 170N/171N/172N/173N/191N/192N/193N/150N/151N/152N Check List Q & A Self-Test Feature Check Before calling for service, check the information in this ...message when the signal from the video card exceeds the maximum resolution and frequency that the monitor can properly handle. Check the signal ...
...Reboot the computer. I cannot see the On Screen Display. There is fully inserted in it's slot. The monitor is on the screen. SyncMaster 170N/171N/172N/173N/191N/192N/193N/150N/151N/152N Check List Q & A Self-Test Feature Check Before calling for service, check the information in this ...message when the signal from the video card exceeds the maximum resolution and frequency that the monitor can properly handle. Check the signal ...
User Manual (user Manual) (English)
Page 58
... computer systems will provide the best operating conditions and monitor settings. In most cases, General PowerSaver Preset Timing Modes English > Main > Specification > General General Model Name SyncMaster 150N/151N/152N LCD Panel Size 15.0 inch diagonal Display area 304.1 (H) x 228.1 (V) Pixel Pitch 0.297 (H) x 0.297 (V) Type a-si TFT active matrix ...: 10% ~ 80%, non-condensing Storage Temperature: -4°F ~113°F (-20°C ~ 45°C) Humidity: 5% ~ 95%, non-condensing Plug and Play Capability This monitor can be installed on any Plug & Play compatible system.
... computer systems will provide the best operating conditions and monitor settings. In most cases, General PowerSaver Preset Timing Modes English > Main > Specification > General General Model Name SyncMaster 150N/151N/152N LCD Panel Size 15.0 inch diagonal Display area 304.1 (H) x 228.1 (V) Pixel Pitch 0.297 (H) x 0.297 (V) Type a-si TFT active matrix ...: 10% ~ 80%, non-condensing Storage Temperature: -4°F ~113°F (-20°C ~ 45°C) Humidity: 5% ~ 95%, non-condensing Plug and Play Capability This monitor can be installed on any Plug & Play compatible system.

User Manual (user Manual) (English)
Page 61
... the ENERGY STAR® guidelines for a certain amount of time. General PowerSaver Preset Timing Modes SyncMaster 150N/151N/152N/153T This monitor has a built-in your monitor OFF when it is EPA ENERGY STAR® compliant and ENERGY2000 compliant when used for energy efficiency. ...installed in power management system called PowerSaver. Use a software utility installed on the keyboard. As an ENERGY STAR® Partner, SAMSUNG has determined that this feature. The PowerSaver system operates with VESA DPMS functionality. This system saves energy by switching your computer ...
... the ENERGY STAR® guidelines for a certain amount of time. General PowerSaver Preset Timing Modes SyncMaster 150N/151N/152N/153T This monitor has a built-in your monitor OFF when it is EPA ENERGY STAR® compliant and ENERGY2000 compliant when used for energy efficiency. ...installed in power management system called PowerSaver. Use a software utility installed on the keyboard. As an ENERGY STAR® Partner, SAMSUNG has determined that this feature. The PowerSaver system operates with VESA DPMS functionality. This system saves energy by switching your computer ...


