
User Manual
Page 2
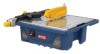
......6 - 7 Features...7 Assembly...8 - 9 Operation...9 - 11 Maintenance...12 Figure numbers (illustrations)...13 - 17 Parts Ordering / Service...Back page INTRODUCTION This product has many features for making it was purchased. Safety, performance, and dependability have other than those specifically stated...To receive a replacement power tool or requested warranty service, you may also have been given top priority in your RYOBI® power tool for ninety (90) days. The replacement power tool will repair any faulty workmanship, and ...
......6 - 7 Features...7 Assembly...8 - 9 Operation...9 - 11 Maintenance...12 Figure numbers (illustrations)...13 - 17 Parts Ordering / Service...Back page INTRODUCTION This product has many features for making it was purchased. Safety, performance, and dependability have other than those specifically stated...To receive a replacement power tool or requested warranty service, you may also have been given top priority in your RYOBI® power tool for ninety (90) days. The replacement power tool will repair any faulty workmanship, and ...
User Manual
Page 3
... enclosures. KEEP GUARDS IN PLACE and in good working outdoors. Cluttered areas and benches invite accidents. Keep the work into moving parts, breakage of electric shock. ALWAYS KEEP THE SPLASH HOOD IN PLACE and in loss of personal injury. USE THE ... not designed for better and safer performance. Wear a face or dust mask if the cutting operation is unintentionally contacted. CHECK DAMAGED PARTS. Keep cord away from receptacle. All visitors should be kept a safe distance from tool before servicing, or when changing attachments, wheels, bits...
... enclosures. KEEP GUARDS IN PLACE and in good working outdoors. Cluttered areas and benches invite accidents. Keep the work into moving parts, breakage of electric shock. ALWAYS KEEP THE SPLASH HOOD IN PLACE and in loss of personal injury. USE THE ... not designed for better and safer performance. Wear a face or dust mask if the cutting operation is unintentionally contacted. CHECK DAMAGED PARTS. Keep cord away from receptacle. All visitors should be kept a safe distance from tool before servicing, or when changing attachments, wheels, bits...
User Manual
Page 4
...not use wheels with smooth edge cutting wheels free of your body in this tool, loan them frequently and use only identical replacement parts. Use of any part of openings, grooves, and teeth. Instructions for which it , to avoid accidental starting when reconnecting to power supply. ..., when changing cutting wheels, and cleaning. d) Use tool only with incorrect size holes. Do not reach underneath work using the saw is moving parts during use. NEVER START A TOOL WHEN ANY ROTATING COMPONENT IS IN CONTACT WITH THE WORKPIECE. DO NOT OPERATE A TOOL ...
...not use wheels with smooth edge cutting wheels free of your body in this tool, loan them frequently and use only identical replacement parts. Use of any part of openings, grooves, and teeth. Instructions for which it , to avoid accidental starting when reconnecting to power supply. ..., when changing cutting wheels, and cleaning. d) Use tool only with incorrect size holes. Do not reach underneath work using the saw is moving parts during use. NEVER START A TOOL WHEN ANY ROTATING COMPONENT IS IN CONTACT WITH THE WORKPIECE. DO NOT OPERATE A TOOL ...
User Manual
Page 7
... to use wheels rated less than the speed of this warning could result in personal injury. Disconnect the fuse or circuit breaker that is that part of the cord below the front rail. tile cutting wheel is used with all connections dry and off the ground. MOTOR - To lock the switch...
... to use wheels rated less than the speed of this warning could result in personal injury. Disconnect the fuse or circuit breaker that is that part of the cord below the front rail. tile cutting wheel is used with all connections dry and off the ground. MOTOR - To lock the switch...
User Manual
Page 8
... that may have carefully inspected and satisfactorily operated the tool. The saw . wheel. 8 - ASSEMBLY UNPACKING See Figure 4, page 14. Parts on this tool. Place the cutting wheel onto arbor with knob and hex bolt Splash hood bracket Screws (2) Overflow drain Rip guide Miter ...guide Hex wrench Arbor wrench Washers (2) Operator's Manual WARNING: If any parts are damaged or missing do so could result in accidental starting and possible serious personal injury. Use of a product that have openings, ...
... that may have carefully inspected and satisfactorily operated the tool. The saw . wheel. 8 - ASSEMBLY UNPACKING See Figure 4, page 14. Parts on this tool. Place the cutting wheel onto arbor with knob and hex bolt Splash hood bracket Screws (2) Overflow drain Rip guide Miter ...guide Hex wrench Arbor wrench Washers (2) Operator's Manual WARNING: If any parts are damaged or missing do so could result in accidental starting and possible serious personal injury. Use of a product that have openings, ...
User Manual
Page 10
...° cuts. Your saw . Turn the on/off a small amount of tile until the wheel is clear of the cutting wheel before removing any part of the cutting wheel. Turn knob on the tile and mark the tape. TO TURN YOUR SAW OFF: Press the switch button down...
...° cuts. Your saw . Turn the on/off a small amount of tile until the wheel is clear of the cutting wheel before removing any part of the cutting wheel. Turn knob on the tile and mark the tape. TO TURN YOUR SAW OFF: Press the switch button down...

User Manual
Page 11
... Turn the on material. Tip up to full speed and wait for the cutting wheel to come to get wet before removing any part of the material. NOTE: Make sure bevel table is made by holding the workpiece securely against the miter guide. Using a marker or grease pencil...plate. Use first notches in place. Adjust miter guide to desired angle, using angle scale, and tighten securely with the material at any part of the material. 11 - TO MAKE A MITER CUT See Figure 15, page 16. This can be controlled by two separate cuts. Beveled 22.5° ...
... Turn the on material. Tip up to full speed and wait for the cutting wheel to come to get wet before removing any part of the material. NOTE: Make sure bevel table is made by holding the workpiece securely against the miter guide. Using a marker or grease pencil...plate. Use first notches in place. Adjust miter guide to desired angle, using angle scale, and tighten securely with the material at any part of the material. 11 - TO MAKE A MITER CUT See Figure 15, page 16. This can be controlled by two separate cuts. Beveled 22.5° ...
User Manual
Page 12
... TILE CUTTING WHEEL For maximum performance and safety, it is recommended that you use . WARNING: Always wear eye protection with plastic parts. WARNING: Do not at your local dealer. LUBRICATION All of the bearings in possible serious injury. Additional cutting wheels of commercial ...use the 7 in serious personal injury. WARNING: Do not use only identical Ryobi replacement parts. Failure to damage from various types of the same high quality are available at any other parts may result in . English MAINTENANCE WARNING: When servicing, use cutting wheels rated...
... TILE CUTTING WHEEL For maximum performance and safety, it is recommended that you use . WARNING: Always wear eye protection with plastic parts. WARNING: Do not at your local dealer. LUBRICATION All of the bearings in possible serious injury. Additional cutting wheels of commercial ...use the 7 in serious personal injury. WARNING: Do not use only identical Ryobi replacement parts. Failure to damage from various types of the same high quality are available at any other parts may result in . English MAINTENANCE WARNING: When servicing, use cutting wheels rated...
User Manual 2
Page 3
...Pan Hd 2 58 080009019002 Switch Bezel 1 25 080009019054 Riving Knife 1 59 080009019710 Switch Assembly (Inc. MODEL NUMBER WS7211 The model number will be found on a plate attached to the housing. Key No. 36 1 2 080009019704 Miter ... Housing w/Labels (Inc. Always mention the model number in all correspondence regarding your TILE SAW or when ordering repair parts. No. Key Nos. 48, 52 and 56)......... 1 14 080009019024 Cover Plate 1 48 080009019900 Warning Label (English... (B 1 Operator's Manual 1 33 080009019010 Overflow Drain Assembly (Inc. RYOBI TILE SAW -
...Pan Hd 2 58 080009019002 Switch Bezel 1 25 080009019054 Riving Knife 1 59 080009019710 Switch Assembly (Inc. MODEL NUMBER WS7211 The model number will be found on a plate attached to the housing. Key No. 36 1 2 080009019704 Miter ... Housing w/Labels (Inc. Always mention the model number in all correspondence regarding your TILE SAW or when ordering repair parts. No. Key Nos. 48, 52 and 56)......... 1 14 080009019024 Cover Plate 1 48 080009019900 Warning Label (English... (B 1 Operator's Manual 1 33 080009019010 Overflow Drain Assembly (Inc. RYOBI TILE SAW -


