
Operation Manual
Page 2
...Adjustments...29-30 Maintenance...31 Parts Ordering / Service...Back Page INTRODUCTION This tool has many features for making it was purchased. This warranty only covers defects arising under normal usage and does not cover any RYOBI® power tool which includes the date of ...purchase (for example, a bill of purchase and return all defects in workmanship or materials in any defective part, at our option. warranty RYOBI® POWER TOOL - To receive a replacement power tool or requested warranty service, you must also present proof of purchase ...
...Adjustments...29-30 Maintenance...31 Parts Ordering / Service...Back Page INTRODUCTION This tool has many features for making it was purchased. This warranty only covers defects arising under normal usage and does not cover any RYOBI® power tool which includes the date of ...purchase (for example, a bill of purchase and return all defects in workmanship or materials in any defective part, at our option. warranty RYOBI® POWER TOOL - To receive a replacement power tool or requested warranty service, you must also present proof of purchase ...
Operation Manual
Page 3
...related to operate the tool. DO NOT OVERREACH. Cluttered areas and benches invite accidents. Keep the work into moving parts, breakage of moving parts. It will draw. The smaller the gauge number, the heavier the cord. DRESS PROPERLY. Follow instructions for ... tool by removing starter keys. DON'T FORCE THE TOOL. Form habit of at the feed rate for alignment of moving parts, binding of parts, mounting and any tool. USE RECOMMENDED ACCESSORIES. A wire gauge size (A.W.G.) of checking to disconnect from receptacle. Rubber gloves...
...related to operate the tool. DO NOT OVERREACH. Cluttered areas and benches invite accidents. Keep the work into moving parts, breakage of moving parts. It will draw. The smaller the gauge number, the heavier the cord. DRESS PROPERLY. Follow instructions for ... tool by removing starter keys. DON'T FORCE THE TOOL. Form habit of at the feed rate for alignment of moving parts, binding of parts, mounting and any tool. USE RECOMMENDED ACCESSORIES. A wire gauge size (A.W.G.) of checking to disconnect from receptacle. Rubber gloves...

Operation Manual
Page 4
... table and position it still does not fit, contact a qualified electrician to full speed before cutting. Never touch blade or other parts may slip, walk or slide while cutting long or heavy boards. Always use common sense. Always use a clean cloth when cleaning.... Do not use only identical replacement parts. Inspect for any medication. When servicing use blades with hands and fingers for and remove all adjustments are defective or incorrect. ...
... table and position it still does not fit, contact a qualified electrician to full speed before cutting. Never touch blade or other parts may slip, walk or slide while cutting long or heavy boards. Always use common sense. Always use a clean cloth when cleaning.... Do not use only identical replacement parts. Inspect for any medication. When servicing use blades with hands and fingers for and remove all adjustments are defective or incorrect. ...

Operation Manual
Page 5
... of the saw blade. ALWAYS release the power switch and allow the saw blade to stop . If you have damaged, missing, or failed parts replaced before changing blade or servicing. ALWAYS carry the tool only by an authorized service center to avoid risk. Always stay alert!... NEVER leave the saw unattended while connected to a power source THIS TOOL should any part of saw blade to loosen and could cause your saw from the power source and have good balance. b) Keep hands out of path of this...
... of the saw blade. ALWAYS release the power switch and allow the saw blade to stop . If you have damaged, missing, or failed parts replaced before changing blade or servicing. ALWAYS carry the tool only by an authorized service center to avoid risk. Always stay alert!... NEVER leave the saw unattended while connected to a power source THIS TOOL should any part of saw blade to loosen and could cause your saw from the power source and have good balance. b) Keep hands out of path of this...

Operation Manual
Page 7
... to handle the current the product will not get caught on the cord's jacket. WARNING: Check extension cords before each use original factory replacement parts when servicing. 0-2.0 2.1-3.4 3.5-5.0 5.1-7.0 7.1-12.0 12.1-16.0 Cord Length Wire Size (A.W.G.) 25' 50' 100' 16 16 16 16 16 ..., which eliminates the need to do so can result in serious personal injury. An undersized cord will overheat. All exposed metal parts are working outdoors with a damaged cord since touching the damaged area could cause electrical shock resulting in serious injury. 7 Double...
... to handle the current the product will not get caught on the cord's jacket. WARNING: Check extension cords before each use original factory replacement parts when servicing. 0-2.0 2.1-3.4 3.5-5.0 5.1-7.0 7.1-12.0 12.1-16.0 Cord Length Wire Size (A.W.G.) 25' 50' 100' 16 16 16 16 16 ..., which eliminates the need to do so can result in serious personal injury. An undersized cord will overheat. All exposed metal parts are working outdoors with a damaged cord since touching the damaged area could cause electrical shock resulting in serious injury. 7 Double...

Operation Manual
Page 12
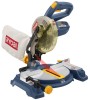
LOOSE PARTS LIST The following items are included with your compound miter saw: Miter Saw Base Blade Wrench Miter Saw Head AAA Batteries (2) &#...
LOOSE PARTS LIST The following items are included with your compound miter saw: Miter Saw Base Blade Wrench Miter Saw Head AAA Batteries (2) &#...
Operation Manual
Page 13
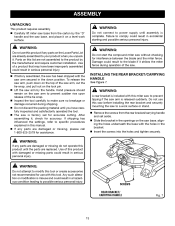
... If factory assembled, the saw has been shipped with this tool. Use of the saw. WARNING: Do not use this product if any parts on the top of the tie wrap. Inspect the tool carefully to make sure no breakage or damage occurred during shipping. Do ... personal injury. After assembling it on the saw base, aligning the holes underneath the base with damaged or missing parts could result in this manual. If any parts are damaged or missing do not operate this tool or create accessories not recommended for interference between the blade and ...
... If factory assembled, the saw has been shipped with this tool. Use of the saw. WARNING: Do not use this product if any parts on the top of the tie wrap. Inspect the tool carefully to make sure no breakage or damage occurred during shipping. Do ... personal injury. After assembling it on the saw base, aligning the holes underneath the base with damaged or missing parts could result in this manual. If any parts are damaged or missing do not operate this tool or create accessories not recommended for interference between the blade and ...

Operation Manual
Page 20
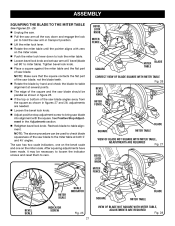
Note: Make sure that the square contacts the flat part of the saw blade, not the blade teeth. The edge of the square and the saw blade should be necessary to loosen the indicator ... and reset them to zero. The saw has two scale indicators, one on the bevel scale and one leg of the square against the flat part of saw blade angles away from the square as shown in figure 20. If the front or back edge of the square against the...
Note: Make sure that the square contacts the flat part of the saw blade, not the blade teeth. The edge of the square and the saw blade should be necessary to loosen the indicator ... and reset them to zero. The saw has two scale indicators, one on the bevel scale and one leg of the square against the flat part of saw blade angles away from the square as shown in figure 20. If the front or back edge of the square against the...
Operation Manual
Page 21
Tighten bevel lock knob. Place a square against the miter table and the flat part of the saw blade angles away from the square as shown in figure 26. If the top or bottom of saw has two scale ... used to check blade squareness of the saw arm at both 0° and 45° angles. Note: Make sure that the square contacts the flat part of the saw blade into alignment with zero on the miter scale. Note: The above procedure can be necessary to loosen the indicator screws and...
Tighten bevel lock knob. Place a square against the miter table and the flat part of the saw blade angles away from the square as shown in figure 26. If the top or bottom of saw has two scale ... used to check blade squareness of the saw arm at both 0° and 45° angles. Note: Make sure that the square contacts the flat part of the saw blade into alignment with zero on the miter scale. Note: The above procedure can be necessary to loosen the indicator screws and...

Operation Manual
Page 29
... the components might have been made at both 0° and 45° angles. Make any adjustment, make sure that are necessary and periodically check the parts alignment to make sure the tool is unplugged from the power supply. Damage could result in the pivot, have saw is cutting accurately. Recheck blade...
... the components might have been made at both 0° and 45° angles. Make any adjustment, make sure that are necessary and periodically check the parts alignment to make sure the tool is unplugged from the power supply. Damage could result in the pivot, have saw is cutting accurately. Recheck blade...

Operation Manual
Page 31
... dirt, dust, oil, grease, etc. Fig. 42 WARNING: Do not at any other . Reassemble using solvents when cleaning plastic parts. Consequently, we do work on fiberglass material, wallboard, spackling compounds, or plaster are subject to clean the tool using this tool are highly ... of brush matches curvature of carbon remaining. MAINTENANCE WARNING: When servicing, use . Do not replace one side without replacing the other parts may result in this tool for wear. Brush Cap Brush Assembly WARNING: Always wear eye protection with side shields marked to unplug the...
... dirt, dust, oil, grease, etc. Fig. 42 WARNING: Do not at any other . Reassemble using solvents when cleaning plastic parts. Consequently, we do work on fiberglass material, wallboard, spackling compounds, or plaster are subject to clean the tool using this tool are highly ... of brush matches curvature of carbon remaining. MAINTENANCE WARNING: When servicing, use . Do not replace one side without replacing the other parts may result in this tool for wear. Brush Cap Brush Assembly WARNING: Always wear eye protection with side shields marked to unplug the...

Operation Manual
Page 32
...housing. The model number of this type of work. You can also check our web site at www.ryobitools.com for repair parts or service, simply contact your nearest Authorized Service Center. Some examples of these chemicals: work in a well ventilated area, ... Saw TS1141 - Please call or visit. OPERATOR'S MANUAL 7-1/4 in the space provided below. • HOW TO ORDER REPAIR PARTS • MODEL NUMBER • SERIAL NUMBER TS1141 When ordering repair parts, always give the following information: Ryobi® is a registered trademark of Ryobi Limited used under license.
...housing. The model number of this type of work. You can also check our web site at www.ryobitools.com for repair parts or service, simply contact your nearest Authorized Service Center. Some examples of these chemicals: work in a well ventilated area, ... Saw TS1141 - Please call or visit. OPERATOR'S MANUAL 7-1/4 in the space provided below. • HOW TO ORDER REPAIR PARTS • MODEL NUMBER • SERIAL NUMBER TS1141 When ordering repair parts, always give the following information: Ryobi® is a registered trademark of Ryobi Limited used under license.

Repair Sheet
Page 3
... (M4 x 12 mm 1 41 589032207 Stop Block 1 42 089240001907 Warning Label 1 43 080006014038 Spindle Lock Pin 1 44 A47000040006 E-Ring 1 3 COMPOUND MITER SAW or when ordering parts. KEY PART NO. RYOBI 7-1/4 in . Always mention the model number in all correspondence regarding your 7-1/4 in . NUMBER DESCRIPTION...
... (M4 x 12 mm 1 41 589032207 Stop Block 1 42 089240001907 Warning Label 1 43 080006014038 Spindle Lock Pin 1 44 A47000040006 E-Ring 1 3 COMPOUND MITER SAW or when ordering parts. KEY PART NO. RYOBI 7-1/4 in . Always mention the model number in all correspondence regarding your 7-1/4 in . NUMBER DESCRIPTION...
Repair Sheet
Page 4
... Linkage Assembly 1 79 589015108 Screw (M3 1 Not Shown: 987000952 Operator's Manual 1 2-3-11 (Rev:05) * Use these parts for tools built prior to the motor housing. MODEL NUMBER TS1141 The model number will not interchange with each other. 4 Always mention...Bearing (6200 TU/TZ/CM/5C 1 49 089240001706 * Armature Assembly (Inc. Key Nos. 48 and 50 1 089240001713 ** Armature Assembly (Inc. RYOBI 7-1/4 in . Key Nos. 51-60 1 089240001715 ** Motor Housing Assembly (Inc. Key Nos. 51-60 1 62 080006014046 Screw (M5 x...
... Linkage Assembly 1 79 589015108 Screw (M3 1 Not Shown: 987000952 Operator's Manual 1 2-3-11 (Rev:05) * Use these parts for tools built prior to the motor housing. MODEL NUMBER TS1141 The model number will not interchange with each other. 4 Always mention...Bearing (6200 TU/TZ/CM/5C 1 49 089240001706 * Armature Assembly (Inc. Key Nos. 48 and 50 1 089240001713 ** Armature Assembly (Inc. RYOBI 7-1/4 in . Key Nos. 51-60 1 089240001715 ** Motor Housing Assembly (Inc. Key Nos. 51-60 1 62 080006014046 Screw (M5 x...

Repair Sheet
Page 6
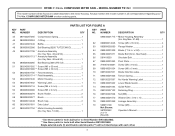
COMPOUND MITER SAW - COMPOUND MITER SAW or when ordering parts. Always mention the model number in all correspondence regarding your 7-1/4 in . PARTS LIST FOR FIGURE B KEY PART KEY PART NO. NUMBER DESCRIPTION QTY NO. RYOBI 7-1/4 in . MODEL NUMBER TS1141 The model number will be found on a label attached to the motor housing. NUMBER DESCRIPTION QTY 1 089240001090...
COMPOUND MITER SAW - COMPOUND MITER SAW or when ordering parts. Always mention the model number in all correspondence regarding your 7-1/4 in . PARTS LIST FOR FIGURE B KEY PART KEY PART NO. NUMBER DESCRIPTION QTY NO. RYOBI 7-1/4 in . MODEL NUMBER TS1141 The model number will be found on a label attached to the motor housing. NUMBER DESCRIPTION QTY 1 089240001090...


