
Operator's Manual
Page 3
..., you can reduce or eliminate the element of surprise. Sudden surprise contributes to keep your tool. Fatigue causes carelessness. Never operate a chain saw when you should be hit while you maintain control of the saw is hot and humid, heavy work area, secure footing, and...; Heavy protective clothing may increase operator fatigue, which could be scheduled for two-handed use replacement bars and chains specified by the manufacturer or the equivalent. Do not operate a chain saw , which you to follow all instructions listed below, may result in some cases may...
..., you can reduce or eliminate the element of surprise. Sudden surprise contributes to keep your tool. Fatigue causes carelessness. Never operate a chain saw when you should be hit while you maintain control of the saw is hot and humid, heavy work area, secure footing, and...; Heavy protective clothing may increase operator fatigue, which could be scheduled for two-handed use replacement bars and chains specified by the manufacturer or the equivalent. Do not operate a chain saw , which you to follow all instructions listed below, may result in some cases may...

Operator's Manual
Page 4
... tension in the instruction manual and all instructions may catch the saw chain and be whipped toward you or pull you have a fire extinguisher available when using chain saw. Use only the replacement guide bars and low kickback chains specified for the saw. ■ Do not adapt the powerhead... the user's hands due to rentals as well as a Class 1C (or Class 2C) saw ; As an additional safety precaution, apply the chain brake prior to setting down the saw. ■ Use extreme caution when cutting small-size brush and saplings because slender material may result in...
... tension in the instruction manual and all instructions may catch the saw chain and be whipped toward you or pull you have a fire extinguisher available when using chain saw. Use only the replacement guide bars and low kickback chains specified for the saw. ■ Do not adapt the powerhead... the user's hands due to rentals as well as a Class 1C (or Class 2C) saw ; As an additional safety precaution, apply the chain brake prior to setting down the saw. ■ Use extreme caution when cutting small-size brush and saplings because slender material may result in...

Operator's Manual
Page 8
... nose of the top area of the guide bar. Notching Undercut A notch cut . It normally contains the throttle. Replacement Saw Chain A chain that complies with the kickback performance requirements of ANSI B175.1 when tested with the kickback performance requirements of ANSI B175.1 when...can occur when the moving saw . It may not meet the ANSI performance requirements when used to reduce kickback significantly. Low-Kickback Chain A chain that may be provided on the front handle, and sometimes employed as a log or branch. Normal Cutting Position Those positions assumed in...
... nose of the top area of the guide bar. Notching Undercut A notch cut . It normally contains the throttle. Replacement Saw Chain A chain that complies with the kickback performance requirements of ANSI B175.1 when tested with the kickback performance requirements of ANSI B175.1 when...can occur when the moving saw . It may not meet the ANSI performance requirements when used to reduce kickback significantly. Low-Kickback Chain A chain that may be provided on the front handle, and sometimes employed as a log or branch. Normal Cutting Position Those positions assumed in...

Operator's Manual
Page 11
...can result in a hazardous condition leading to find some slight lubricant residue on the saw has been fully factory tested. PACKING LIST Chain Saw Scabbard Combination Wrench 2-Cycle Engine Lubricant Case Operator's Manual WARNING: If any acces- Any such alteration or modification is not ...until you careless. It is not completely assembled or if any parts are included. n Carefully remove the product and any parts are replaced. n Do not discard the packing material until the parts are damaged or missing do so could result in serious personal injury. APPLICATIONS...
...can result in a hazardous condition leading to find some slight lubricant residue on the saw has been fully factory tested. PACKING LIST Chain Saw Scabbard Combination Wrench 2-Cycle Engine Lubricant Case Operator's Manual WARNING: If any acces- Any such alteration or modification is not ...until you careless. It is not completely assembled or if any parts are included. n Carefully remove the product and any parts are replaced. n Do not discard the packing material until the parts are damaged or missing do so could result in serious personal injury. APPLICATIONS...
Operator's Manual
Page 13
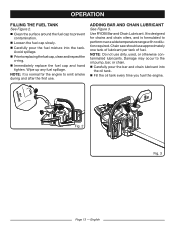
...dilution required. n Loosen the fuel cap slowly. n Immediately replace the fuel cap and hand tighten. n Fill the oil tank every time you fuel the engine. Avoid spillage. NOTE: It is normal for chains and chain oilers, and is designed for the engine to emit smoke during...first use. English n Carefully pour the fuel mixture into the oil tank. Chain saw should use dirty, used, or otherwise contaminated lubricants. Fig. 2 Fig. 3 Page 13 - Use RYOBI Bar and Chain Lubricant. ADDING BAR AND CHAIN LUBRICANT See Figure 3. OPERATION FILLING THE FUEL TANK See Figure 2.
...dilution required. n Loosen the fuel cap slowly. n Immediately replace the fuel cap and hand tighten. n Fill the oil tank every time you fuel the engine. Avoid spillage. NOTE: It is normal for chains and chain oilers, and is designed for the engine to emit smoke during...first use. English n Carefully pour the fuel mixture into the oil tank. Chain saw should use dirty, used, or otherwise contaminated lubricants. Fig. 2 Fig. 3 Page 13 - Use RYOBI Bar and Chain Lubricant. ADDING BAR AND CHAIN LUBRICANT See Figure 3. OPERATION FILLING THE FUEL TANK See Figure 2.

Operator's Manual
Page 25
...thrown into your eyes and other parts may create a hazard or cause product damage. REPLACING THE GUIDE BAR AND CHAIN See Figures 34 - 43. DANGER: Never start the engine before installing the guide bar, chain, clutch cover, and clutch drum. English Failure to remove dirt, dust, lubricant,...understand all these parts in place, the clutch can damage, weaken or destroy plastic which may be damaged by their use only identical replacement parts. MAINTENANCE WARNING: When servicing, use . RUN POSITION WARNING: Always wear eye protection with side shields marked to possible serious ...
...thrown into your eyes and other parts may create a hazard or cause product damage. REPLACING THE GUIDE BAR AND CHAIN See Figures 34 - 43. DANGER: Never start the engine before installing the guide bar, chain, clutch cover, and clutch drum. English Failure to remove dirt, dust, lubricant,...understand all these parts in place, the clutch can damage, weaken or destroy plastic which may be damaged by their use only identical replacement parts. MAINTENANCE WARNING: When servicing, use . RUN POSITION WARNING: Always wear eye protection with side shields marked to possible serious ...

Operator's Manual
Page 26
...and lower edges angled away from the bar. CUTTERS CHAIN ROTATION CHAIN DRIVE LINKS Fig. 37 BAR GROOVE CHAIN DRIVE LINKS Fig. 38 Page 26 - n Remove the old chain from the guide bar. If they face backwards, turn the loop over. n Replace the outer guide bar plate ensuring that the bar ... not set by pulling the chain brake lever/hand guard towards the front handle to the run position. NOTE: When replacing the guide bar and chain, always use the specified bar and chain listed in the Bar and Chain Combinations section later in the long slot of chain rotation. n Remove the clutch...
...and lower edges angled away from the bar. CUTTERS CHAIN ROTATION CHAIN DRIVE LINKS Fig. 37 BAR GROOVE CHAIN DRIVE LINKS Fig. 38 Page 26 - n Remove the old chain from the guide bar. If they face backwards, turn the loop over. n Replace the outer guide bar plate ensuring that the bar ... not set by pulling the chain brake lever/hand guard towards the front handle to the run position. NOTE: When replacing the guide bar and chain, always use the specified bar and chain listed in the Bar and Chain Combinations section later in the long slot of chain rotation. n Remove the clutch...

Operator's Manual
Page 27
... Fig. 39 Page 27 - Lift the tip of the guide bar, the chain is not set. n Fingertighten the bar mounting nuts. n Remove all slack from the chain by hand without binding. MAINTENANCE n Replace the clutch cover and bar mounting nuts. The chain is correctly tensioned when there is no sag on the underside of...
... Fig. 39 Page 27 - Lift the tip of the guide bar, the chain is not set. n Fingertighten the bar mounting nuts. n Remove all slack from the chain by hand without binding. MAINTENANCE n Replace the clutch cover and bar mounting nuts. The chain is correctly tensioned when there is no sag on the underside of...

Operator's Manual
Page 29
... for wear or damage when replacing the chain. If signs of severe kickback. NOTE: Inspect the drive sprocket for kickback. • Not low enough decreases cutting ability. This fast-cutting chain provides kickback reduction when properly maintained. The chain requires sharpening when the wood ... wear or damage are present in the areas indicated, have the drive sprocket replaced by mud or sand on the wood, have the saw chain sharpened by an authorized service center or replace with a recommended low-kickback chain. ≈ .050 in. ≈ .050 in . English Fig. ...
... for wear or damage when replacing the chain. If signs of severe kickback. NOTE: Inspect the drive sprocket for kickback. • Not low enough decreases cutting ability. This fast-cutting chain provides kickback reduction when properly maintained. The chain requires sharpening when the wood ... wear or damage are present in the areas indicated, have the drive sprocket replaced by mud or sand on the wood, have the saw chain sharpened by an authorized service center or replace with a recommended low-kickback chain. ≈ .050 in. ≈ .050 in . English Fig. ...

Operator's Manual
Page 30
... top plate of the bar. Always wear protective gloves when performing maintenance to the chain to sharpening. n Keep the file level with a wire brush. n Tension the chain prior to prevent serious personal injury. Refer to replace or repair a damaged chain can cause excessive engine speed during cutting, which may result in the opposite direction...
... top plate of the bar. Always wear protective gloves when performing maintenance to the chain to sharpening. n Keep the file level with a wire brush. n Tension the chain prior to prevent serious personal injury. Refer to replace or repair a damaged chain can cause excessive engine speed during cutting, which may result in the opposite direction...

Operator's Manual
Page 32
... in the recessed slot in the lubricating hole. English The bar should be cleaned every day of the following faults should be replaced: n Wear inside the bar rails that the lubrication holes and chain groove are free from impurities. MAINTENANCE MAINTAINING THE GUIDE BAR See Figure 58. CAUTION: Make sure the...; Fig. 59 Fig. 60 MAINTAINING THE SAFE-T-TIP® NOSE GUARD See Figures 59 - 60. Turn the guide bar and check that permits the chain to distribute the wear for wear and damage. WARNING: Although the guide bar comes with wrench until snug. CAUTION: Make sure the...
... in the recessed slot in the lubricating hole. English The bar should be cleaned every day of the following faults should be replaced: n Wear inside the bar rails that the lubrication holes and chain groove are free from impurities. MAINTENANCE MAINTAINING THE GUIDE BAR See Figure 58. CAUTION: Make sure the...; Fig. 59 Fig. 60 MAINTAINING THE SAFE-T-TIP® NOSE GUARD See Figures 59 - 60. Turn the guide bar and check that permits the chain to distribute the wear for wear and damage. WARNING: Although the guide bar comes with wrench until snug. CAUTION: Make sure the...
Operator's Manual
Page 33
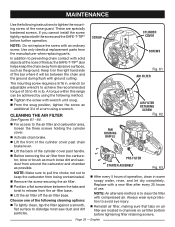
..., rinse, and let dry completely. n Activate chain brake. Keep it on air filter bottom before further operation. n Tighten the screw with an ordinary screw. Always wear eye protection to dislodge most saw dust and dirt particles. Replace with compressed air. n Reinstall air filter, making... to avoid eye injury. n Remove the screw securing the air filter. SCREWS In addition to preventing chain contact with ground cutting. If you cannot install the screw tightly, replace both the screw and the SAFE-T-TIP® before tightening filter retaining screws. FAN HOUSING BAFFLE...
..., rinse, and let dry completely. n Activate chain brake. Keep it on air filter bottom before further operation. n Tighten the screw with an ordinary screw. Always wear eye protection to dislodge most saw dust and dirt particles. Replace with compressed air. n Reinstall air filter, making... to avoid eye injury. n Remove the screw securing the air filter. SCREWS In addition to preventing chain contact with ground cutting. If you cannot install the screw tightly, replace both the screw and the SAFE-T-TIP® before tightening filter retaining screws. FAN HOUSING BAFFLE...

Operator's Manual
Page 36
... Keep away from carburetor. Spark arrestors may be certified. n Remove the clutch cover and clean the chain brake components. Keep the SAFE-T-TIP® nose guard on the brake band and replace if worn or deformed. Fig. 72 n Abide by all Federal and local regulations for the safe ... cannot be in different locations depending on the model purchased. English The band thickness should not be cleaned or replaced every 50 hours or yearly to ensure proper performance of a chain brake to children. n Run the engine until it in a well-ventilated place that could become stale and ...
... Keep away from carburetor. Spark arrestors may be certified. n Remove the clutch cover and clean the chain brake components. Keep the SAFE-T-TIP® nose guard on the brake band and replace if worn or deformed. Fig. 72 n Abide by all Federal and local regulations for the safe ... cannot be in different locations depending on the model purchased. English The band thickness should not be cleaned or replaced every 50 hours or yearly to ensure proper performance of a chain brake to children. n Run the engine until it in a well-ventilated place that could become stale and ...

Operator's Manual
Page 38
...) properly. "L" (Low Jet) adjustment. Refer to RUN position (pushed in the RUN ( l ) position.] No spark. Move choke lever to Spark Plug Replacement earlier in . Clean spark arrestor screen. English This will not start , move choke lever to RUN ( l ) position. "H" (High Jet) ly at RUN... Cleaning the Air Filter in the Maintenance section of this manual. Page 38 - chain gauge Length of Bar Guide Bar Part Number 20 in. 310629001 18 in. 310628001 Chain Part Number 900920027 901430001 Drive Links 78 link 72 link TROUBLESHOOTING Problem Possible Cause Solution...
...) properly. "L" (Low Jet) adjustment. Refer to RUN position (pushed in the RUN ( l ) position.] No spark. Move choke lever to Spark Plug Replacement earlier in . Clean spark arrestor screen. English This will not start , move choke lever to RUN ( l ) position. "H" (High Jet) ly at RUN... Cleaning the Air Filter in the Maintenance section of this manual. Page 38 - chain gauge Length of Bar Guide Bar Part Number 20 in. 310629001 18 in. 310628001 Chain Part Number 900920027 901430001 Drive Links 78 link 72 link TROUBLESHOOTING Problem Possible Cause Solution...

Operator's Manual
Page 39
... section of guide bar while rotating tension adjustment dial. Guide bar and chain assembled incorrectly. Tip of this manual. Release chain brake. Inspect guide bar and chain for drive sprocket replacement. Raise tip of this manual. Oiler is present, the chain may be dull or bar may be filled every time fuel tank is...
... section of guide bar while rotating tension adjustment dial. Guide bar and chain assembled incorrectly. Tip of this manual. Release chain brake. Inspect guide bar and chain for drive sprocket replacement. Raise tip of this manual. Oiler is present, the chain may be dull or bar may be filled every time fuel tank is...

Operator's Manual
Page 40
..., Guide Bars, Saw Chains Techtronic Industries North America, Inc., reserves the right to change or improve the design of any RYOBI® brand outdoor product without assuming any obligation to be defective in material or workmanship will be repaired or replaced without charge for Techtronic ... Techtronic Industries North America, Inc., warrants to the original retail purchaser that this RYOBI® brand outdoor product is free from defect in material and workmanship and agrees to repair or replace, at Techtronic Industries North America, Inc.'s, discretion, any defective product free of ...
..., Guide Bars, Saw Chains Techtronic Industries North America, Inc., reserves the right to change or improve the design of any RYOBI® brand outdoor product without assuming any obligation to be defective in material or workmanship will be repaired or replaced without charge for Techtronic ... Techtronic Industries North America, Inc., warrants to the original retail purchaser that this RYOBI® brand outdoor product is free from defect in material and workmanship and agrees to repair or replace, at Techtronic Industries North America, Inc.'s, discretion, any defective product free of ...


