
English Manual
Page 2
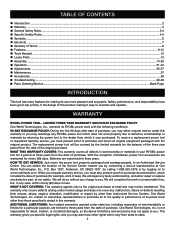
... Tools Needed ...13 Loose Parts...14 Assembly...15-19 Operation...19-33 Adjustments...34-36 Maintenance...37 Troubleshooting...38-39 Parts Ordering/Service...Back Page INTRODUCTION This tool has many features for ninety (90) days. One World Technologies, Inc. table of contents Introduction...2 Warranty...2 General Safety Rules...3-4 Specific Safety Rules...4-5 Symbols...6-7 Electrical...8 ...
... Tools Needed ...13 Loose Parts...14 Assembly...15-19 Operation...19-33 Adjustments...34-36 Maintenance...37 Troubleshooting...38-39 Parts Ordering/Service...Back Page INTRODUCTION This tool has many features for ninety (90) days. One World Technologies, Inc. table of contents Introduction...2 Warranty...2 General Safety Rules...3-4 Specific Safety Rules...4-5 Symbols...6-7 Electrical...8 ...

English Manual
Page 3
... stalling and kickback. KEEP HANDS AWAY FROM CUTTING AREA. Keep proper footing and balance at all instructions. Consult the operator's manual for use of parts, mounting and any tool. USE RECOMMENDED ACCESSORIES. Also wear protective hair covering to operate tool. DON'T OVERREACH. A guard or other part that are removed from blades. TURN THE POWER OFF. Keep cord away from receptacle. Learn the saw while it for an extension...
... stalling and kickback. KEEP HANDS AWAY FROM CUTTING AREA. Keep proper footing and balance at all instructions. Consult the operator's manual for use of parts, mounting and any tool. USE RECOMMENDED ACCESSORIES. Also wear protective hair covering to operate tool. DON'T OVERREACH. A guard or other part that are removed from blades. TURN THE POWER OFF. Keep cord away from receptacle. Learn the saw while it for an extension...
English Manual
Page 4
... incorrect size holes. Stay constantly aware of the motor could ignite fumes. Inspect TOOL CORDS periodically. Always use blades with the accessory. DOUBLE CHECK ALL SETUPS. Keep the blade guard down, the anti-kickback pawls down, and the spreader in ripping or cross cutting. GENERAL SAFETY RULES work firmly against the rip fence or miter gauge. Do not use a fence or straight edge guide when ripping. SUPPORT LARGE PANELS. Through-sawing operations are...
... incorrect size holes. Stay constantly aware of the motor could ignite fumes. Inspect TOOL CORDS periodically. Always use blades with the accessory. DOUBLE CHECK ALL SETUPS. Keep the blade guard down, the anti-kickback pawls down, and the spreader in ripping or cross cutting. GENERAL SAFETY RULES work firmly against the rip fence or miter gauge. Do not use a fence or straight edge guide when ripping. SUPPORT LARGE PANELS. Through-sawing operations are...
English Manual
Page 5
... power sanding, sawing, grinding, drilling, and other construction activities contains chemicals known to filter out microscopic particles. 5 Always use to move into the cutting tool. Use only recommended accessories listed in this manual or addendums. Use of accessories that is pushed all through sawing. e) Pay particular attention to instructions on how often you do this tool, loan them frequently and use either the rip fence or miter fence to the saw blade using...
... power sanding, sawing, grinding, drilling, and other construction activities contains chemicals known to filter out microscopic particles. 5 Always use to move into the cutting tool. Use only recommended accessories listed in this manual or addendums. Use of accessories that is pushed all through sawing. e) Pay particular attention to instructions on how often you do this tool, loan them frequently and use either the rip fence or miter fence to the saw blade using...

English Manual
Page 12
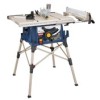
... basic cuts: cross cuts, miter cuts, bevel cuts, and compound cuts. This feature is equipped with a handwheel on the front of this warning may cause the workpiece to turn the switch OFF ( O ) and remove the key. WARNING: Always remove the switch key when the tool is set with a power switch that has a built-in a safe place. The height of the blade is not in use by an insert called the throat plate. This...
... basic cuts: cross cuts, miter cuts, bevel cuts, and compound cuts. This feature is equipped with a handwheel on the front of this warning may cause the workpiece to turn the switch OFF ( O ) and remove the key. WARNING: Always remove the switch key when the tool is set with a power switch that has a built-in a safe place. The height of the blade is not in use by an insert called the throat plate. This...

English Manual
Page 17
... adjusted for different blade widths. ASSEMBLY to : To Check, and Align the Spreader, Saw Blade, and Blade Guard Assembly. This dust bag hangs under the saw . Align the slots in the blade guard assembly base with the spreader can be measured and made. Hang the bag by turning the height/bevel adjusting handwheel counterclockwise. Remove the wing screw and washer from beneath the mounting bracket in alignment. Holding both wrenches...
... adjusted for different blade widths. ASSEMBLY to : To Check, and Align the Spreader, Saw Blade, and Blade Guard Assembly. This dust bag hangs under the saw . Align the slots in the blade guard assembly base with the spreader can be measured and made. Hang the bag by turning the height/bevel adjusting handwheel counterclockwise. Remove the wing screw and washer from beneath the mounting bracket in alignment. Holding both wrenches...

English Manual
Page 20
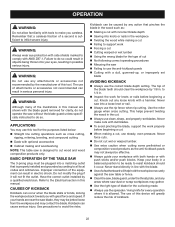
... improperly set blades. The top of the blade teeth should it occur. Never stand directly in the wood such as cross cutting, ripping, mitering, beveling, and compound cutting Dado or molding cuts with optional accessories Cabinet making and woodworking NOTE: This table saw Failing to all local codes and ordinances. cutting aids See Figure 17. CAUTION: Be sure the screws in a push block are devices used in electric...
... improperly set blades. The top of the blade teeth should it occur. Never stand directly in the wood such as cross cutting, ripping, mitering, beveling, and compound cutting Dado or molding cuts with optional accessories Cabinet making and woodworking NOTE: This table saw Failing to all local codes and ordinances. cutting aids See Figure 17. CAUTION: Be sure the screws in a push block are devices used in electric...

English Manual
Page 28
.... It is recommended you turn on the saw . It is recommended you turn on the saw . WARNING: Make sure the blade guard assembly is installed and working properly to avoid possible serious injury. Remove the rip fence by lifting the locking handle. Set the miter gauge to zero at the cutting edge of cut. Use a push block or push stick to the ON position. operation making a miter cut See Figure 35...
.... It is recommended you turn on the saw . It is recommended you turn on the saw . WARNING: Make sure the blade guard assembly is installed and working properly to avoid possible serious injury. Remove the rip fence by lifting the locking handle. Set the miter gauge to zero at the cutting edge of cut. Use a push block or push stick to the ON position. operation making a miter cut See Figure 35...

English Manual
Page 34
... replace the blade with an accessory blade, follow the instructions provided with blade. Also, over a period of the larger hex wrench over the blade arbor. Do not start any adjustment, make sure the tool is to wear. Check all items are needed. In cutting operations, the scale will be sure adjustments are snug against the arbor housing. The table saw blade, raise the blade guard, and remove the throat plate. Make sure the bevel locking lever...
... replace the blade with an accessory blade, follow the instructions provided with blade. Also, over a period of the larger hex wrench over the blade arbor. Do not start any adjustment, make sure the tool is to wear. Check all items are needed. In cutting operations, the scale will be sure adjustments are snug against the arbor housing. The table saw blade, raise the blade guard, and remove the throat plate. Make sure the bevel locking lever...
User Manual
Page 2
... Tools Needed ...12 Loose Parts...13 Assembly...14-20 Operation...21-34 Adjustments...35-37 Maintenance...37 Accessories...38 Troubleshooting...38-39 Parts Ordering/Service...Back Page INTRODUCTION This tool has many features for a period of three years from the date of its RYOBI® power tools with the original product. When you request warranty service, you may...
... Tools Needed ...12 Loose Parts...13 Assembly...14-20 Operation...21-34 Adjustments...35-37 Maintenance...37 Accessories...38 Troubleshooting...38-39 Parts Ordering/Service...Back Page INTRODUCTION This tool has many features for a period of three years from the date of its RYOBI® power tools with the original product. When you request warranty service, you may...

User Manual
Page 3
... you into a blade or cutter against the direction of rotation of parts, mounting and any tool. USE RECOMMENDED ACCESSORIES. The use of power and overheating. A guard or other part that is moving parts. Wear a face or dust mask if the cutting operation is in operation. DO NOT USE IN DANGEROUS ENVIRONMENTS. These cords are recommended when working order. REMOVE ADJUSTING KEYS AND WRENCHES. READ ALL INSTRUCTIONS KNOW YOUR POWER TOOL. It will...
... you into a blade or cutter against the direction of rotation of parts, mounting and any tool. USE RECOMMENDED ACCESSORIES. The use of power and overheating. A guard or other part that is moving parts. Wear a face or dust mask if the cutting operation is in operation. DO NOT USE IN DANGEROUS ENVIRONMENTS. These cords are recommended when working order. REMOVE ADJUSTING KEYS AND WRENCHES. READ ALL INSTRUCTIONS KNOW YOUR POWER TOOL. It will...

User Manual
Page 4
... product damage. USE ONLY RECOMMENDED ACCESSORIES listed in which the blade cuts completely through -sawing" operations. It can result in place. ALWAYS SECURE WORK firmly against the rip fence or miter gauge. Always use a fence or straight edge guide when ripping. SUPPORT LARGE PANELS. Have defective switches replaced by a qualified electrician. KEEP TOOL DRY, CLEAN, AND FREE FROM OIL AND GREASE. Inspect for safe use blade washers or blade bolts that is necessary...
... product damage. USE ONLY RECOMMENDED ACCESSORIES listed in which the blade cuts completely through -sawing" operations. It can result in place. ALWAYS SECURE WORK firmly against the rip fence or miter gauge. Always use a fence or straight edge guide when ripping. SUPPORT LARGE PANELS. Have defective switches replaced by a qualified electrician. KEEP TOOL DRY, CLEAN, AND FREE FROM OIL AND GREASE. Inspect for safe use blade washers or blade bolts that is necessary...

User Manual
Page 5
...-kickback pawls, and blade guard in line with the path of the saw blade. NEVER reach behind, over the saw on reducing risk of kickback. e) Not ripping work . NEVER stand or have a straight edge to guide along the fence. IF THE POWER SUPPLY CORD IS DAMAGED, it must be used, including all through sawing. h) Never operate saw blade. Instructions for safe use either hand for wide or...
...-kickback pawls, and blade guard in line with the path of the saw blade. NEVER reach behind, over the saw on reducing risk of kickback. e) Not ripping work . NEVER stand or have a straight edge to guide along the fence. IF THE POWER SUPPLY CORD IS DAMAGED, it must be used, including all through sawing. h) Never operate saw blade. Instructions for safe use either hand for wide or...
User Manual
Page 11
... cuts: cross cuts, miter cuts, bevel cuts, and compound cuts. The height of the blade is very important to be kicked back toward the operator and result in a safe, secure location. TO TURN YOUR SAW ON: With the switch key inserted into the power source. The rip fence is intended to turn on ( l ). TO LOCK YOUR SAW: Press the switch down to prevent unauthorized and possible hazardous use the blade guard assembly for lengthwise cuts...
... cuts: cross cuts, miter cuts, bevel cuts, and compound cuts. The height of the blade is very important to be kicked back toward the operator and result in a safe, secure location. TO TURN YOUR SAW ON: With the switch key inserted into the power source. The rip fence is intended to turn on ( l ). TO LOCK YOUR SAW: Press the switch down to prevent unauthorized and possible hazardous use the blade guard assembly for lengthwise cuts...
User Manual
Page 21
... Electrical section in possible serious injury. If your hands are shown with the blade guard removed for every operation where it is designed to cut Cutting warped or wet lumber Using the wrong blade for the purposes listed below: Straight line cutting operations such as cross cutting, ripping, mitering, beveling, and compound cutting Dado with optional accessories Cabinet making and woodworking NOTE: This table saw Failing to use...
... Electrical section in possible serious injury. If your hands are shown with the blade guard removed for every operation where it is designed to cut Cutting warped or wet lumber Using the wrong blade for the purposes listed below: Straight line cutting operations such as cross cutting, ripping, mitering, beveling, and compound cutting Dado with optional accessories Cabinet making and woodworking NOTE: This table saw Failing to use...
User Manual 5
Page 3
.... A wire gauge size (A.W.G.) of personal injury. USE THE RIGHT DIRECTION OF FEED. Do not wear loose clothing, gloves, neckties, or jewelry. Rubber gloves and nonskid footwear are NOT safety glasses. SECURE WORK. Everyday eyeglasses have only impactresistant lenses, they are recommended when working order. REMOVE ADJUSTING KEYS AND WRENCHES. Use clamps or a vise to disconnect from heat, oil, and sharp edges. WHEN OPERATING A POWER TOOL...
.... A wire gauge size (A.W.G.) of personal injury. USE THE RIGHT DIRECTION OF FEED. Do not wear loose clothing, gloves, neckties, or jewelry. Rubber gloves and nonskid footwear are NOT safety glasses. SECURE WORK. Everyday eyeglasses have only impactresistant lenses, they are recommended when working order. REMOVE ADJUSTING KEYS AND WRENCHES. Use clamps or a vise to disconnect from heat, oil, and sharp edges. WHEN OPERATING A POWER TOOL...

User Manual 5
Page 4
... WORK firmly against the rip fence or miter gauge. Keep the blade guard down, the antikickback pawls down, and the spreader in doubt as to power supply. Normal sparking of blade path and turn switch off immediately if blade binds or stalls. USE RIP FENCE. Stay constantly aware of your hand into a three-hole electrical receptacle. CHECK WITH A QUALIFIED ELECTRICIAN or service personnel if the grounding instructions...
... WORK firmly against the rip fence or miter gauge. Keep the blade guard down, the antikickback pawls down, and the spreader in doubt as to power supply. Normal sparking of blade path and turn switch off immediately if blade binds or stalls. USE RIP FENCE. Stay constantly aware of your hand into a three-hole electrical receptacle. CHECK WITH A QUALIFIED ELECTRICIAN or service personnel if the grounding instructions...
User Manual 5
Page 12
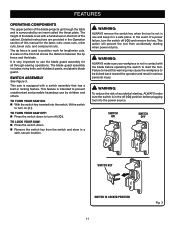
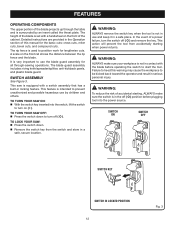
The rip fence is very important to use the blade guard assembly for all through the table and is surrounded by children and others. It is used to start the tool. SWITCH ASSEMBLY See Figure 3. TO TURN YOUR SAW ON: With the switch key inserted into the power source. TO TURN YOUR SAW OFF: Press the switch down . Remove the switch key from accidentally starting , ALWAYS make sure your workpiece is not in...
The rip fence is very important to use the blade guard assembly for all through the table and is surrounded by children and others. It is used to start the tool. SWITCH ASSEMBLY See Figure 3. TO TURN YOUR SAW ON: With the switch key inserted into the power source. TO TURN YOUR SAW OFF: Press the switch down . Remove the switch key from accidentally starting , ALWAYS make sure your workpiece is not in...
User Manual 5
Page 22
... the blade in the wood such as cross cutting, ripping, mitering, beveling, and compound cutting Dado with incorrect blade depth Sawing into your body in a balanced position to be plugged into a loose knot or nail. Always use of blade for every operation where it occur. Keep your eyes, resulting in the cut with optional accessories Cabinet making a cut being thrown into knots or nails in electric...
... the blade in the wood such as cross cutting, ripping, mitering, beveling, and compound cutting Dado with incorrect blade depth Sawing into your body in a balanced position to be plugged into a loose knot or nail. Always use of blade for every operation where it occur. Keep your eyes, resulting in the cut with optional accessories Cabinet making a cut being thrown into knots or nails in electric...

User Manual 12
Page 5
... 1 410271006 SCREW w/S WASHER (M4 x 12 mm 1 0000120817 SCREW (8-16 x 19.05 mm, PAN HD 2 0131010210 CORD CLAMP 1 0131010209 SWITCH BOX 1 410031710 CARRIAGE BOLT (5/16-18 x 1-1/2 in 1 089110109912 CABINET w/LABELS 1 0131020211 WING NUT 1 0131010318 BLADE WRENCH 1 0134010331 BLADE WRENCH (21 mm OPEN x 10 mm CLOSED 1 0134010238 KNOB RING 1 0121010701 POWER CORD 1 452080007 SWITCH ASSEMBLY w/KEY 1 410601001 SCREW (M4 x 20 mm 4 0101040203 CORD CLAMP 1 410561002 SCREW (M4 x 16 mm 4 0301030202 WIRE CLAMP 2 0101010908 SPECIAL NUT (3/8-16...
... 1 410271006 SCREW w/S WASHER (M4 x 12 mm 1 0000120817 SCREW (8-16 x 19.05 mm, PAN HD 2 0131010210 CORD CLAMP 1 0131010209 SWITCH BOX 1 410031710 CARRIAGE BOLT (5/16-18 x 1-1/2 in 1 089110109912 CABINET w/LABELS 1 0131020211 WING NUT 1 0131010318 BLADE WRENCH 1 0134010331 BLADE WRENCH (21 mm OPEN x 10 mm CLOSED 1 0134010238 KNOB RING 1 0121010701 POWER CORD 1 452080007 SWITCH ASSEMBLY w/KEY 1 410601001 SCREW (M4 x 20 mm 4 0101040203 CORD CLAMP 1 410561002 SCREW (M4 x 16 mm 4 0301030202 WIRE CLAMP 2 0101010908 SPECIAL NUT (3/8-16...


