
English Manual
Page 5
... (work thrown back toward you loan someone this manual or addendums. Use of accessories that no obstructions will interfere with either the rip fence or miter fence to position and guide the work. NEVER stand or have any work before transporting saw blade. SAVE THESE ...behind, over, or within three inches of the blade or cutter with safe operation BEFORE performing any part of blade pinching and kickback, always support large panels. Remove all fences and auxiliary tables before it must always be replaced only by the manufacturer or by : a) Keeping...
... (work thrown back toward you loan someone this manual or addendums. Use of accessories that no obstructions will interfere with either the rip fence or miter fence to position and guide the work. NEVER stand or have any work before transporting saw blade. SAVE THESE ...behind, over, or within three inches of the blade or cutter with safe operation BEFORE performing any part of blade pinching and kickback, always support large panels. Remove all fences and auxiliary tables before it must always be replaced only by the manufacturer or by : a) Keeping...

English Manual
Page 9
... in a non-through cut removing a wedge from a block so the end (or part of the end) is angled rather than 90°. Resin A sticky, sap-based substance that serves as a guide for narrow ripping operations. Revolutions Per Minute (RPM) The number of turns completed by the blade in ... dropped into the tool first. Arbor The shaft on which the operation is being done. As it securely against the table or fence during any ripping operation. Cross Cut A cutting or shaping operation made with the workpiece at 90°. Featherboard A device used to help keep the...
... in a non-through cut removing a wedge from a block so the end (or part of the end) is angled rather than 90°. Resin A sticky, sap-based substance that serves as a guide for narrow ripping operations. Revolutions Per Minute (RPM) The number of turns completed by the blade in ... dropped into the tool first. Arbor The shaft on which the operation is being done. As it securely against the table or fence during any ripping operation. Cross Cut A cutting or shaping operation made with the workpiece at 90°. Featherboard A device used to help keep the...

English Manual
Page 11
...keep the guard down over the blade for a cross cut . WARNING: Do not use the spreader for adjustments. BLADE GUARD - RIP FENCE - A metal fence guides the workpiece and is inaccessible to children and others not qualified to use blades rated less than the saw table, the easy-... angle of the cabinet. SPREADER - FEATURES KNOW YOUR TABLE SAW See Figure 2. To cut . The rip fence is adjusted with all through-sawing operations. The anti-kickback pawls (also a part of the project you are toothed plates mounted on the front of this operator's manual as well as ...
...keep the guard down over the blade for a cross cut . WARNING: Do not use the spreader for adjustments. BLADE GUARD - RIP FENCE - A metal fence guides the workpiece and is inaccessible to children and others not qualified to use blades rated less than the saw table, the easy-... angle of the cabinet. SPREADER - FEATURES KNOW YOUR TABLE SAW See Figure 2. To cut . The rip fence is adjusted with all through-sawing operations. The anti-kickback pawls (also a part of the project you are toothed plates mounted on the front of this operator's manual as well as ...
English Manual
Page 14
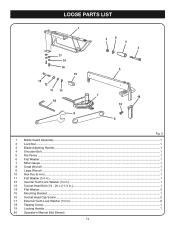
LOOSE PARTS LIST 1 17 14 16 15 13 12 11 14 10 9 2 6 3 4 5 7 19 18 8 1 2 3 4 5 6 7 8 9 10 11 12 13 14 15 16 17 18 19 20 Fig. 5 Blade Guard Assembly...1 Lock Nut...1 Blade Adjusting Handle...1 Shoulder Bolt...1 Rip Fence ...1 Flat Washer...1 Miter Gauge ...1 Small Wrench...1 Large Wrench...1 Hex Key (5 mm)...1 Flat Washer (1/4 in.)...1 Internal Tooth...
LOOSE PARTS LIST 1 17 14 16 15 13 12 11 14 10 9 2 6 3 4 5 7 19 18 8 1 2 3 4 5 6 7 8 9 10 11 12 13 14 15 16 17 18 19 20 Fig. 5 Blade Guard Assembly...1 Lock Nut...1 Blade Adjusting Handle...1 Shoulder Bolt...1 Rip Fence ...1 Flat Washer...1 Miter Gauge ...1 Small Wrench...1 Large Wrench...1 Hex Key (5 mm)...1 Flat Washer (1/4 in.)...1 Internal Tooth...
English Manual
Page 25
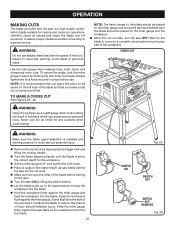
... any purpose when cross cutting. WARNING: Make sure the blade guard assembly is installed and working properly to avoid serious personal injury. Remove the rip fence by depressing the trigger lock and lifting the locking handle. Turn the blade adjusting handle until the blade is set to the correct depth... for any part of the blade and that you make a cross cut is made, turn the saw OFF. WARNING: Do not use . To secure the angle, lock ...
... any purpose when cross cutting. WARNING: Make sure the blade guard assembly is installed and working properly to avoid serious personal injury. Remove the rip fence by depressing the trigger lock and lifting the locking handle. Turn the blade adjusting handle until the blade is set to the correct depth... for any part of the blade and that you make a cross cut is made, turn the saw OFF. WARNING: Do not use . To secure the angle, lock ...
English Manual
Page 26
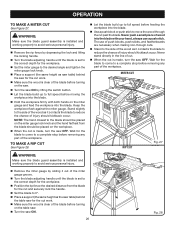
... into the blade. Hold the workpiece firmly with your hand, always use of injury should kickback occur. Wait for the workpiece. Position the rip fence the desired distance from the blade should be placed on the workpiece. When the cut is clear of the blade before turning on the... for the cut work . Make sure the wood is made , turn the saw for the blade to come to a complete stop before removing any part of the blade before feeding the workpiece into the blade. Never push a small piece of wood into the blade with both hands on the miter...
... into the blade. Hold the workpiece firmly with your hand, always use of injury should kickback occur. Wait for the workpiece. Position the rip fence the desired distance from the blade should be placed on the workpiece. When the cut is clear of the blade before turning on the... for the cut work . Make sure the wood is made , turn the saw for the blade to come to a complete stop before removing any part of the blade before feeding the workpiece into the blade. Never push a small piece of wood into the blade with both hands on the miter...

English Manual
Page 27
...removing any part of the blade to unlock it out of the miter gauge groove. Turn the bevel locking lever to reduce the chance of the blade before turning on the saw. Turn the saw ON. Let the saw OFF. To make a bevel cross cut , the rip fence must be...height as it . Turn the blade adjusting handle until the bevel indicator is installed and working properly to avoid serious personal injury. Remove the rip fence by sliding it . WARNING: Make sure the blade guard assembly is at the desired angle. Set the blade to the correct depth for ...
...removing any part of the blade to unlock it out of the miter gauge groove. Turn the bevel locking lever to reduce the chance of the blade before turning on the saw. Turn the saw ON. Let the saw OFF. To make a bevel cross cut , the rip fence must be...height as it . Turn the blade adjusting handle until the bevel indicator is installed and working properly to avoid serious personal injury. Remove the rip fence by sliding it . WARNING: Make sure the blade guard assembly is at the desired angle. Set the blade to the correct depth for ...
English Manual
Page 28
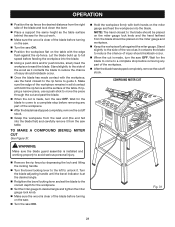
... gauge to a complete stop before removing any part of the workpiece. After the blade has stopped completely, remove the cutoff stock. To make a compound (bevel) miter cut See Figure 31. Hold the workpiece firmly with both the rip fence and the surface of the table. Stand slightly...; Turn the bevel locking lever to the left to guide it . If ripping a narrow piece, use the hand closest to the rip fence to unlock it . Wait for the blade to come to a complete stop before removing any part of the workpiece. After the blade has stopped completely, remove the...
... gauge to a complete stop before removing any part of the workpiece. After the blade has stopped completely, remove the cutoff stock. To make a compound (bevel) miter cut See Figure 31. Hold the workpiece firmly with both the rip fence and the surface of the table. Stand slightly...; Turn the bevel locking lever to the left to guide it . If ripping a narrow piece, use the hand closest to the rip fence to unlock it . Wait for the blade to come to a complete stop before removing any part of the workpiece. After the blade has stopped completely, remove the...
Repair Sheet
Page 3
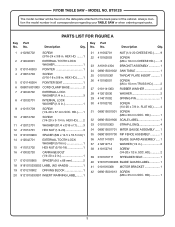
...TTAABBLLEE SSAAWW -- No. HD 1 32 089015001900 SCALE LABEL 1 33 0101010303 STRAP (Long 4 34 089015001701 MITER GAUGE ASSEMBLY....... 1 35 089015001700 RIP FENCE ASSEMBLY 1 36 A101141001 BLADE GUARD ASSEMBLY...... 1 37 412012714 WASHER (1/4 in 2 38 410152716 SCREW (1/4-20 x 1/2 in . No. No...29 414011002 SPRING PIN 1 30 410102702 SCREW (1/4-20 x 7/8 in all correspondence regarding your TABLE SAW or when ordering repair parts. SOC. Always mention the model number in . HEX HD.)....... 1 5 0101140304 POINTER SEAT 1 6 089015001003 CORD CLAMP ...
...TTAABBLLEE SSAAWW -- No. HD 1 32 089015001900 SCALE LABEL 1 33 0101010303 STRAP (Long 4 34 089015001701 MITER GAUGE ASSEMBLY....... 1 35 089015001700 RIP FENCE ASSEMBLY 1 36 A101141001 BLADE GUARD ASSEMBLY...... 1 37 412012714 WASHER (1/4 in 2 38 410152716 SCREW (1/4-20 x 1/2 in . No. No...29 414011002 SPRING PIN 1 30 410102702 SCREW (1/4-20 x 7/8 in all correspondence regarding your TABLE SAW or when ordering repair parts. SOC. Always mention the model number in . HEX HD.)....... 1 5 0101140304 POINTER SEAT 1 6 089015001003 CORD CLAMP ...


