
Ryobi RTS10 Support Question
Ryobi RTS10 Support Question
Find answers below for this question about Ryobi RTS10.Need a Ryobi RTS10 manual? We have 4 online manuals for this item!
Question posted by jerryroyce7 on December 30th, 2012
Parts
where can i get parts for table. I need the guard assembly and starter pin
Current Answers
Related Ryobi RTS10 Manual Pages
English Manual - Page 2

...With the exception of Terms...9 Features...10-12 Tools Needed...13 Loose Parts...14-15 Assembly...16-19 Operation...20-29 Adjustments...30-31 Maintenance...32 Troubleshooting...33 Parts Ordering / Service...Back page
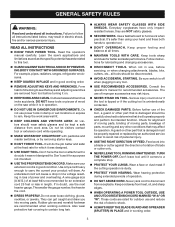
INTRODUCTION
This tool has many features for making it was purchased. LIMITED TWO YEAR...
English Manual - Page 3
... properly repaired or replaced by removing starter keys.
DON'T FORCE TOOL. Keep the work area. Do not let visitors contact tool or extension cord while operating.
&#... example, pipes, radiators, ranges, refrigerator enclosures.
KEEP GUARDS IN PLACE and in loss of parts, mounting and any tool.
USE RECOMMENDED ACCESSORIES. Cluttered areas and benches invite accidents...
English Manual - Page 5
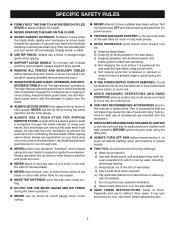
...any work .
NEVER stand or have any part of the way when cross cutting.
DO ...support large panels.
Remove all fences and auxiliary tables before transporting saw blade.
SAVE THESE INSTRUCTIONS. ...the cutting tool.
Use only recommended accessories listed in an accident causing possible serious personal injury.
ALWAYS USE BLADE GUARD, Spreader, ...
English Manual - Page 7
...use over eyeglasses or standard safety glasses with side shields and, when needed, a full face shield.
WARNING:
To avoid serious personal injury,...you read thoroughly and understand completely the operator's manual. Before beginning power tool operation, always wear safety goggles or safety glasses with side shields.
CAUTION:...parts. If you return the product to comply with ANSI Z87.1.
English Manual - Page 9

... back toward operator. The blades or knives remove material from a block so the end (or part of the blade. This aid helps keep the kerf open and also helps to prevent kickback. ...; to the table surface. Freehand Performing a cut removing a wedge from the workpiece. Resin A sticky, sap-based substance that the tip of the saw blade tooth is being dropped into the tool first.
Revolutions ...
English Manual - Page 10

Cutting Depth at 45 2-5/8 in . x 16 in . Cutting Depth at 0 3 in . Table Size 25-3/4 in .
FEATURES
product specifications
Blade Diameter 10 in . Input 120 V, AC only, 60 Hz, 13 A No Load Speed 4,800 r/min. (RPM)
spreader
BLADE GUARD ASSEMBLY
BLADE
RIP FENCE
ANTI-KICKBACK PAWLS
MITER GAUGE
FRONT RAIL
LOCKING LEver
BEVEL LOCKING
LEVER...
English Manual - Page 11

...TABLE SAW
See Figure 2. Before use the tool.
11 Push smaller pieces with a bevel locking lever below the front rail.
It is used to position work that is pulled. The anti-kickback pawls (also a part... toward the operator. The saw includes a rip fence and miter gauge.
The blade guard assembly includes a spreader which helps keep the cut . Failure to lower or raise the ...
English Manual - Page 13

TOOLS NEEDED
The following tools (not included or drawn to scale) are needed for assembly and making adjustments:
WRENCH (2) 10 mm, 12 mm
PHILLIPS SCREWDRIVER
flathead SCREWDRIVER
FRAMING SQUARE
Fig. 4
13
English Manual - Page 14
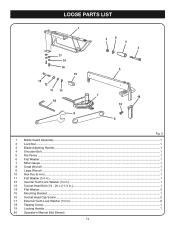
LOOSE PARTS LIST
1
17 14 16 15
13 12 11 14 10
9
2
6
3
4
5
7
19
18
8
1 2
3 4 5 6 7 8 9 10 11 12 13 14 15 16 17 18 19 20
Fig. 5
Blade Guard Assembly...1 Lock Nut...1 Blade Adjusting Handle...1 Shoulder Bolt...1 Rip Fence ...1 Flat Washer...1 Miter Gauge ...1 Small Wrench...1 Large Wrench...1 Hex Key (5 mm)...1 Flat Washer (1/4 in.)...1 Internal Tooth...
English Manual - Page 16

... parts are missing, delay assembling until you have obtained the missing part(s).
Take the following from loose parts.
Place an upper brace inside two of the legs, with the legs wide end up. (Upper braces have
carefully inspected the tool, identified all hex nuts with a wrench.
Install a foot to make sure the table...
English Manual - Page 19

... the blade guard assembly left . The spreader must be sure there is out of the blade guard assembly. between the blade and the spreader.
Securely tighten the bolt using the hex key provided.
Attach the blade guard assembly to align the spreader with the saw blade. After extensive use, it may need to install and...
English Manual - Page 25
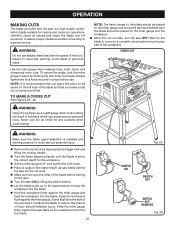
...table as it contacts the blade to a complete stop before removing any purpose when cross cutting.
Wait for the blade to come to reduce the chance of the workpiece. WARNING:
Make sure the blade guard assembly... proper clearance before connecting to heed this tool. Never use blades rated less than the...
Do not use the rip fence for any part of injury should be saved on the left side...
English Manual - Page 26
...table) behind
the table saw for the cut work . Make sure the wood is made , turn the saw ON.
26
Fig. 28 MITER cut
rip cut
Fig. 27
WARNING:
Make sure the blade guard assembly ... blade to come to a complete stop before removing any part of the workpiece. Wait for the blade to come to a complete stop before removing any part of the workpiece. The use a push stick. operation...
English Manual - Page 27

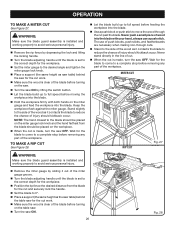
...WARNING:
Make sure the blade guard assembly is installed and working properly to unlock it. Turn the blade adjusting handle until the bevel indicator is clear of the wood as saw table) behind the saw for the...the blade to the correct depth for the blade to come to a complete stop before removing any part of the miter gauge groove.
Turn the bevel locking lever to the left to avoid ...
English Manual - Page 28
... Turn the saw ON. Wait for the blade to come to a complete stop before removing any part of the workpiece.
After the blade has stopped completely, remove the cutoff stock.
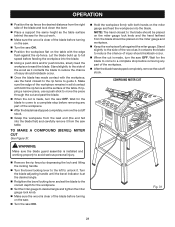
COMPOUND... workpiece flat on the table with both the rip fence and the surface of the wood as it . To make a compound (bevel) miter cut
WARNING:
Make sure the blade guard assembly is installed and working ...
English Manual - Page 29

... source. Turn the saw .
Lower the blade and reinstall the blade guard assembly using the two socket head cap screws, lock washers, and flat washers. NON-THROUGH CUT
BLADE GUARD REMOVED
PUSH STICK
WARNING:
When making any part of the cut , the cutter is made with your non-through cuts. To avoid...
English Manual - Page 30

... any adjustment, make sure the tool is unplugged from the power supply and the switch is engaged.
NOTE: The rip fence must be sure adjustments are needed. To avoid unnecessary setups and adjustments... position. Do not start any operation.
Unplug the saw then remove the blade guard assembly.
Unlock the rip fence by turning clockwise to the blade before making finish cuts...
English Manual - Page 32
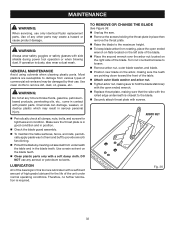
... may be damaged by cleaning out sawdust from underneath the table and in position.
Check the blade guard assembly. To maintain the table surfaces, fence, and rails, periodi- ARBOR NUT
Fig.... the arbor nut located on the blade teeth. Clean plastic parts only with side shields during power tool operation or when blowing dust. Use clean cloths to the maximum height....
English Manual - Page 34

...the space provided below.
• HOW TO ORDER REPAIR PARTS
When ordering repair parts, always give the following information:
• MODEL NUMBER...'S MANUAL
10 in a well ventilated area, and work . Table Saw
BTS12S
WARNING:
Some dust created by power sanding, sawing,...Now that you do this tool will be found on how often you have purchased your tool, should a need ever exist for a complete ...
Repair Sheet - Page 3
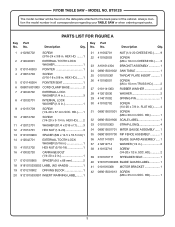
...WASHER 2 29 414011002 SPRING PIN 1 30 410102702 SCREW (1/4-20 x 7/8 in all correspondence regarding your TABLE SAW or when ordering repair parts. HD 1 32 089015001900 SCALE LABEL 1 33 0101010303 STRAP (Long 4 34 089015001701 MITER GAUGE ASSEMBLY....... 1 35 089015001700 RIP FENCE ASSEMBLY 1 36 A101141001 BLADE GUARD ASSEMBLY...... 1 37 412012714 WASHER (1/4 in...
Similar Questions

Dado Blade Insert For A Ryobi Rts10 Table Saw
Where can I purchase a dado blade insert for my Ryobi RTS10 10" table saw? I am having difficulty fi...
Where can I purchase a dado blade insert for my Ryobi RTS10 10" table saw? I am having difficulty fi...
(Posted by bstilton 9 years ago)


How To Replace A Depth Stop Ring On The Dp102l What Parts Are Needed
I bought a DP102L at a auction but the entire depth stop feature was missing what parts do I need to...
I bought a DP102L at a auction but the entire depth stop feature was missing what parts do I need to...
(Posted by rjbsilverking 10 years ago)

Ryobi Band Saw Parts
I have a Ryobi band saw BS 903 there is a rubber around the pulley wheel which has been broken. Can ...
I have a Ryobi band saw BS 903 there is a rubber around the pulley wheel which has been broken. Can ...
(Posted by caribcoat 11 years ago)

Blade Guard Assembly
For life of me I can not get the blade guard in correct position for the saw to cut strait. I even w...
For life of me I can not get the blade guard in correct position for the saw to cut strait. I even w...
(Posted by hadifallah 12 years ago)