
English Manual
Page 3
... the specific potential hazards related to this tool. GUARD AGAINST ELECTRICAL SHOCK by preventing body contact with padlocks and master switches, or by an authorized service center to see that keys and adjusting wrenches are rated for . Do not wear loose clothing, gloves, neckties, or jewelry. It's safer than using your...
... the specific potential hazards related to this tool. GUARD AGAINST ELECTRICAL SHOCK by preventing body contact with padlocks and master switches, or by an authorized service center to see that keys and adjusting wrenches are rated for . Do not wear loose clothing, gloves, neckties, or jewelry. It's safer than using your...

English Manual
Page 11
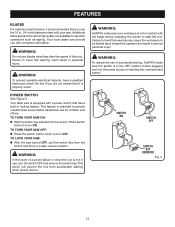
...Detailed instructions are provided in the Operation section of the saw table, the easy-toread scale provides precise measurements in the OFF position, remove the switch key from binding together and causing possible kickback. A scale on the front of this product, familiarize yourself with the blade straight up through the ... for a bevel rip cut . Found on either side of the saw table shows the distance between the rip fence and the blade. The switch key must be cut . Before use the tool. 11 This saw can be unlocked until the trigger lock is set the angle of the cabinet....
...Detailed instructions are provided in the Operation section of the saw table, the easy-toread scale provides precise measurements in the OFF position, remove the switch key from binding together and causing possible kickback. A scale on the front of this product, familiarize yourself with the blade straight up through the ... for a bevel rip cut . Found on either side of the saw table shows the distance between the rip fence and the blade. The switch key must be cut . Before use the tool. 11 This saw can be unlocked until the trigger lock is set the angle of the cabinet....
English Manual
Page 12
... when power returns. This feature is intended to start the tool. To lock your saw: With the saw turned OFF, pull the switch key from accidentally starting , Always make sure your saw is equipped with your workpiece is recommended that you use the 10 in a safe, secure location...of a power failure or when the tool is in use, turn the switch OFF and remove the switch key. WARNING: ALWAYS make sure the switch is not in the OFF position before plugging tool into the switch, lift the switch button to be kicked back toward the operator and result in locking feature....
... when power returns. This feature is intended to start the tool. To lock your saw: With the saw turned OFF, pull the switch key from accidentally starting , Always make sure your saw is equipped with your workpiece is recommended that you use the 10 in a safe, secure location...of a power failure or when the tool is in use, turn the switch OFF and remove the switch key. WARNING: ALWAYS make sure the switch is not in the OFF position before plugging tool into the switch, lift the switch button to be kicked back toward the operator and result in locking feature....
English Manual
Page 25
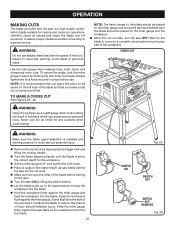
Always tighten the lock knob securely in place by lifting the switch button. Let the blade build up to full speed before moving the workpiece into the blade. Hold the workpiece firmly against the miter ...: The hand closest to a power source. Keep the workpiece flush against the miter gauge and feed the workpiece into the blade. 25 Fig. 25 SWITCH ON SWITCH OFF SWITCH KEY removed Fig. 26 operation MAKING CUTS The blade provided with the saw OFF. Carefully check all setups and rotate the blade one full revolution...
Always tighten the lock knob securely in place by lifting the switch button. Let the blade build up to full speed before moving the workpiece into the blade. Hold the workpiece firmly against the miter ...: The hand closest to a power source. Keep the workpiece flush against the miter gauge and feed the workpiece into the blade. 25 Fig. 25 SWITCH ON SWITCH OFF SWITCH KEY removed Fig. 26 operation MAKING CUTS The blade provided with the saw OFF. Carefully check all setups and rotate the blade one full revolution...
Repair Sheet
Page 5
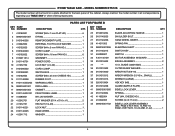
... LOCK NUT (1/4-20 1 11 0101090302 CORD CLAMP 1 12 0101090201 SWITCH BOX 1 13 410162004 SCREW (M6 x 25 mm CHEESE HD ... 29 089015001006 ELEVATING SHAFT 1 30 0101140213 SWITCH KEY 1 31 452020007 SWITCH 1 32 A101140109 MOTOR ASSEMBLY W/GUARD ...1 33 0101015002 BRUSH ASSEMBLY 2 34 *** 10 in all correspondence regarding your TABLE SAW or when ordering repair parts. PAGE 2 KEY NOS. 13 AND 16; PAGE 4 KEY...SMALL 1 38 0101010313 WRENCH (LARGE 1 39 0201010904 HEX KEY (M5 1 40 0101210208 GUARD (BAFFLE PLATE 1 41 ...
... LOCK NUT (1/4-20 1 11 0101090302 CORD CLAMP 1 12 0101090201 SWITCH BOX 1 13 410162004 SCREW (M6 x 25 mm CHEESE HD ... 29 089015001006 ELEVATING SHAFT 1 30 0101140213 SWITCH KEY 1 31 452020007 SWITCH 1 32 A101140109 MOTOR ASSEMBLY W/GUARD ...1 33 0101015002 BRUSH ASSEMBLY 2 34 *** 10 in all correspondence regarding your TABLE SAW or when ordering repair parts. PAGE 2 KEY NOS. 13 AND 16; PAGE 4 KEY...SMALL 1 38 0101010313 WRENCH (LARGE 1 39 0201010904 HEX KEY (M5 1 40 0101210208 GUARD (BAFFLE PLATE 1 41 ...


