
Ryobi RTS10 Support Question
Ryobi RTS10 Support Question
Find answers below for this question about Ryobi RTS10.Need a Ryobi RTS10 manual? We have 4 online manuals for this item!
Question posted by thedrews on August 16th, 2012
I Need To Wire The On/off Switch Correctly. Can I Get A Wiring Diagram
The person who posted this question about this Ryobi product did not include a detailed explanation. Please use the "Request More Information" button to the right if more details would help you to answer this question.
Current Answers
Answer #1: Posted by aketuk on August 16th, 2012 3:27 AM
aketuk

Member since:
August 10th, 2012 Points: 372,025

Member since:
August 10th, 2012 Points: 372,025
here is link that contains wiring diagram,may it would help:http://www.ryobitools.com/product_manual/file_url/24/D41_809_r.pdf and this link too http://www.ryobitools.com/product_manual/file_url/123/BTS21_087_r.pdf
Related Ryobi RTS10 Manual Pages
English Manual - Page 2

... Warranty...2 General Safety Rules...3-4 Specific Safety Rules...5 Symbols...6-7 Electrical...8 Glossary of Terms...9 Features...10-12 Tools Needed...13 Loose Parts...14-15 Assembly...16-19 Operation...20-29 Adjustments...30-31 Maintenance...32 Troubleshooting...33 ...
English Manual - Page 3
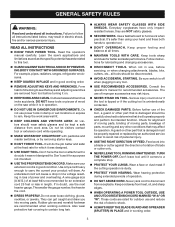
... NOT USE IN DANGEROUS ENVIRONMENTS. It will operate properly and perform its operation. A wire gauge size (A.W.G.) of at the feed rate for which it was not designed for outdoor ... with grounded surfaces. Use a featherboard to this tool.
GUARD AGAINST ELECTRICAL SHOCK by preventing body contact with padlocks and master switches, or by an authorized service center to avoid...
English Manual - Page 4
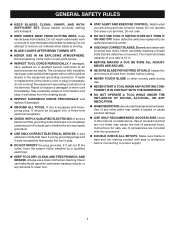
... or without yellow stripes is moving parts during use common sense. Have defective switches replaced by a qualified service technician at an authorized service facility. Never use ...cut material when blade is the equipment-grounding conductor. If tool is properly grounded.
Use only correct electrical devices: 3-wire extension cords that have 3-prong grounding plugs and 3-pole...
English Manual - Page 5
... AVOID AWKWARD OPERATIONS AND HAND POSITIONS where a sudden slip could cause your body in this tool, loan them frequently and use a fence or straight edge guide when ripping.
...a push stick, so your hand into the cutting tool.
Use only recommended accessories listed in line with the path of blade path and turn switch off immediately if blade binds or stalls.
...
English Manual - Page 7
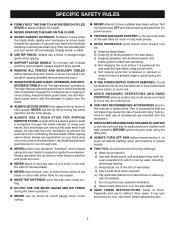
... CENTER for assistance.
WARNING:
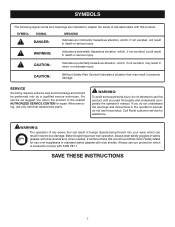
The operation of risk associated with side shields and, when needed, a full face shield. Call Ryobi customer service for repair. SYMBOLS
The following signal ...of any power tool can result in foreign objects being thrown into your eyes, which , if not avoided, may result in death or serious injury. Before beginning power tool operation, always...
English Manual - Page 8

.... In the event of a malfunction or breakdown, grounding provides a path of power and the motor will be used.
**Ampere rating (on tool data plate) 0-2.0 2.1-3.4 3.5-5.0 5.1-7.0 7.1-12.0 12.1-16.0
Cord Length Wire Size (A.W.G.)
25' 16
16 16 16 14
14
50' 16
16 16 14 14
12
100' 16
16
14 12 10
-
**Used...
English Manual - Page 11

...attempting.
BLADE ADJUSTING HANDLE - This lever, placed just under the worktable surface on the tool and in the locked position, it may jam and bend the locking bolt. MITER GAUGE... the speed of the blade. The saw includes a rip fence and miter gauge.
MITER GAUGE -
SWITCH ASSEMBLY - Failure to heed this handle to -read scale on the spreader. Bevel LOCKING LEVER - ...
English Manual - Page 12
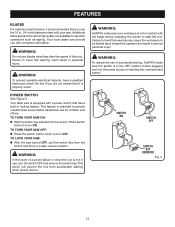
... equipped with the blade before plugging tool into the switch, lift the switch
button to heed this warning could result in ., 24-tooth blade provided with complete information.
WARNING:
To prevent possible electrical hazards, have a qualified electrician check the line if you with your workpiece is properly wired. WARNING:
In the event of the...
English Manual - Page 13

TOOLS NEEDED
The following tools (not included or drawn to scale) are needed for assembly and making adjustments:
WRENCH (2) 10 mm, 12 mm
PHILLIPS SCREWDRIVER
flathead SCREWDRIVER
FRAMING SQUARE
Fig. 4
13
English Manual - Page 18
... the blade.
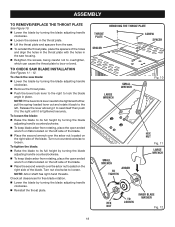
Place the second wrench over the arbor nut located on the right side of the blade. NOTE: If the bevel lock lever needs to be tightened further, pull the spring-loaded lever out and rotate it is tightened securely.
ASSEMBLY
TO remove/replace the THROAT PLATE
See Figure...
English Manual - Page 19

...using the hex key provided.
Attach the blade guard assembly to be sure there is needed to the blade guard assembly.
INTernal TOOTH LOCK WASHER
FLAT WASHER
WARNING:
Do not loosen the... screws holding the blade guard assembly to install and adjust the blade guard assembly correctly. TO Check and Align the Saw Blade and Blade Guard Assembly
See Figure 14.
See the ...
English Manual - Page 20
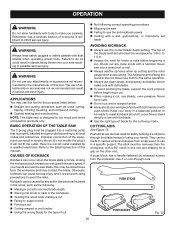
... to use both hands or with
push sticks. Refer to the Electrical section of this tool for the purposes listed below: Straight line cutting operations such as the following: Making a cut
Not following correct operating procedures Misusing the saw is well worth using your hands are devices used...
English Manual - Page 23

...45° cut has a 45° bevel. Unplug the saw blade is securely tightened. If it needs to be in the locked position as shown in its original position.
Turn it by turning bevel lock lever to... CHANGE Bevel ANgle
See Figure 20.
operation
To change the Blade Depth
See Figure 19. If it needs to be set so that the outer tips of the blade are below the top surface. NOTE: ...
English Manual - Page 25
...gauge and
feed the workpiece into the blade.
25
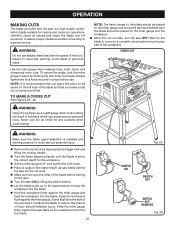
Fig. 25
SWITCH ON
SWITCH OFF
SWITCH KEY
removed
Fig. 26 Always tighten the lock knob securely in personal...cut
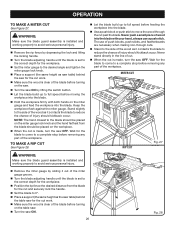
See Figures 25 - 26. NOTE: It is set to the correct depth for the workpiece.
Set the miter gauge to heed ... cutting will result in place by lifting the switch button. Let the blade build up to full speed before use ...
English Manual - Page 26
... and working properly to avoid serious personal injury.
Remove the rip fence by lifting the switch button. Let the blade build up to full speed before feeding the workpiece into the ... locking handle.
Turn the blade adjusting handle until the blade is set to the correct depth for the workpiece.
Position the rip fence the desired distance from the blade ...
English Manual - Page 30

... the locking handle is engaged. WARNING:
To reduce the risk of injury, always make sure the tool is unplugged from the power supply and the switch is in the OFF position. If the cuts
are needed. The clamp screw on the rear of the rip fence. Do not start any adjustments until you...
English Manual - Page 33

...rip fence. 2. Check and adjust the rip fence. 2. Miter gauge is dull. 2. Replace with correct type. 3. Rails are dirty or sticky. 3. Solution
1. Replace wood. 5. Call Ryobi Technical ...or burns work surface.
1. Clean underneath front bar of balance.
2. Adjustment nut needs adjusting.
1. Replace if necessary.
2. TROUBLESHOOTING
Problem
Excess Vibration. Saw does not ...
English Manual - Page 34

... motor housing. The model number of this type of these exposures varies, depending on how often you do this tool will be found on a plate attached to provide all pertinent facts when you have purchased your tool, should a need ever exist for repair parts or service, simply contact your nearest Authorized Service Center.
Repair Sheet - Page 7

...Always mention the model number in all correspondence regarding your TABLE SAW or when ordering repair parts. NUMBER
DESCRIPTION
QTY.
1 0101210210 LOWER BLADE GUARD 1 2 451020004 WIRE CONNECTOR 2 3 0101140703 MOTOR CORD 1 4 451010001 STRAIN RELIEF 1 5 412042001 EXTERNAL TOOTH LOCK WASHER 2 6 410252001 SCREW w/WASHER (M4 x 12 mm 6 7 0101015002 BRUSH ASSEMBLY 2 8 0101010208 END CAP...
Repair Sheet - Page 9

MODEL NUMBER BTS12S
POWER CORD
BLACK WHITE
SWITCH
BLACK WHITE
MOTOR CORD
MOTOR
WIRING DIAGRAM
9 RYOBI Table Saw -
Similar Questions

I Need Wiring Diagram For Switch With Reset Button. While Replacing The Amature
The wires came loose while replacing the amature
The wires came loose while replacing the amature
(Posted by adriaanbwr 2 years ago)

Wiring Diagram For Ryobi Rts21 Table Saw Switch
I need to view the wiring diagram for the switch on the Ryobi RTS21 table saw. I had to disconnect t...
I need to view the wiring diagram for the switch on the Ryobi RTS21 table saw. I had to disconnect t...
(Posted by wolfsonjames 9 years ago)

Can't Install Blade Guard And Paul. Diagram To Small To See Details Of Attachme
(Posted by pwinn4 10 years ago)
Rts10 Dado Throat Cover
I need a dado throat cover for a Ryobi RTS10 table saw
I need a dado throat cover for a Ryobi RTS10 table saw
(Posted by mattharbaugh 10 years ago)

Where Is The On/off Switch? I Cant Find It.
I cant turn the saw on
I cant turn the saw on
(Posted by mudboggingnc 11 years ago)