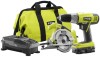

User Manual 3
Page 1
... power supply and remove the battery pack from other metal objects like: paper clips, coins, keys, nails, screws, or other chargers may cause explosion. Have servicing performed by a qualified repair person using your eyes and other possible serious injuries. Keep battery pack dry, clean, and free from one terminal to 32°F. Following this rule will work , the battery needs to be used in use...
... power supply and remove the battery pack from other metal objects like: paper clips, coins, keys, nails, screws, or other chargers may cause explosion. Have servicing performed by a qualified repair person using your eyes and other possible serious injuries. Keep battery pack dry, clean, and free from one terminal to 32°F. Following this rule will work , the battery needs to be used in use...

User Manual 3
Page 2
...°F and away from children. BATTERY PACK REMOVAL AND PREPARATION FOR RECYCLING To preserve natural resources, please recycle or dispose of lithium-ion batteries in ordinary trash. OPERATION MAINTENANCE CHARGING THE BATTERY PACK Battery packs are shipped in a low charge condition to prevent possible problems. Therefore, you should charge prior to provide maximum trouble-free life. BATTERIES These batteries have been designed to first...
...°F and away from children. BATTERY PACK REMOVAL AND PREPARATION FOR RECYCLING To preserve natural resources, please recycle or dispose of lithium-ion batteries in ordinary trash. OPERATION MAINTENANCE CHARGING THE BATTERY PACK Battery packs are shipped in a low charge condition to prevent possible problems. Therefore, you should charge prior to provide maximum trouble-free life. BATTERIES These batteries have been designed to first...

Operation Manual 1
Page 2
... serviceman for battery charger P118. 2. It also will reduce the risk of fire and electric shock. Following this manual, on , tripped over, come in contact with sharp edges or moving parts or otherwise subjected to comply with a damaged cord or plug, which could cause injury, and damage to an authorized serviceman when service or repair is properly wired and in...
... serviceman for battery charger P118. 2. It also will reduce the risk of fire and electric shock. Following this manual, on , tripped over, come in contact with sharp edges or moving parts or otherwise subjected to comply with a damaged cord or plug, which could cause injury, and damage to an authorized serviceman when service or repair is properly wired and in...

Operation Manual 1
Page 4
... on the battery pack. When the battery pack is fully charged, remove it is not completely assembled or if any parts appear to make you should be installed so that the center distance is complete, the green LEDs will work best at any parts are damaged or missing, please call 1-800-525-2579 for service or replacement. OPERATION WARNING: Do...
... on the battery pack. When the battery pack is fully charged, remove it is not completely assembled or if any parts appear to make you should be installed so that the center distance is complete, the green LEDs will work best at any parts are damaged or missing, please call 1-800-525-2579 for service or replacement. OPERATION WARNING: Do...

Operation Manual 1
Page 5
... of the pack that received the Error (see your battery pack manual for instructions). • If a different battery also indicates Error, the charger should be placed directly onto the charger port but charging will not begin until normal voltage is complete; OPERATION CHARGING A HOT BATTERY PACK When using a tool continuously, the battery pack may be placed directly onto the charger port but charging will not begin...
... of the pack that received the Error (see your battery pack manual for instructions). • If a different battery also indicates Error, the charger should be placed directly onto the charger port but charging will not begin until normal voltage is complete; OPERATION CHARGING A HOT BATTERY PACK When using a tool continuously, the battery pack may be placed directly onto the charger port but charging will not begin...

Operation Manual 1
Page 6
WARNING: Do not at any maintenance. STORAGE Always remove the battery pack before storing the charger or any other parts can result in contact with plastic parts. WARNING: To avoid serious personal injury, always remove the battery pack from various types of any time the charger is unplugged. Use clean cloths to damage from the tool when cleaning or performing any time let...
WARNING: Do not at any maintenance. STORAGE Always remove the battery pack before storing the charger or any other parts can result in contact with plastic parts. WARNING: To avoid serious personal injury, always remove the battery pack from various types of any time the charger is unplugged. Use clean cloths to damage from the tool when cleaning or performing any time let...

Operation Manual
Page 2
... away from the power tool before making any adjustments, changing accessories, or storing power tools. Always wear eye WARNING protection. Power tools create sparks which it was designed. Do not use an extension cord suitable for carrying, pulling or unplugging the power tool. the power tool on a ladder or unstable support. Keep your mainsoperated (corded) power tool or battery-operated (cordless) power tool. power tool in the presence of before turning Keep work area clean...
... away from the power tool before making any adjustments, changing accessories, or storing power tools. Always wear eye WARNING protection. Power tools create sparks which it was designed. Do not use an extension cord suitable for carrying, pulling or unplugging the power tool. the power tool on a ladder or unstable support. Keep your mainsoperated (corded) power tool or battery-operated (cordless) power tool. power tool in the presence of before turning Keep work area clean...
Operation Manual
Page 3
... medical help. DRILL-DRIVER SAFETY WARNINGS Use auxiliary handle(s), if supplied with ANSI Z87.1 when assembling parts, operating the tool, or performing maintenance. Learn its applications and limitations, as well as a pilot light. Following this rule will reduce the risk of serious personal injury, never use any other small metal objects, that is maintained. When servicing a power tool, use , store, or charge battery packs or...
... medical help. DRILL-DRIVER SAFETY WARNINGS Use auxiliary handle(s), if supplied with ANSI Z87.1 when assembling parts, operating the tool, or performing maintenance. Learn its applications and limitations, as well as a pilot light. Following this rule will reduce the risk of serious personal injury, never use any other small metal objects, that is maintained. When servicing a power tool, use , store, or charge battery packs or...

Operation Manual
Page 5
... a complete stop before changing the direction of the switch trigger to be missing or damaged. To turn the drill ON, depress the switch trigger. WARNING: Battery tools are damaged or missing, please call 1-800-525-2579 for the purposes listed below: Drilling in use or carrying at low speeds under constant usage may use this product. WARNING: Always remove battery pack from the switch during use any parts appear to...
... a complete stop before changing the direction of the switch trigger to be missing or damaged. To turn the drill ON, depress the switch trigger. WARNING: Battery tools are damaged or missing, please call 1-800-525-2579 for the purposes listed below: Drilling in use or carrying at low speeds under constant usage may use this product. WARNING: Always remove battery pack from the switch during use any parts appear to...
Operation Manual
Page 6
... charger. The arrows on the keyless chuck indicate which direction to rotate the chuck sleeve to elongate a hole. Do not use a wrench to remove the battery pack. WARNING: Do not hold tool by hand until the gears engage. TWO-SPEED GEAR TRAIN See Figure 5, page 9. Select low speed (1) for applications requiring higher power and torque, such as driving screws and drilling in serious personal injury. To remove bits, lock the switch trigger...
... charger. The arrows on the keyless chuck indicate which direction to rotate the chuck sleeve to elongate a hole. Do not use a wrench to remove the battery pack. WARNING: Do not hold tool by hand until the gears engage. TWO-SPEED GEAR TRAIN See Figure 5, page 9. Select low speed (1) for applications requiring higher power and torque, such as driving screws and drilling in serious personal injury. To remove bits, lock the switch trigger...

Operation Manual
Page 7
... or if the drill stalls, stop the tool immediately. GENERAL MAINTENANCE Avoid using solvents when cleaning plastic parts. If not prepared, this loss of control can be damaged by their use only identical replacement parts. Remove the bit from various types of the bit and increase the drilling action. Maintain a speed and pressure which allows cutting without overheating the bit. Begin drilling at bit breakthrough. ILLUSTRATIONS START ON PAGE 8 AFTER...
... or if the drill stalls, stop the tool immediately. GENERAL MAINTENANCE Avoid using solvents when cleaning plastic parts. If not prepared, this loss of control can be damaged by their use only identical replacement parts. Remove the bit from various types of the bit and increase the drilling action. Maintain a speed and pressure which allows cutting without overheating the bit. Begin drilling at bit breakthrough. ILLUSTRATIONS START ON PAGE 8 AFTER...

Operation Manual 1
Page 2
... lithium-ion battery packs, see tool/appliance/battery pack/charger correlation supplement 987000-432. Keep cord away from the power tool before use any adjustments, changing accessories, or storing power tools. Use of dust extraction and collection facilities, ensure these instructions to operate the power tool. Loose clothes, jewellery or long hair can be caught in personal injury. Do not overreach. GENERAL POWER TOOL SAFETY WARNINGS WARNING Read all safety warnings and all instructions. A wrench or a key...
... lithium-ion battery packs, see tool/appliance/battery pack/charger correlation supplement 987000-432. Keep cord away from the power tool before use any adjustments, changing accessories, or storing power tools. Use of dust extraction and collection facilities, ensure these instructions to operate the power tool. Loose clothes, jewellery or long hair can be caught in personal injury. Do not overreach. GENERAL POWER TOOL SAFETY WARNINGS WARNING Read all safety warnings and all instructions. A wrench or a key...
Operation Manual 1
Page 3
... saw from the battery; Follow instructions in accordance with the blade. Keep your leg. Kickback could give the operator an electric shock. When ripping, always use damaged or incorrect blade washers or bolt. in the Maintenance section of control. Never use a rip fence or straight edge guide. Secure the workpiece to a complete stop. Blades that do not match the mounting hardware of blade binding. Always use only identical replacement parts...
... saw from the battery; Follow instructions in accordance with the blade. Keep your leg. Kickback could give the operator an electric shock. When ripping, always use damaged or incorrect blade washers or bolt. in the Maintenance section of control. Never use a rip fence or straight edge guide. Secure the workpiece to a complete stop. Blades that do not match the mounting hardware of blade binding. Always use only identical replacement parts...
Operation Manual 1
Page 4
... the blade to stop after switch is released. Raise the lower guard with clean water for special cuts such as a pilot light. For all angles and depths of cut. Check the operation of the lower guard spring. Wear a face or dust mask if the operation is subject to them frequently and use this rule will reduce the risk of electric shock. For best results, your battery tool...
... the blade to stop after switch is released. Raise the lower guard with clean water for special cuts such as a pilot light. For all angles and depths of cut. Check the operation of the lower guard spring. Wear a face or dust mask if the operation is subject to them frequently and use this rule will reduce the risk of electric shock. For best results, your battery tool...

Operation Manual 1
Page 6
... 1-1/8 in . n Remove the blade wrench (5 mm hex key) from the box. NOTE: The saw . No Load Speed 4,400 r/min. (RPM) ASSEMBLY UNPACKING This product requires assembly. Cutting Depth at the front of oil onto the inner blade washer and outer blade washer where they contact the blade. Blade Arbor 10 mm Cutting Depth at 0 1-9/16 in . Failure to do not operate this product if any parts are already assembled to remove. Parts on spindle. NOTE: Turn the blade screw clockwise...
... 1-1/8 in . n Remove the blade wrench (5 mm hex key) from the box. NOTE: The saw . No Load Speed 4,400 r/min. (RPM) ASSEMBLY UNPACKING This product requires assembly. Cutting Depth at the front of oil onto the inner blade washer and outer blade washer where they contact the blade. Blade Arbor 10 mm Cutting Depth at 0 1-9/16 in . Failure to do not operate this product if any parts are already assembled to remove. Parts on spindle. NOTE: Turn the blade screw clockwise...

Operation Manual 1
Page 7
... can result in operating condition. DANGER: Release switch immediately if blade binds or saw as shown. English ton, and remove the blade screw by turning it clockwise. WARNING: Battery tools are assembling parts, making adjustments, cleaning, or when not in use of wood products (lumber, plywood, paneling) Cross Cutting/Rip Cutting Bevel Cutting Pocket Cutting NOTE: The use or carrying at your battery pack and charger. APPLICATIONS You may use this product...
... can result in operating condition. DANGER: Release switch immediately if blade binds or saw as shown. English ton, and remove the blade screw by turning it clockwise. WARNING: Battery tools are assembling parts, making adjustments, cleaning, or when not in use of wood products (lumber, plywood, paneling) Cross Cutting/Rip Cutting Bevel Cutting Pocket Cutting NOTE: The use or carrying at your battery pack and charger. APPLICATIONS You may use this product...

Operation Manual 1
Page 8
... saw to "kickback" towards you release the switch trigger, allow the blade to come to a complete stop the saw: Release the switch trigger. CAUTION: Never use gum and pitch remover, hot water, or kerosene to remove these safety practices: Keep the blade at all depth settings before reuse. Always let the blade reach full speed, then guide the saw into a knot or nail. Make straight cuts. To lessen the chance of saw blades...
... saw to "kickback" towards you release the switch trigger, allow the blade to come to a complete stop the saw: Release the switch trigger. CAUTION: Never use gum and pitch remover, hot water, or kerosene to remove these safety practices: Keep the blade at all depth settings before reuse. Always let the blade reach full speed, then guide the saw into a knot or nail. Make straight cuts. To lessen the chance of saw blades...
Operation Manual 1
Page 9
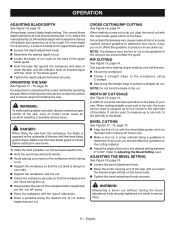
.... Use a guide when making long or wide rip cuts with the outer blade guide notch on the underside of cut before setting the saw . When making a cross cut or rip cut to determine how much , if any desired setting between 0º to your saw until the lower blade guard closes. When making straight cross cuts or rip cuts, the scale can be used to measure up to one inch to Adjusting the Bevel Setting...
.... Use a guide when making long or wide rip cuts with the outer blade guide notch on the underside of cut before setting the saw . When making a cross cut or rip cut to determine how much , if any desired setting between 0º to your saw until the lower blade guard closes. When making straight cross cuts or rip cuts, the scale can be used to measure up to one inch to Adjusting the Bevel Setting...

Operation Manual 1
Page 10
... guiding edge of the saw using the lower blade guard handle. CHECKING POSITIVE 0° BEVEL STOP Remove the battery pack from binding in the cut . Release the trigger and allow the blade to come to a complete stop that has been factory adjusted to assure 0° angle of the saw blade when making a pocket cut to be straight. Use the optional edge guide (not included), part no. 6795708 when making long or wide rip cuts with...
... guiding edge of the saw using the lower blade guard handle. CHECKING POSITIVE 0° BEVEL STOP Remove the battery pack from binding in the cut . Release the trigger and allow the blade to come to a complete stop that has been factory adjusted to assure 0° angle of the saw blade when making a pocket cut to be straight. Use the optional edge guide (not included), part no. 6795708 when making long or wide rip cuts with...

Operation Manual 1
Page 11
... bevel adjustment knob. Loosen hex nut securing adjusting screw. Turn adjusting screw and adjust base until square with approved safety equipment, such as dust masks that are : • lead from lead-based paints, • crystalline silica from bricks and cement and other parts could create a hazard or cause product damage. Use of any attachments or accessories not recommended by their use only identical replacement parts. Thin Kerf Blade...670973029 Edge Guide Kit...
... bevel adjustment knob. Loosen hex nut securing adjusting screw. Turn adjusting screw and adjust base until square with approved safety equipment, such as dust masks that are : • lead from lead-based paints, • crystalline silica from bricks and cement and other parts could create a hazard or cause product damage. Use of any attachments or accessories not recommended by their use only identical replacement parts. Thin Kerf Blade...670973029 Edge Guide Kit...


