Ryobi P825 Support and Manuals
Get Help and Manuals for this Ryobi item
Popular Ryobi P825 Manual Pages
User Manual 3 - Page 1

... may cause explosion. Have servicing performed by a qualified repair person using your eyes and other small...model number above 265°F (130°C) may cause sparks, burns, or a fire. Always remove battery pack from one terminal to decreasing battery charge. READ AND UNDERSTAND ALL INSTRUCTIONS. An exploded battery can make a connection from your RYOBI...
User Manual 3 - Page 2

... have been designed to replace the batteries. Do not disassemble battery pack and attempt to provide maximum trouble-free life.
Local,...Service Center for electrical check.
Charge the battery pack only with these batteries, especially when wearing rings and jewelry, could result in a serious burn.
SAVE THESE INSTRUCTIONS
2 - Please refer to charger operator's manual...
Operation Manual 1 - Page 2

...,
have the charger replaced by an authorized serviceman...INSTRUCTIONS.
This manual contains important safety and operating instructions for electrical check to comply with plastic parts. Failure to follow all instructions...service or repair is less than 50°F or more than the plug when disconnecting from outlet before attempting any way. IMPORTANT SAFETY INSTRUCTIONS...
Operation Manual 1 - Page 4

...RYOBI&#...service or replacement. This indicates the battery is fully charged and the charger is 4-1/2 in. If any parts... are lit, remove the battery pack from the charger to avoid damaging the product.
Screws should snap into your nearest repair... a problem.
&#...parts appear to be installed...
Operation Manual 1 - Page 5

... normally, dispose of the pack that received the Error (see your battery pack manual for instructions). • If a different battery also indicates Error, the charger should be placed directly onto the ...reaches cooled temperature, charger begins charge mode. A hot battery pack may be replaced. OFF
When battery pack reaches warmed temperature, charger begins charge mode. charger maintains...
Operation Manual - Page 3
... may create a risk of fire when used with specifically designated battery packs.
Read operator's manual carefully. Be aware of serious personal injury, never ...parts, operating the tool, or performing maintenance. If liquid contacts eyes, additionally seek medical help. SERVICE
Have your power tool serviced by a qualified repair person using your power tool. Follow instructions...
Operation Manual - Page 6
...instructions, see the operator's manuals... with a "live" wire will make exposed metal parts of screw you intend to use a wrench to ...the drill bit. Contact with the rotating drill bit. OPERATION
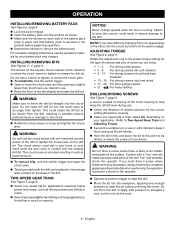
INSTALLING/REMOVING BATTERY PACK
See Figure 2, page 8. ... (2) for fast drilling or driving applications, for the correct setting (forward or reverse).
Select low speed (1)...
Parts Diagram - Page 3

... Bit Clip (0.4 mm 1
17 6782045
Double Bit 1
NOT SHOWN:
988000929 Operator's Manual 1
3-5-13 (REV:02)
3 RYOBI 18 VOLT, 1/2 in . 2-SPEED DRILL DRIVER or when ordering parts. MODEL NUMBER P271
The model number will be found on a label attached to the motor housing.
NUMBER DESCRIPTION
QTY
1 201024004 Housing Assembly 1
2 3000909
Level Assembly 1
3 940114178 Logo...
Parts Diagram - Page 4
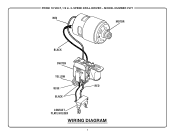
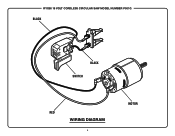
MODEL NUMBER P271 RED MOTOR
BLACK
SWITCH
YELLOW RED
BLUE BLACK
CONTACT PLATE HOLDER
WIRING DIAGRAM
4 RYOBI 18 VOLT, 1/2 in. 2-SPEED DRILL DRIVER -
Parts Diagram 1 - Page 3

...Hex Key (M5 1
41 680001001 Spring (Optional 1
42 520177001 Edge Guide Knob Bolt (Optional 1
43 201985003 Optional Edge Guide Assembly (Inc. RYOBI 18 VOLT CORDLESS CIRCULAR SAW MODEL NUMBER P501G
The model number will be found on a label attached to the motor housing. PARTS LIST
KEY PART NO NUMBER
1 660144005 2 6112101 3 6112004 4 6620104 5 6850303 6 6322602 7 9030308 8 941120075 9 6619302...
Parts Diagram 1 - Page 4
RYOBI 18 VOLT CORDLESS CIRCULAR SAW MODEL NUMBER P501G
BLACK
BLACK SWITCH
RED
WIRING DIAGRAM
4
MOTOR
Operation Manual 1 - Page 3
... or misaligned in line with specifically designated battery packs. Keep your power tool serviced by a qualified repair person using only identical replacement parts. Contact with a "live ...guide. English BATTERY TOOL USE AND CARE
Recharge only with water. This will run eccentrically, causing loss of arbour holes. Follow instructions in accordance with these instructions...
Operation Manual 1 - Page 4
...parts, gummy deposits, or a build-up or kickback from the workpiece as a pilot light. Unsharpened or improperly set blades produce narrow kerf causing excessive friction, blade binding and kickback.
Blade depth and bevel adjusting locking levers must be serviced before placing saw blade is restarted.
Support large panels to instruct...to be retracted manually only for at ...
Operation Manual 1 - Page 8

..., sharp, and properly set
blade. Supporting the workpiece incorrectly. ...part of accidental starting.
Always let the blade reach full speed, then guide...setting. To stop . NOTE: You can depress the lock-off button. Squeeze the switch trigger. Never make cuts with moving . If you have the guard repaired or replaced. The lock resets each use a straight edge guide...
Operation Manual 1 - Page 9
... been provided on the blade guard. Tighten the depth adjustment knob securely. ADJUSTING THE BEVEL SETTING
See Figure 18, page 14. Loosen the bevel adjustment knob. Raise the motor...: The distance from the workpiece, the blade is supported,
not the "cut off" piece. Place the workpiece with the inner blade guide notch on the bevel scale. Tighten the...
Ryobi P825 Reviews
We have not received any reviews for Ryobi yet.