
English Manual
Page 1
OPERATOR'S MANUAL 6 in., 18 VOLT BUFFER/POLISHER P430 BATTERIES AND CHARGERS SOLD SEPARATELY Your buffer/polisher has been engineered and manufactured to our high standard for your purchase. Thank you years of rugged, trouble-free performance. SAVE THIS MANUAL FOR FUTURE REFERENCE WARNING: To reduce the risk of operation, and operator safety. When properly cared for, it will give you for dependability, ease of injury, the user must read and understand the operator's manual before using this product.
OPERATOR'S MANUAL 6 in., 18 VOLT BUFFER/POLISHER P430 BATTERIES AND CHARGERS SOLD SEPARATELY Your buffer/polisher has been engineered and manufactured to our high standard for your purchase. Thank you years of rugged, trouble-free performance. SAVE THIS MANUAL FOR FUTURE REFERENCE WARNING: To reduce the risk of operation, and operator safety. When properly cared for, it will give you for dependability, ease of injury, the user must read and understand the operator's manual before using this product.
English Manual
Page 8
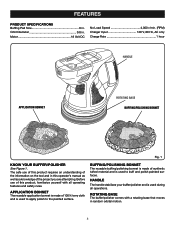
...well as a knowledge of this product, familiarize yourself with a rotating base that moves in random orbital motion. 8 ROTATING BASE The buffer/polisher comes with all operations. The safe use of the project you are attempting. HANDLE The handle stabilizes your...RPM) Charger Input 120 V, 60 Hz, AC only Charge Rate 1 hour HANDLE APPLICATION BONNET ROTATING BASE BUFFING/POLISHING BONNET Fig. 1 KNOW YOUR BUFFER/POLISHER See Figure 1. BUFFING/POLISHING BONNET The reusable buffing/polishing bonnet is made of synthetic tufted material and is used to the painted surface. ...
...well as a knowledge of this product, familiarize yourself with a rotating base that moves in random orbital motion. 8 ROTATING BASE The buffer/polisher comes with all operations. The safe use of the project you are attempting. HANDLE The handle stabilizes your...RPM) Charger Input 120 V, 60 Hz, AC only Charge Rate 1 hour HANDLE APPLICATION BONNET ROTATING BASE BUFFING/POLISHING BONNET Fig. 1 KNOW YOUR BUFFER/POLISHER See Figure 1. BUFFING/POLISHING BONNET The reusable buffing/polishing bonnet is made of synthetic tufted material and is used to the painted surface. ...
English Manual
Page 9
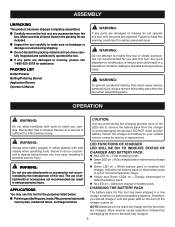
... missing do so could result in a hazardous condition leading to possible serious personal injury. Make sure that could result in serious personal injury. PACKING LIST Buffer/Polisher Buffing/Polishing Bonnet Application Bonnet Operator's Manual WARNING: If any parts are charged. OPERATION WARNING: Do not allow familiarity with side shields when operating...
... missing do so could result in a hazardous condition leading to possible serious personal injury. Make sure that could result in serious personal injury. PACKING LIST Buffer/Polisher Buffing/Polishing Bonnet Application Bonnet Operator's Manual WARNING: If any parts are charged. OPERATION WARNING: Do not allow familiarity with side shields when operating...
English Manual
Page 10
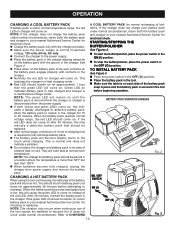
...; Normally the red LED on charger will come on. Refer to recharge. STARTING/STOPPING THE BUFFER/POLISHER See Figures 3. To start the buffer/polisher, place the power switch in the ON ( l ) position. To stop the buffer/polisher, place the power switch in maintenance charge mode. You should let a hot battery pack...
...; Normally the red LED on charger will come on. Refer to recharge. STARTING/STOPPING THE BUFFER/POLISHER See Figures 3. To start the buffer/polisher, place the power switch in the ON ( l ) position. To stop the buffer/polisher, place the power switch in maintenance charge mode. You should let a hot battery pack...
English Manual
Page 11
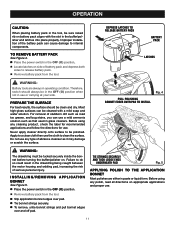
... POLISHING BONNET EDGES OVER PAD TO INSTALL Fig. 4 WARNING: The drawstring must be tucked securely inside the bonnet before turning the buffer/polisher on. Before using any cleaning product, check the label for recommended applications and follow the directions for use. Therefore, switch ...( O ) position. Remove battery pack from the tool. TO REMOVE BATTERY PACK See Figure 4. Place the power switch in the buffer/polisher and latches into place properly. OPERATION CAUTION: When placing battery pack in the tool, be sure raised rib on battery pack aligns with a mild...
... POLISHING BONNET EDGES OVER PAD TO INSTALL Fig. 4 WARNING: The drawstring must be tucked securely inside the bonnet before turning the buffer/polisher on. Before using any cleaning product, check the label for recommended applications and follow the directions for use. Therefore, switch ...( O ) position. Remove battery pack from the tool. TO REMOVE BATTERY PACK See Figure 4. Place the power switch in the buffer/polisher and latches into place properly. OPERATION CAUTION: When placing battery pack in the tool, be sure raised rib on battery pack aligns with a mild...
English Manual
Page 12
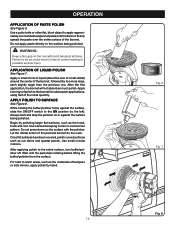
... the bonnet, followed by polishing larger flat surfaces, such as car doors and quarter panels. Do not apply paste directly to the entire surface, turn buffer/polisher off. Use a broad sweeping motion in loss of bumpers or side mirrors, apply polish by hand. 12 WAX Fig. 6 Fig. 7 Fig...position (to the bonnet for subsequent applications, using half of polish to the left). Wait until the pad stops rotating before lifting the buffer/polisher from the surface. For hard to apply approximately one . Apply two rings of the initial quantity. Always start and stop the polisher...
... the bonnet, followed by polishing larger flat surfaces, such as car doors and quarter panels. Do not apply paste directly to the entire surface, turn buffer/polisher off. Use a broad sweeping motion in loss of bumpers or side mirrors, apply polish by hand. 12 WAX Fig. 6 Fig. 7 Fig...position (to the bonnet for subsequent applications, using half of polish to the left). Wait until the pad stops rotating before lifting the buffer/polisher from the surface. For hard to apply approximately one . Apply two rings of the initial quantity. Always start and stop the polisher...
English Manual
Page 13
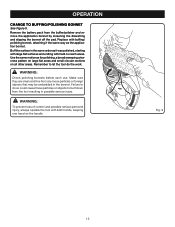
Make sure they are clean and free from any loose particles or foreign objects that may be thrown from the buffer/polisher and remove the application bonnet by loosening the drawstring and slipping the bonnet off the pad. Buff the surface in the same order as ...
Make sure they are clean and free from any loose particles or foreign objects that may be thrown from the buffer/polisher and remove the application bonnet by loosening the drawstring and slipping the bonnet off the pad. Buff the surface in the same order as ...

English Manual
Page 16
...• HOW TO ORDER REPAIR PARTS When ordering repair parts, always give the following information: • MODEL NUMBER P430 • SERIAL NUMBER Ryobi® is a registered trademark of Ryobi Limited used under license. 983000-967 05-11-06 (REV:00) ONE WORLD TECHNOLOGIES, INC. 1428 Pearman Dairy Road..., Anderson, SC 29625 Phone 1-800-525-2579 www.ryobitools.com 16 Please record the model number and serial number in . 18 VOLT BUFFER/POLISHER P430 WARNING: ...
...• HOW TO ORDER REPAIR PARTS When ordering repair parts, always give the following information: • MODEL NUMBER P430 • SERIAL NUMBER Ryobi® is a registered trademark of Ryobi Limited used under license. 983000-967 05-11-06 (REV:00) ONE WORLD TECHNOLOGIES, INC. 1428 Pearman Dairy Road..., Anderson, SC 29625 Phone 1-800-525-2579 www.ryobitools.com 16 Please record the model number and serial number in . 18 VOLT BUFFER/POLISHER P430 WARNING: ...

Repair Sheet
Page 2
May Be Purchased Locally 2 MODEL NUMBER P430 The model number will be found on a plate attached to the motor housing. Always mention the model number in . 18 VOLT Buffer/Polisher - RYOBI 6 in all correspondence regarding your Buffer/Polisher or when ordering repair parts. 5 1 4 2 3 PARTS LIST KEY PART NO. NUMBER DESCRIPTION QTY 1 2 3 4 5 6 7 019011001003 PAD ASSEMBLY 1 019011001002...
May Be Purchased Locally 2 MODEL NUMBER P430 The model number will be found on a plate attached to the motor housing. Always mention the model number in . 18 VOLT Buffer/Polisher - RYOBI 6 in all correspondence regarding your Buffer/Polisher or when ordering repair parts. 5 1 4 2 3 PARTS LIST KEY PART NO. NUMBER DESCRIPTION QTY 1 2 3 4 5 6 7 019011001003 PAD ASSEMBLY 1 019011001002...
