

English Manual
Page 1
Thank you years of injury, the user must read and understand the operator's manual before using this product. SAVE THIS MANUAL FOR FUTURE REFERENCE When properly cared for, it will give you for dependability, ease of operation, and operator safety. WARNING: To reduce the risk of rugged, trouble-free performance. OPERATOR'S MANUAL 6 in., 18 VOLT BUFFER/POLISHER P430 BATTERIES AND CHARGERS SOLD SEPARATELY Your buffer/polisher has been engineered and manufactured to our high standard for your purchase.
Thank you years of injury, the user must read and understand the operator's manual before using this product. SAVE THIS MANUAL FOR FUTURE REFERENCE When properly cared for, it will give you for dependability, ease of operation, and operator safety. WARNING: To reduce the risk of rugged, trouble-free performance. OPERATOR'S MANUAL 6 in., 18 VOLT BUFFER/POLISHER P430 BATTERIES AND CHARGERS SOLD SEPARATELY Your buffer/polisher has been engineered and manufactured to our high standard for your purchase.

English Manual
Page 2
... ...3-4 � Specific Safety Rules...4 Safety Rules for Charger ...5 � Symbols...6-7 � Features...8 � Assembly ...9 � Operation...9-13 � Maintenance ...14 � Parts Ordering / Service ...Back Page INTRODUCTION This tool has many features for two years. LIMITED TWO YEAR WARRANTY AND 30 DAY EXCHANGE POLICY One World Technologies, Inc., warrants its RYOBI® power tools with the...
... ...3-4 � Specific Safety Rules...4 Safety Rules for Charger ...5 � Symbols...6-7 � Features...8 � Assembly ...9 � Operation...9-13 � Maintenance ...14 � Parts Ordering / Service ...Back Page INTRODUCTION This tool has many features for two years. LIMITED TWO YEAR WARRANTY AND 30 DAY EXCHANGE POLICY One World Technologies, Inc., warrants its RYOBI® power tools with the...

English Manual
Page 3
.... Use of starting . Any power tool that cannot be drawn into air vents. Do not use the cord for your application. Such preventive safety measures reduce the risk of these instructions to bind and are caused by poorly maintained power tools. Keep cutting tools sharp and clean. If damaged, have the switch on invites accidents. Remove any adjustments, changing accessories, or storing power tools. Properly maintained cutting tools with...
.... Use of starting . Any power tool that cannot be drawn into air vents. Do not use the cord for your application. Such preventive safety measures reduce the risk of these instructions to bind and are caused by poorly maintained power tools. Keep cutting tools sharp and clean. If damaged, have the switch on invites accidents. Remove any adjustments, changing accessories, or storing power tools. Properly maintained cutting tools with...

English Manual
Page 4
... a source of operation. Read operator's manual carefully. Use of the power tool for the particular type of electric shock, fire, or serious personal injury. Do not place battery tools or their batteries near fire or heat. Following this rule will reduce the risk of power tool, taking into an electrical outlet; GENERAL SAFETY RULES Use the power tool, accessories and tool bits etc., in accordance with these instructions and in...
... a source of operation. Read operator's manual carefully. Use of the power tool for the particular type of electric shock, fire, or serious personal injury. Do not place battery tools or their batteries near fire or heat. Following this rule will reduce the risk of power tool, taking into an electrical outlet; GENERAL SAFETY RULES Use the power tool, accessories and tool bits etc., in accordance with these instructions and in...

English Manual
Page 5
Failure to follow all instructions listed below : Cord Length (Feet) 25' 50' 100' Cord Size (AWG) 16 16 16 NOTE: AWG = American Wire Gauge Do not operate charger with a damaged cord or plug, which could occur and create an electric shock hazard. Following this tool. Never use the cord to wet or damp conditions. Do not pull the charger cord rather than the plug when disconnecting...
Failure to follow all instructions listed below : Cord Length (Feet) 25' 50' 100' Cord Size (AWG) 16 16 16 NOTE: AWG = American Wire Gauge Do not operate charger with a damaged cord or plug, which could occur and create an electric shock hazard. Following this tool. Never use the cord to wet or damp conditions. Do not pull the charger cord rather than the plug when disconnecting...

English Manual
Page 6
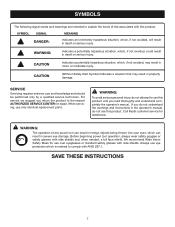
... Wet Conditions Alert Do not expose to keep your hands away from the blade will allow you to keep your safety. SYMBOL NAME DESIGNATION/EXPLANATION V Volts Voltage A Amperes Current Hz Hertz Frequency (cycles per second) W Watt Power min Minutes Time Alternating Current Type of current Direct Current no No Load Speed Type or a characteristic of injury or damage, avoid contact...
... Wet Conditions Alert Do not expose to keep your hands away from the blade will allow you to keep your safety. SYMBOL NAME DESIGNATION/EXPLANATION V Volts Voltage A Amperes Current Hz Hertz Frequency (cycles per second) W Watt Power min Minutes Time Alternating Current Type of current Direct Current no No Load Speed Type or a characteristic of injury or damage, avoid contact...
English Manual
Page 7
... the nearest AUTHORIZED SERVICE CENTER for repair. CAUTION (Without Safety Alert Symbol) Indicates a situation that may result in death or serious injury. Call Ryobi customer service for use only identical replacement parts. When servicing, use over eyeglasses or standard safety glasses with side shields. WARNING: The operation of risk associated with side shields and, when needed, a full face shield. SAVE THESE INSTRUCTIONS 7 WARNING: To...
... the nearest AUTHORIZED SERVICE CENTER for repair. CAUTION (Without Safety Alert Symbol) Indicates a situation that may result in death or serious injury. Call Ryobi customer service for use only identical replacement parts. When servicing, use over eyeglasses or standard safety glasses with side shields. WARNING: The operation of risk associated with side shields and, when needed, a full face shield. SAVE THESE INSTRUCTIONS 7 WARNING: To...
English Manual
Page 8
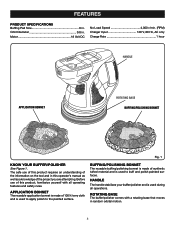
Motor 18 Volt DC No Load Speed 4,000 r/min. (RPM) Charger Input 120 V, 60 Hz, AC only Charge Rate 1 hour HANDLE APPLICATION BONNET ROTATING BASE BUFFING/POLISHING BONNET Fig. 1 KNOW YOUR BUFFER/POLISHER See Figure 1. The safe use of this operator's manual as well as a knowledge of the information on the tool and in . Before use of this product requires an understanding of...
Motor 18 Volt DC No Load Speed 4,000 r/min. (RPM) Charger Input 120 V, 60 Hz, AC only Charge Rate 1 hour HANDLE APPLICATION BONNET ROTATING BASE BUFFING/POLISHING BONNET Fig. 1 KNOW YOUR BUFFER/POLISHER See Figure 1. The safe use of this operator's manual as well as a knowledge of the information on the tool and in . Before use of this product requires an understanding of...
English Manual
Page 9
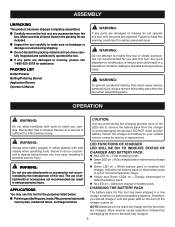
... can result in maintenance charge mode. Green LED on = When battery pack is out of normal temperature range. Yellow and Green LEDs on = Deeply discharged or defective battery pack. No LED on . The use any accessories from the tool when assembling parts. ASSEMBLY UNPACKING This product has been shipped completely assembled. Carefully remove the tool and any attachments...
... can result in maintenance charge mode. Green LED on = When battery pack is out of normal temperature range. Yellow and Green LEDs on = Deeply discharged or defective battery pack. No LED on . The use any accessories from the tool when assembling parts. ASSEMBLY UNPACKING This product has been shipped completely assembled. Carefully remove the tool and any attachments...
English Manual
Page 10
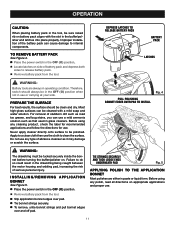
... work best at normal room temperature. After 30 minutes, reinsert the battery pack in the charger for checking or replacing. Refer to CHARGING A COOL BATTERY PACK for approximately 30 minutes before beginning operation. BATTERY PACK SHOWN IN CHARGER ON / OFF SWITCH ON (I) OFF (O) Fig. 2 Fig. 3 10 NOTE: The charger and battery pack should come on until the battery pack is removed from the power...
... work best at normal room temperature. After 30 minutes, reinsert the battery pack in the charger for checking or replacing. Refer to CHARGING A COOL BATTERY PACK for approximately 30 minutes before beginning operation. BATTERY PACK SHOWN IN CHARGER ON / OFF SWITCH ON (I) OFF (O) Fig. 2 Fig. 3 10 NOTE: The charger and battery pack should come on until the battery pack is removed from the power...
English Manual
Page 11
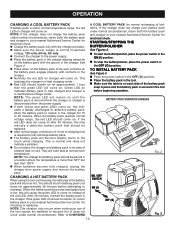
...; Remove battery pack from the tool. Failure to internal components. PULL POLISHING BONNET EDGES OVER PAD TO INSTALL Fig. 4 WARNING: The drawstring must be polished. TO REMOVE BATTERY PACK See Figure 4. Place the power switch in the buffer/polisher and latches into place properly. Never apply cleaner directly onto surface to release battery pack. Remove battery pack from the tool. Slip application bonnet edges...
...; Remove battery pack from the tool. Failure to internal components. PULL POLISHING BONNET EDGES OVER PAD TO INSTALL Fig. 4 WARNING: The drawstring must be polished. TO REMOVE BATTERY PACK See Figure 4. Place the power switch in the buffer/polisher and latches into place properly. Never apply cleaner directly onto surface to release battery pack. Remove battery pack from the tool. Slip application bonnet edges...
English Manual
Page 12
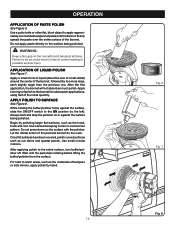
...until the pad stops rotating before lifting the buffer/polisher from the surface. Use a broad sweeping motion in loss of bumpers or side mirrors, apply polish by hand. 12 WAX Fig. 6 Fig. 7 Fig. 8 Use small circular motions. Apply two rings of polish to apply approximately one . Do not apply paste directly to ... reach areas, such as much polish. Always start and stop the polisher on the surface with both hands at all times. For hard to possible serious injury. Do not press down on or against the surface, slide the ON/OFF switch to the ON position (to the surface being...
...until the pad stops rotating before lifting the buffer/polisher from the surface. Use a broad sweeping motion in loss of bumpers or side mirrors, apply polish by hand. 12 WAX Fig. 6 Fig. 7 Fig. 8 Use small circular motions. Apply two rings of polish to apply approximately one . Do not apply paste directly to ... reach areas, such as much polish. Always start and stop the polisher on the surface with both hands at all times. For hard to possible serious injury. Do not press down on or against the surface, slide the ON/OFF switch to the ON position (to the surface being...
English Manual
Page 13
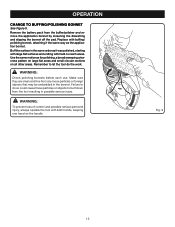
... areas and small circular motions on the handle. WARNING: Check polishing bonnets before each use. WARNING: To prevent loss of control and possible serious personal injury, always operate the tool with hard-to reach areas. Replace with buffing/ polishing bonnet, attaching it was polished, starting with large flat surfaces and ending with both hands, keeping one hand on all...
... areas and small circular motions on the handle. WARNING: Check polishing bonnets before each use. WARNING: To prevent loss of control and possible serious personal injury, always operate the tool with hard-to reach areas. Replace with buffing/ polishing bonnet, attaching it was polished, starting with large flat surfaces and ending with both hands, keeping one hand on all...
English Manual
Page 14
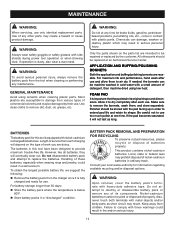
... local waste authority for this tool have been designed to remove dirt, dust, oil, grease, etc. Only the parts shown on the type of service from the tool when cleaning or performing any other parts should be repaired or replaced by their use and allow them to remove the bonnets, wash them, and store separately. Use of batteries properly. If needed, the bonnets can damage, weaken...
... local waste authority for this tool have been designed to remove dirt, dust, oil, grease, etc. Only the parts shown on the type of service from the tool when cleaning or performing any other parts should be repaired or replaced by their use and allow them to remove the bonnets, wash them, and store separately. Use of batteries properly. If needed, the bonnets can damage, weaken...

English Manual
Page 16
... a need ever exist for repair parts or service, simply contact your nearest Authorized Service Center. OPERATOR'S MANUAL 6 in. 18 VOLT BUFFER/POLISHER P430 WARNING: Some dust created by power sanding, sawing, grinding, drilling, and other construction activities contains chemicals known to cause cancer, birth defects or other masonry products, and • arsenic and chromium from these exposures varies, depending on a plate attached to the motor housing...
... a need ever exist for repair parts or service, simply contact your nearest Authorized Service Center. OPERATOR'S MANUAL 6 in. 18 VOLT BUFFER/POLISHER P430 WARNING: Some dust created by power sanding, sawing, grinding, drilling, and other construction activities contains chemicals known to cause cancer, birth defects or other masonry products, and • arsenic and chromium from these exposures varies, depending on a plate attached to the motor housing...

Repair Sheet
Page 2
Always mention the model number in . 18 VOLT Buffer/Polisher - May Be Purchased Locally 2 MODEL NUMBER P430 The model number will be found on a plate attached to the motor housing. RYOBI 6 in all correspondence regarding your Buffer/Polisher or when ordering repair parts. 5 1 4 2 3 PARTS LIST KEY PART NO. NUMBER DESCRIPTION QTY 1 2 3 4 5 6 7 019011001003 PAD ASSEMBLY 1 019011001002 SPRING WASHER (M5 1 019011001001 * SCREW (M5 X 12 MM 1 019011001012 POLISHING BONNET 1 019011001011 TERRY CLOTH BONNET 1 130255004 BATTERY PACK (P100) (NOT...
Always mention the model number in . 18 VOLT Buffer/Polisher - May Be Purchased Locally 2 MODEL NUMBER P430 The model number will be found on a plate attached to the motor housing. RYOBI 6 in all correspondence regarding your Buffer/Polisher or when ordering repair parts. 5 1 4 2 3 PARTS LIST KEY PART NO. NUMBER DESCRIPTION QTY 1 2 3 4 5 6 7 019011001003 PAD ASSEMBLY 1 019011001002 SPRING WASHER (M5 1 019011001001 * SCREW (M5 X 12 MM 1 019011001012 POLISHING BONNET 1 019011001011 TERRY CLOTH BONNET 1 130255004 BATTERY PACK (P100) (NOT...


