User Manual
Page 2
.... Remove any adjustments, changing accessories, or storing power tools. English ELECTRICAL SAFETY Power tool plugs must be drawn into air vents. Do not use a ground fault circuit interrupter (GFCI) protected supply. Do not use with earthed (grounded) power tools. Loose clothes, jewellery or long hair can cause you are doing and use the power tool if the switch does not turn it on a ladder or unstable support. Stable...
.... Remove any adjustments, changing accessories, or storing power tools. English ELECTRICAL SAFETY Power tool plugs must be drawn into air vents. Do not use a ground fault circuit interrupter (GFCI) protected supply. Do not use with earthed (grounded) power tools. Loose clothes, jewellery or long hair can cause you are doing and use the power tool if the switch does not turn it on a ladder or unstable support. Stable...
User Manual
Page 3
....1 when assembling parts, operating the tool, or performing maintenance. Follow instructions in the Maintenance section of operation. Following this rule will reduce the risk of electric shock, fire, or serious injury. Always wear eye protection with side shields marked to control. Use the power tool, accessories and tool bits etc. Following this manual. therefore, they are always in a hazardous situation. An exploded battery can make...
....1 when assembling parts, operating the tool, or performing maintenance. Follow instructions in the Maintenance section of operation. Following this rule will reduce the risk of electric shock, fire, or serious injury. Always wear eye protection with side shields marked to control. Use the power tool, accessories and tool bits etc. Following this manual. therefore, they are always in a hazardous situation. An exploded battery can make...
User Manual
Page 4
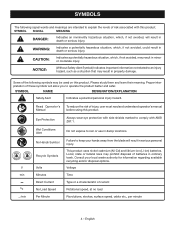
.... Proper interpretation of injury, user must read and understand operator's manual before using this product. This product uses nickel-cadmium (Ni-Cd) and lithium-ion (Li-ion) batteries. SYMBOLS The following symbols may prohibit disposal of current Rotational speed, at no .../min No Hands Symbol Recycle Symbols Volts Minutes Direct Current No Load Speed Per Minute Failure to rain or use in death or serious...
.... Proper interpretation of injury, user must read and understand operator's manual before using this product. This product uses nickel-cadmium (Ni-Cd) and lithium-ion (Li-ion) batteries. SYMBOLS The following symbols may prohibit disposal of current Rotational speed, at no .../min No Hands Symbol Recycle Symbols Volts Minutes Direct Current No Load Speed Per Minute Failure to rain or use in death or serious...

User Manual
Page 5
... by sliding the lock-off button into the locked position. Insert the battery pack into place and the battery pack is secured before beginning operation. To install: Lock the switch trigger by sliding the lock-off button into your eyes resulting in possible serious injury. To remove: Lock the switch trigger by the manufacturer of the battery pack and remove the battery pack from your battery pack and charger. 5 - FEATURES PRODUCT SPECIFICATIONS...
... by sliding the lock-off button into the locked position. Insert the battery pack into place and the battery pack is secured before beginning operation. To install: Lock the switch trigger by sliding the lock-off button into your eyes resulting in possible serious injury. To remove: Lock the switch trigger by the manufacturer of the battery pack and remove the battery pack from your battery pack and charger. 5 - FEATURES PRODUCT SPECIFICATIONS...
User Manual
Page 6
... and depress the switch trigger. Allow the saw bar. Raise the blade clamp lever, push the lock lever in use or carrying at different positions on the side of the saw. Insert the saw blade between the blade clamp and the saw blade to a work . To install the blade: Remove the battery pack. Lift the blade clamp lock/release lever located on the blade. Let the blade and saw do the work bench or table with a vise...
... and depress the switch trigger. Allow the saw bar. Raise the blade clamp lever, push the lock lever in use or carrying at different positions on the side of the saw. Insert the saw blade between the blade clamp and the saw blade to a work . To install the blade: Remove the battery pack. Lift the blade clamp lock/release lever located on the blade. Let the blade and saw do the work bench or table with a vise...
User Manual
Page 7
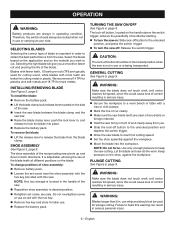
... in the blade path when cutting into electrical wiring can result in objects being thrown into a wall; WARNING: To avoid serious personal injury, always remove the battery pack from various types of any time let brake fluids, gasoline, petroleumbased products, penetrating oils, etc., come in contact with the saw blade. Do not force the tool and use only identical replacement parts. Use clean cloths...
... in the blade path when cutting into electrical wiring can result in objects being thrown into a wall; WARNING: To avoid serious personal injury, always remove the battery pack from various types of any time let brake fluids, gasoline, petroleumbased products, penetrating oils, etc., come in contact with the saw blade. Do not force the tool and use only identical replacement parts. Use clean cloths...

User Manual 2
Page 1
P516 REPAIR SHEET RYOBI 18V RECIPROCATING SAW MODEL NO.
P516 REPAIR SHEET RYOBI 18V RECIPROCATING SAW MODEL NO.
User Manual 2
Page 2
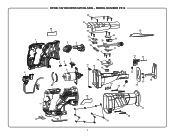
MODEL NUMBER P516 30 31 39 30 2 3 32 33 34 36 35 29 37 9 7 56 8 16 11 12 10 28 14 15 13 26 25 27 22 20 23 24 1 40 17 18 38 19 21 20 2 1 4 RYOBI 18V RECIPROCATING SAW -
MODEL NUMBER P516 30 31 39 30 2 3 32 33 34 36 35 29 37 9 7 56 8 16 11 12 10 28 14 15 13 26 25 27 22 20 23 24 1 40 17 18 38 19 21 20 2 1 4 RYOBI 18V RECIPROCATING SAW -
User Manual 2
Page 3
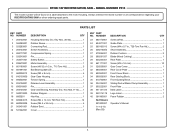
Key Nos. 38-40 1 Rubber Sleeve 1 Connecting Rod 1 Switch Assembly 1 Compression Spring 1 Pin 1 Safety Button 1 Motor Assembly 1 Screw (#8-32 x 1/2 in ., T20 Torx Pan Hd 2 Shoe Assembly 1 Rubber Cushion 2 Blade (Wood Cutting 1 Rear Plate 1 Screw (M4 x 16 mm 10 Gear Case Cover 1 Rear Cover Plate 1 Front Cover Block 1 Rear Guiding Block 1 Front Guiding Block 1 Sliding Rod w/Blade Clamp Assembly 1 Front Plate 1 Data Label 1 Logo Label 1 Foam Rubber 2 Operator's Manual 3 MODEL NUMBER P516 The model number will be found on a label attached to the...
Key Nos. 38-40 1 Rubber Sleeve 1 Connecting Rod 1 Switch Assembly 1 Compression Spring 1 Pin 1 Safety Button 1 Motor Assembly 1 Screw (#8-32 x 1/2 in ., T20 Torx Pan Hd 2 Shoe Assembly 1 Rubber Cushion 2 Blade (Wood Cutting 1 Rear Plate 1 Screw (M4 x 16 mm 10 Gear Case Cover 1 Rear Cover Plate 1 Front Cover Block 1 Rear Guiding Block 1 Front Guiding Block 1 Sliding Rod w/Blade Clamp Assembly 1 Front Plate 1 Data Label 1 Logo Label 1 Foam Rubber 2 Operator's Manual 3 MODEL NUMBER P516 The model number will be found on a label attached to the...
User Manual 2
Page 4
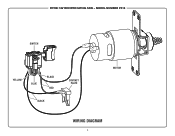
MODEL NUMBER P516 SWITCH YELLOW BLUE BLACK RED BLACK CONTACT PLATE MOTOR WIRING DIAGRAM 4 RYOBI 18V RECIPROCATING SAW -
MODEL NUMBER P516 SWITCH YELLOW BLUE BLACK RED BLACK CONTACT PLATE MOTOR WIRING DIAGRAM 4 RYOBI 18V RECIPROCATING SAW -


