

Operation Manual 2
Page 6
...after each use or damage. Cutter blades contacting a "live " and could cause loss of serious personal injury. Before starting the hedge trimmer, make sure the blade has stopped before each use water or any buildup of children or untrained individuals. Replace blade cover when ... handle and guard properly assembled to be plugged into an electrical outlet; The use with a debris remover, do not have to hedge trimmer. If you loan someone this product only with ANSI Z87.1. Remove any liquids to instruct others who may result in operating condition....
...after each use or damage. Cutter blades contacting a "live " and could cause loss of serious personal injury. Before starting the hedge trimmer, make sure the blade has stopped before each use water or any buildup of children or untrained individuals. Replace blade cover when ... handle and guard properly assembled to be plugged into an electrical outlet; The use with a debris remover, do not have to hedge trimmer. If you loan someone this product only with ANSI Z87.1. Remove any liquids to instruct others who may result in operating condition....
Operation Manual 2
Page 7
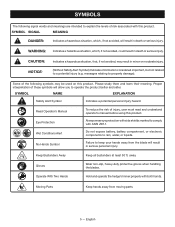
... them and learn their meaning. Gloves Wear non-slip, heavy-duty protective gloves when handling the blades. Operate With Two Hands Hold and operate the hedge trimmer properly with ANSI Z87.1. messages relating to rain, water, or liquids. Failure to operate the product better and safer. SYMBOL SIGNAL MEANING DANGER: Indicates a hazardous...
... them and learn their meaning. Gloves Wear non-slip, heavy-duty protective gloves when handling the blades. Operate With Two Hands Hold and operate the hedge trimmer properly with ANSI Z87.1. messages relating to rain, water, or liquids. Failure to operate the product better and safer. SYMBOL SIGNAL MEANING DANGER: Indicates a hazardous...
Operation Manual 2
Page 9
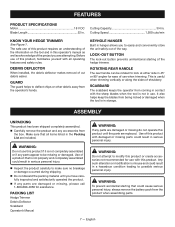
...completely assembled. n Do not discard the packing material until the parts are included. Cutting Speed 1,500 cuts/min KNOW YOUR HEDGE TRIMMER See Figure 1. KEYHOLE HANGER Built in serious personal injury. LOCK-OUT BUTTON The lock-out button prevents unintentional starting that ... n Inspect the product carefully to be rotated to modify this product or create accessories not recommended for assistance. PACKING LIST Hedge Trimmer Debris Deflector Scabbard Operator's Manual WARNING: If any parts appear to make sure no breakage or damage occurred during shipping. ...
...completely assembled. n Do not discard the packing material until the parts are included. Cutting Speed 1,500 cuts/min KNOW YOUR HEDGE TRIMMER See Figure 1. KEYHOLE HANGER Built in serious personal injury. LOCK-OUT BUTTON The lock-out button prevents unintentional starting that ... n Inspect the product carefully to be rotated to modify this product or create accessories not recommended for assistance. PACKING LIST Hedge Trimmer Debris Deflector Scabbard Operator's Manual WARNING: If any parts appear to make sure no breakage or damage occurred during shipping. ...

Operation Manual 2
Page 10
... NOTE: Always wear non-slip, heavy-duty gloves when installing or removing the debris deflector. Remove the battery pack. Place the hedge trimmer on a sturdy flat surface. Align the angled edge of the debris deflector with the grooves on the guide bar. Slide the ...in objects being thrown into the product as a handle or attempt to inflict serious injury. WARNING: Make sure the latches on the hedge trimmer handles. Tighten securely all fasteners and caps and do so could cause the battery pack to comply with hands free of attachments or ...
... NOTE: Always wear non-slip, heavy-duty gloves when installing or removing the debris deflector. Remove the battery pack. Place the hedge trimmer on a sturdy flat surface. Align the angled edge of the debris deflector with the grooves on the guide bar. Slide the ...in objects being thrown into the product as a handle or attempt to inflict serious injury. WARNING: Make sure the latches on the hedge trimmer handles. Tighten securely all fasteners and caps and do so could cause the battery pack to comply with hands free of attachments or ...
Operation Manual 2
Page 11
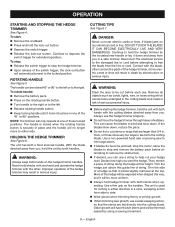
...handle button. Turn handle to the right or to the left or to help cut before each use the hedge trimmer properly. Do not force the hedge trimmer through heavy shrubbery. Continue to bind and slow down. Disconnect the electrical service to the damaged line or cord before ..., so that it down , reduce the pace. Do not try to feed into the cutting blade. Trim the side of the hedge trimmer, or live electric cords or lines will automatically reset to either direction in . CUTTING TIPS See Figure 7. Contact with the other conductive parts of...
...handle button. Turn handle to the right or to the left or to help cut before each use the hedge trimmer properly. Do not force the hedge trimmer through heavy shrubbery. Continue to bind and slow down. Disconnect the electrical service to the damaged line or cord before ..., so that it down , reduce the pace. Do not try to feed into the cutting blade. Trim the side of the hedge trimmer, or live electric cords or lines will automatically reset to either direction in . CUTTING TIPS See Figure 7. Contact with the other conductive parts of...
Operation Manual 2
Page 12
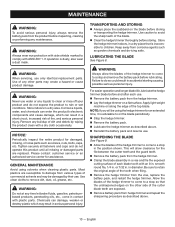
...: To avoid serious personal injury, always remove the battery pack from the vise, replace the battery pack, and restart the hedge trimmer. English Remove any time let brake fluids, gasoline, petroleumbased products, penetrating oils, etc., come to remove dirt, dust, oil, grease..., etc. Keep away from the hedge trimmer. Lay the hedge trimmer on the blade before and after each blade tooth with a dry cloth occasionally. Allow the blades of dirt and debris by...
...: To avoid serious personal injury, always remove the battery pack from the vise, replace the battery pack, and restart the hedge trimmer. English Remove any time let brake fluids, gasoline, petroleumbased products, penetrating oils, etc., come to remove dirt, dust, oil, grease..., etc. Keep away from the hedge trimmer. Lay the hedge trimmer on the blade before and after each blade tooth with a dry cloth occasionally. Allow the blades of dirt and debris by...

Operation Manual 2
Page 13
...a small vacuum cleaner brush to clear dust or debris from corrosive agents such as kerosene. Moisture can cause a shock hazard. Store the hedge trimmer in a dry, well-ventilated place that is inaccessible to ensure your product, call (toll free) 1-800-860-4050. 11 - Your product has...the RYOBI Help Line! English Wipe off any moisture with a mild detergent. Keep away from the air vents on the cutting blades before storing. CALL US FIRST For any strong detergents on the plastic housing or the handle. STORING THE HEDGE TRIMMER See Figure 10. Clean the hedge trimmer ...
...a small vacuum cleaner brush to clear dust or debris from corrosive agents such as kerosene. Moisture can cause a shock hazard. Store the hedge trimmer in a dry, well-ventilated place that is inaccessible to ensure your product, call (toll free) 1-800-860-4050. 11 - Your product has...the RYOBI Help Line! English Wipe off any moisture with a mild detergent. Keep away from the air vents on the cutting blades before storing. CALL US FIRST For any strong detergents on the plastic housing or the handle. STORING THE HEDGE TRIMMER See Figure 10. Clean the hedge trimmer ...
Parts Diagram
Page 3
... Assembly...1 Data Label (P2606)...1 Data Label (P2606VNM)...1 Screw (M4 x 16 mm, Pan Hd.)...4 Hedge Sweep...1 Blade Shield...1 Rotating Handle Label...1 Logo Label...2 Operator's Manual 3 RYOBI 18 VOLT HEDGE TRIMMER − ITEM NO. PART NUMBER 1 661817001 2 311825001 3 311829001 4 679055007 5 679055008 6 311827001...) (P2606)...1 Housing Assembly (Inc. Always mention the item number and manufacturing number in all correspondence regarding your HEDGE TRIMMER or when ordering replacement parts. Key Nos. 19, 23-24) (P2606VNM 1 Top Cover Assembly (Inc. P2606...
... Assembly...1 Data Label (P2606)...1 Data Label (P2606VNM)...1 Screw (M4 x 16 mm, Pan Hd.)...4 Hedge Sweep...1 Blade Shield...1 Rotating Handle Label...1 Logo Label...2 Operator's Manual 3 RYOBI 18 VOLT HEDGE TRIMMER − ITEM NO. PART NUMBER 1 661817001 2 311825001 3 311829001 4 679055007 5 679055008 6 311827001...) (P2606)...1 Housing Assembly (Inc. Always mention the item number and manufacturing number in all correspondence regarding your HEDGE TRIMMER or when ordering replacement parts. Key Nos. 19, 23-24) (P2606VNM 1 Top Cover Assembly (Inc. P2606...
Parts Diagram
Page 4
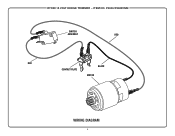
P2606/P2606VNM SWITCH ASSEMBLY RED RED BLACK CONTACT PLATE MOTOR WIRING DIAGRAM 4 RYOBI 18 VOLT HEDGE TRIMMER − ITEM NO.
P2606/P2606VNM SWITCH ASSEMBLY RED RED BLACK CONTACT PLATE MOTOR WIRING DIAGRAM 4 RYOBI 18 VOLT HEDGE TRIMMER − ITEM NO.


