Ryobi P20102BTL Support and Manuals
Get Help and Manuals for this Ryobi item

View All Support Options Below
Free Ryobi P20102BTL manuals!
Problems with Ryobi P20102BTL?
Ask a Question
Free Ryobi P20102BTL manuals!
Problems with Ryobi P20102BTL?
Ask a Question
Popular Ryobi P20102BTL Manual Pages
Operation Manual - Page 2
...émité inférieur, extremo inferior)
C
H -
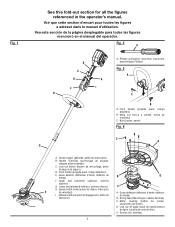
Vea esta sección de la página desplegable para todas las figuras mencionó en el manual del operador. Release button (bouton de dégagement, botón de
de hierba)
liberación)
B - Fig. 1
See this fold-out section for all the figures...
Operation Manual - Page 6
...like. Overreaching can be properly repaired or replaced by an authorized service dealer.
Make sure all parts of your finger on the...Do not allow children or untrained individuals to follow all instructions before inserting battery pack. They can result in serious ... recommended when working outdoors. To install any other brand of cutting head to rain or wet...
Operation Manual - Page 7
... charge battery tool in the instructions. avoid contact. If liquid ...fire.
Have servicing performed by a qualified repair person using your product ...61550; Use battery only with specifically designated battery packs. If you ...accidentally occurs, flush with local codes for line trimmer use a ...hazards when not using only identical replacement parts. This will reduce the risk of...
Operation Manual - Page 8
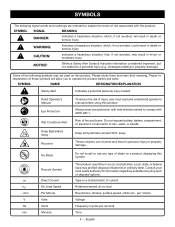
...
No Blade
Recycle Symbol
Direct Current No Load Speed Per Minute Volts Hertz Minutes
Do not install or use any type of fire and burns. no load
Revolutions, strokes, surface speed, ...batteries.
Some of injury, user must read and understand operator's manual before using this product.
Read Operator's Manual
Eye Protection
Wet Conditions Alert
Keep Bystanders Away
Ricochet
To reduce...
Operation Manual - Page 9
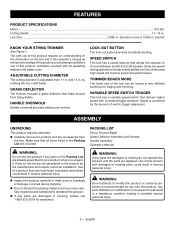
FEATURES
PRODUCT SPECIFICATIONS
Motor...18...of this product, familiarize yourself with Screws Handle Assembly Operator's Manual
WARNING:
Do not use of this product or create accessories not...parts could result in the Packing List are replaced.
Speed is misuse and could result in two different positions for edging and trimming.
by the manufacturer and require customer installation...
Operation Manual - Page 10
...
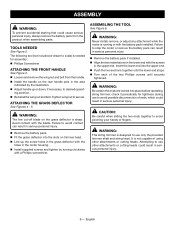
WARNING:
To prevent accidental starting that could cause serious personal injury, always remove the battery pack from the handle. n Install the handle on the grass deflector is running or with the blade. TOOLS NEEDED
See Figure 2. Attempting to avoid pinching your ...HANDLE
See Figure 3. n Loosen and remove the wing nut and bolt from the product when assembling parts.
Operation Manual - Page 11
...This will automatically reset to make you are replaced.
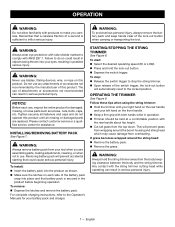
For complete charging instructions, refer to comply with your right hand on...INSTALLING/REMOVING BATTERY PACK
See Figure 7. STARTING/STOPPING THE STRING TRIMMER
See Figure 8. WARNING:
Always remove battery pack from the top down. Please contact customer service or a qualified service center for damaged, missing, or loose parts...
Operation Manual - Page 12
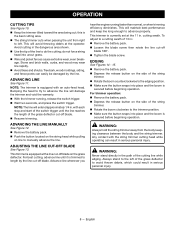
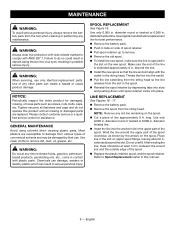
... - 15. Remove the battery pack. Depress the release button on line to manually advance the line.
Always stand to the left . This will damage the trimmer and void the warranty.... Wire and picket fences cause extra line wear, even breakage. this is currently set at the operator. with the string trimmer cutting head while operating can easily be damaged by the...
Operation Manual - Page 13
....
Install the new spool so that the line and slot align with the eyelet in the string head. Refer to damage from various types of spool retainer.
Pull spool retainer up to do not operate this manual.
9 - English
Tighten securely all missing or damaged parts are susceptible to Spool Replacement earlier in...
Operation Manual - Page 14
..., family, or household use (90 days for business or commercial use).
Install more line.
Refer to itself.
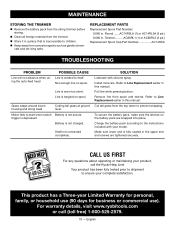
For warranty details, visit www.ryobitools.com or call the Ryobi Help Line!
Twisted............AC80RL1 (1) or AC80RL3 (3 pk.) Replacement Spool Cap Part Number AC14HCA
TROUBLESHOOTING
PROBLEM
Line will not advance when using the auto-feed head
POSSIBLE CAUSE...
Parts Diagram - Page 1
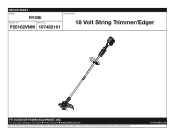
... Volt String Trimmer/Edger
P20102VNM 107482101
TTI OUTDOOR POWER EQUIPMENT, INC. P.O. Box 1288, Anderson, SC 29622 1-800-525-2579 www.ryobitools.com
The model number and manufacturing location will be found on a label attached to the product. Always mention this information in all communications regarding this product and when...
Parts Diagram - Page 3
... x 40 mm, Hex Hd.)
1
Not Shown:
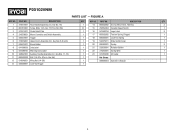
12 518949001 Wing Nut (1/4-20)
1
998000054 Operator's Manual
13 539526001 Lock-Out Trigger
1
3
Key No. 16)
1
14 660502002 Screw (M5 x 8 mm... Trigger
1
18 698399001 Lock-Out Spring
1
6 316079001 Upper Boom Assembly (Inc.
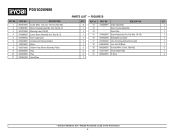
PART NO. P20102VNM
PARTS LIST -
DESCRIPTION
QTY.
1 316077001 Rear Handle Assembly (Inc. DESCRIPTION
QTY. FIGURE ...
Parts Diagram - Page 5
...1
5 941588793 Front Logo Label
1
16 941263204 Adjustable Cut Label
1
6 679034001 Compression Spring (Slider)
1
17 941263205 Line Trimming Instructions Label
1
7 742679001 Motor
1
18 638845006 Line Cut-Off Blade
1
8 562079002 Rubber Plate (Motor Mounting Plate)
2
19 660208055...Key No. 3)
1
15 316082001 Guard Assembly (Inc. PART NO. P20102VNM
PARTS LIST - FIGURE B
KEY NO.
Ryobi P20102BTL Reviews
We have not received any reviews for Ryobi yet.