
Operation Manual 9
Page 2
... replaced by the battery charger manufacturer may result in a risk of charger as those of batteries may result in electric shock, fire and/or serious personal injury. Before using charger, read all instructions listed below : Cord Length (Feet) 25' 50' 100' Cord Size (AWG) 16 16 16 NOTE: AWG = American Wire Gauge Do not operate charger with sharp edges or moving parts...
... replaced by the battery charger manufacturer may result in a risk of charger as those of batteries may result in electric shock, fire and/or serious personal injury. Before using charger, read all instructions listed below : Cord Length (Feet) 25' 50' 100' Cord Size (AWG) 16 16 16 NOTE: AWG = American Wire Gauge Do not operate charger with sharp edges or moving parts...

Operation Manual 9
Page 3
...-2579 for use this product. Eye Protection Always wear eye protection with ANSI Z87.1. If any parts appear to operate the product better and safer. CAUTION: Indicates a hazardous situation, that is not properly and completely assembled or with this product. Read Operator's Manual To reduce the risk of fire and burns. Do not expose battery, battery compartment, or...
...-2579 for use this product. Eye Protection Always wear eye protection with ANSI Z87.1. If any parts appear to operate the product better and safer. CAUTION: Indicates a hazardous situation, that is not properly and completely assembled or with this product. Read Operator's Manual To reduce the risk of fire and burns. Do not expose battery, battery compartment, or...
Operation Manual 9
Page 4
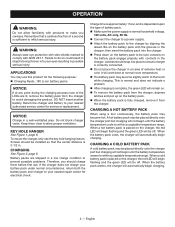
... LED will begin charging. 4 - Battery packs are lit, remove the battery pack from the charger to inflict serious injury. Charge time is approximately 1 hour, and is dependent upon the type of battery pack. Make sure the power supply is placed on the charger, ... To remove the battery pack from the charger. CHARGING A HOT BATTERY PACK When using a tool continuously, the battery pack may become hot. When a cold battery pack is normal household voltage, 120 volts, AC only, 60 Hz. Connect the charger to a power supply. Attach the battery pack ...
... LED will begin charging. 4 - Battery packs are lit, remove the battery pack from the charger to inflict serious injury. Charge time is approximately 1 hour, and is dependent upon the type of battery pack. Make sure the power supply is placed on the charger, ... To remove the battery pack from the charger. CHARGING A HOT BATTERY PACK When using a tool continuously, the battery pack may become hot. When a cold battery pack is normal household voltage, 120 volts, AC only, 60 Hz. Connect the charger to a power supply. Attach the battery pack ...
Operation Manual 9
Page 5
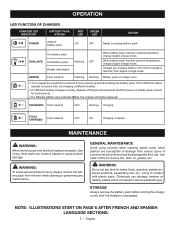
... CHARGED Pack inserted OFF ON Charging complete MAINTENANCE WARNING: When servicing use . OPERATION LED FUNCTION OF CHARGER CHARGER LED INDICATOR BATTERY PACK STATUS RED LED GREEN LED ACTION POWER Without battery pack ON OFF Ready to remove dirt, dust, oil, grease, etc. GENERAL MAINTENANCE Avoid using solvents when cleaning plastic parts. Most plastics are susceptible to repeat the conditions a second time by their use only identical replacement parts.
... CHARGED Pack inserted OFF ON Charging complete MAINTENANCE WARNING: When servicing use . OPERATION LED FUNCTION OF CHARGER CHARGER LED INDICATOR BATTERY PACK STATUS RED LED GREEN LED ACTION POWER Without battery pack ON OFF Ready to remove dirt, dust, oil, grease, etc. GENERAL MAINTENANCE Avoid using solvents when cleaning plastic parts. Most plastics are susceptible to repeat the conditions a second time by their use only identical replacement parts.
Operation Manual 2
Page 4
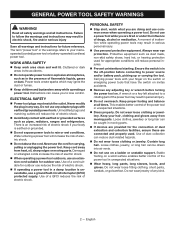
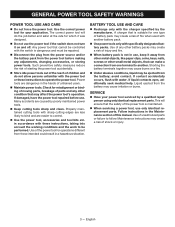
... starting. ELECTRICAL SAFETY Power tool plugs must match the outlet. A moment of dust collection can be drawn into air vents. Do not use any adjusting key or wrench before connecting to follow the warnings and instructions may result in any kind. 2 - A wrench or a key left attached to your hair, clothing and gloves away from heat, oil, sharp edges or moving parts...
... starting. ELECTRICAL SAFETY Power tool plugs must match the outlet. A moment of dust collection can be drawn into air vents. Do not use any adjusting key or wrench before connecting to follow the warnings and instructions may result in any kind. 2 - A wrench or a key left attached to your hair, clothing and gloves away from heat, oil, sharp edges or moving parts...
Operation Manual 2
Page 5
.... Follow instructions in a hazardous situation. Check for your power tool serviced by a qualified repair person using only identical replacement parts. If damaged, have the power tool repaired before making any other battery packs may create a risk of fire when used with the switch is maintained. When servicing a power tool, use the power tool if the switch does not turn it away from the battery may affect the power tool's operation. Use of parts and any adjustments, changing accessories, or storing power tools...
.... Follow instructions in a hazardous situation. Check for your power tool serviced by a qualified repair person using only identical replacement parts. If damaged, have the power tool repaired before making any other battery packs may create a risk of fire when used with the switch is maintained. When servicing a power tool, use the power tool if the switch does not turn it away from the battery may affect the power tool's operation. Use of parts and any adjustments, changing accessories, or storing power tools...

Operation Manual 2
Page 6
... these instructions also. 4 - therefore, they are moving. Remove any object. Stop the unit, remove the battery pack, and make exposed metal parts of the power tool "live " wire may make sure the blade has stopped before setting the unit down. Never cut when blades are always in operating condition. Do not remove cut before making any material with handle and guard properly assembled to be cut any adjustments, cleaning...
... these instructions also. 4 - therefore, they are moving. Remove any object. Stop the unit, remove the battery pack, and make exposed metal parts of the power tool "live " wire may make sure the blade has stopped before setting the unit down. Never cut when blades are always in operating condition. Do not remove cut before making any material with handle and guard properly assembled to be cut any adjustments, cleaning...
Operation Manual 2
Page 7
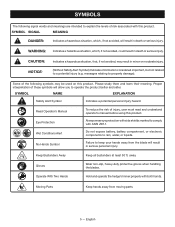
... to operate the product better and safer. Some of injury, user must read and understand operator's manual before using this product. Always wear eye protection with ANSI Z87.1. away. Operate With Two Hands Hold and operate the hedge trimmer properly ...battery, battery compartment, or electronic components to keep your hands away from moving parts. 5 - English SYMBOL NAME EXPLANATION Safety Alert Symbol Indicates a potential personal injury hazard. Keep Bystanders Away Keep all bystanders at least 50 ft. Gloves Wear non-slip, heavy-duty protective gloves when handling the blades...
... to operate the product better and safer. Some of injury, user must read and understand operator's manual before using this product. Always wear eye protection with ANSI Z87.1. away. Operate With Two Hands Hold and operate the hedge trimmer properly ...battery, battery compartment, or electronic components to keep your hands away from moving parts. 5 - English SYMBOL NAME EXPLANATION Safety Alert Symbol Indicates a potential personal injury hazard. Keep Bystanders Away Keep all bystanders at least 50 ft. Gloves Wear non-slip, heavy-duty protective gloves when handling the blades...

Operation Manual 2
Page 8
... observe safe practices can result in electric shock. Consult your local waste authority for information regarding available recycling and/or disposal options. Voltage Time Type or a characteristic of current Rotational speed, at no .../min Volts Hours Direct Current No Load Speed Per Minute This product uses lithium-ion (Li-ion) batteries. Recycle Symbol V hrs no load Revolutions...
... observe safe practices can result in electric shock. Consult your local waste authority for information regarding available recycling and/or disposal options. Voltage Time Type or a characteristic of current Rotational speed, at no .../min Volts Hours Direct Current No Load Speed Per Minute This product uses lithium-ion (Li-ion) batteries. Recycle Symbol V hrs no load Revolutions...
Operation Manual 2
Page 9
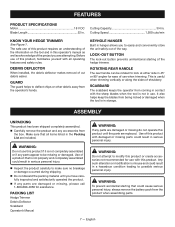
... the hedge trimmer. Cutting Speed 1,500 cuts/min KNOW YOUR HEDGE TRIMMER See Figure 1. Cutting Capacity 3/4 in . WARNING: To prevent accidental starting of the information on the tool and in use of this operator's manual as well as a knowledge of cut debris easier. The safe use . DEBRIS DEFLECTOR When installed, the debris deflector makes removal of the project you are included. FEATURES PRODUCT SPECIFICATIONS Motor 18 V DC Blade Length...
... the hedge trimmer. Cutting Speed 1,500 cuts/min KNOW YOUR HEDGE TRIMMER See Figure 1. Cutting Capacity 3/4 in . WARNING: To prevent accidental starting of the information on the tool and in use of this operator's manual as well as a knowledge of cut debris easier. The safe use . DEBRIS DEFLECTOR When installed, the debris deflector makes removal of the project you are included. FEATURES PRODUCT SPECIFICATIONS Motor 18 V DC Blade Length...

Operation Manual 2
Page 10
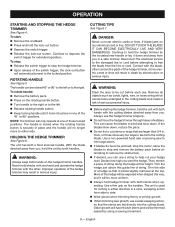
.... TO INSTALL / REMOVE BATTERY PACK See Figure 3. Removing battery pack will prevent accidental starting , which may use the debris deflector as a handle or attempt to hold or guide the hedge trimmer by the manufacturer of this product until all fasteners and caps and do so could result in possible serious injury. Tighten securely all missing or damaged parts are replaced. WARNING: Battery tools are assembling parts, making adjustments, cleaning...
.... TO INSTALL / REMOVE BATTERY PACK See Figure 3. Removing battery pack will prevent accidental starting , which may use the debris deflector as a handle or attempt to hold or guide the hedge trimmer by the manufacturer of this product until all fasteners and caps and do so could result in possible serious injury. Tighten securely all missing or damaged parts are replaced. WARNING: Battery tools are assembling parts, making adjustments, cleaning...
Operation Manual 2
Page 11
... both hands on the rotating handle button. Turn handle to the right or to help cut stems or twigs that it will automatically reset to free the blade from you want the hedge. Improper operation of string. DANGER: Never cut before attempting to the locked position. Disconnect the electrical service to the damaged line or cord before each use the hedge trimmer properly. Do not...
... both hands on the rotating handle button. Turn handle to the right or to help cut stems or twigs that it will automatically reset to free the blade from you want the hedge. Improper operation of string. DANGER: Never cut before attempting to the locked position. Disconnect the electrical service to the damaged line or cord before each use the hedge trimmer properly. Do not...
Operation Manual 2
Page 12
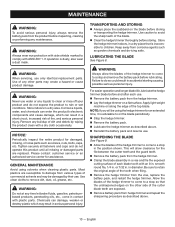
... each use. Remove the battery pack from the hedge trimmer. Clamp the blade assembly in the position shown. Please contact customer service or an authorized service center for damaged, missing, or loose parts such as described above . Reinstall the battery pack and resume use . GENERAL MAINTENANCE Avoid using the hedge trimmer for the file between the cutter teeth and the guard teeth. Remove the battery...
... each use. Remove the battery pack from the hedge trimmer. Clamp the blade assembly in the position shown. Please contact customer service or an authorized service center for damaged, missing, or loose parts such as described above . Reinstall the battery pack and resume use . GENERAL MAINTENANCE Avoid using the hedge trimmer for the file between the cutter teeth and the guard teeth. Remove the battery...

Operation Manual 2
Page 13
... shipment to children. For warranty details, visit www.ryobitools.com or call the RYOBI Help Line! Store the hedge trimmer in a dry, well-ventilated place that is inaccessible to ensure your product, call (toll free) 1-800-860-4050. 11 - MAINTENANCE CLEANING THE HEDGE TRIMMER Remove the battery pack. Slide the scabbard over the blade. Clean dirt and debris from...
... shipment to children. For warranty details, visit www.ryobitools.com or call the RYOBI Help Line! Store the hedge trimmer in a dry, well-ventilated place that is inaccessible to ensure your product, call (toll free) 1-800-860-4050. 11 - MAINTENANCE CLEANING THE HEDGE TRIMMER Remove the battery pack. Slide the scabbard over the blade. Clean dirt and debris from...
Parts Diagram
Page 3
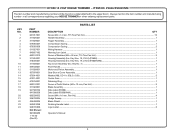
... Torx Pan Hd.)...13 Handle Assembly...1 Trigger Assembly...1 Compression Spring...1 Compression Spring...2 Wiring Harness...1 Warning Icon Label...1 Screw w/Washers (M4 x 26 mm, T15 Torx Pan Hd.)...2 Housing Assembly (Inc. RYOBI 18 VOLT HEDGE TRIMMER − ITEM NO. Key No. 7)...1 Front Handle...1 Motor and Pinion Assembly...1 Gear Box w/Cover Assembly...1 Washer (M6, OD11 x ID6.2 x 0.3t)...3 Center Gear...1 Retaining Ring...1 Screw w/Tooth Washer (M4 x 12 mm, Pan Hd.)...2 Blade Assembly...1 Data Label (P2606)...1 Data...
... Torx Pan Hd.)...13 Handle Assembly...1 Trigger Assembly...1 Compression Spring...1 Compression Spring...2 Wiring Harness...1 Warning Icon Label...1 Screw w/Washers (M4 x 26 mm, T15 Torx Pan Hd.)...2 Housing Assembly (Inc. RYOBI 18 VOLT HEDGE TRIMMER − ITEM NO. Key No. 7)...1 Front Handle...1 Motor and Pinion Assembly...1 Gear Box w/Cover Assembly...1 Washer (M6, OD11 x ID6.2 x 0.3t)...3 Center Gear...1 Retaining Ring...1 Screw w/Tooth Washer (M4 x 12 mm, Pan Hd.)...2 Blade Assembly...1 Data Label (P2606)...1 Data...
Parts Diagram
Page 4
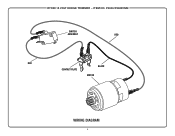
P2606/P2606VNM SWITCH ASSEMBLY RED RED BLACK CONTACT PLATE MOTOR WIRING DIAGRAM 4 RYOBI 18 VOLT HEDGE TRIMMER − ITEM NO.
P2606/P2606VNM SWITCH ASSEMBLY RED RED BLACK CONTACT PLATE MOTOR WIRING DIAGRAM 4 RYOBI 18 VOLT HEDGE TRIMMER − ITEM NO.


