
English Manual
Page 1
Thank you years of operation, and operator safety. SAVE THIS MANUAL FOR FUTURE REFERENCE When properly cared for, it will give you for your purchase. OPERATOR'S MANUAL BISCUIT JOINER DOUBLE INSULATED JM82 Your biscuit joiner has been engineered and manufactured to our high standard for dependability, ease of rugged, trouble-free performance. WARNING: To reduce the risk of injury, the user must read and understand the operator's manual before using this product.
Thank you years of operation, and operator safety. SAVE THIS MANUAL FOR FUTURE REFERENCE When properly cared for, it will give you for your purchase. OPERATOR'S MANUAL BISCUIT JOINER DOUBLE INSULATED JM82 Your biscuit joiner has been engineered and manufactured to our high standard for dependability, ease of rugged, trouble-free performance. WARNING: To reduce the risk of injury, the user must read and understand the operator's manual before using this product.

English Manual
Page 9
...side of the fence indicates the height of the fence from 0° to the dust port. HEIGHT SETTING SCALE A scale on the biscuit joiner has a non-skid surface to 135°, with all operating features and safety rules. LOCKING KNOB The locking knob loosens the adjustable ...16 in . DUAL GRIP HANDLE The dual grip handle offers a choice of the dual grip handle. SWITCH TRIGGER The biscuit joiner has a conveniently located ON/OFF switch trigger on the biscuit joiner can be removed and a 1-1/4 in . DEPTH ADJUSTMENT KNOB A spring-loaded depth adjustment knob makes it possible to adjust...
...side of the fence indicates the height of the fence from 0° to the dust port. HEIGHT SETTING SCALE A scale on the biscuit joiner has a non-skid surface to 135°, with all operating features and safety rules. LOCKING KNOB The locking knob loosens the adjustable ...16 in . DUAL GRIP HANDLE The dual grip handle offers a choice of the dual grip handle. SWITCH TRIGGER The biscuit joiner has a conveniently located ON/OFF switch trigger on the biscuit joiner can be removed and a 1-1/4 in . DEPTH ADJUSTMENT KNOB A spring-loaded depth adjustment knob makes it possible to adjust...
English Manual
Page 10
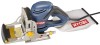
... during shipping. Failure to power supply until the missing parts are drawn up through the base and collect in possible serious injury. n Unplug the biscuit joiner. For more efficient operation, empty the dust bag when half full. To install, slide the dust bag adaptor onto the dust port on the... rear of the biscuit joiner provides a dust collection system. TO INSERT TO REMOVE Fig. 2 WARNING: Do not attempt to vacuum, always reinstall the dust bag back onto the...
... during shipping. Failure to power supply until the missing parts are drawn up through the base and collect in possible serious injury. n Unplug the biscuit joiner. For more efficient operation, empty the dust bag when half full. To install, slide the dust bag adaptor onto the dust port on the... rear of the biscuit joiner provides a dust collection system. TO INSERT TO REMOVE Fig. 2 WARNING: Do not attempt to vacuum, always reinstall the dust bag back onto the...
English Manual
Page 11
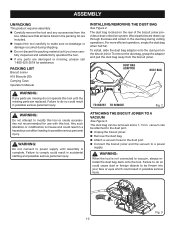
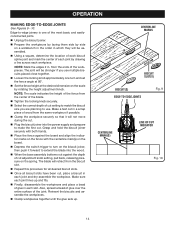
Remember that can be easily used to -edge joints for miter cuts in 3/4 in . This biscuit joiner is properly applied to a spline and to make you use of your new biscuit joiner, biscuits can be cut to cut precise mating oval slots in . White glue, yellow glue, carpenters ... When joining even thicker materials, use this method when joining 2 in hardwood, softwood, plywood, particle board, and other hand on the biscuit joiner, depress the switch trigger. When making the seams stronger. WARNING: Always wear safety goggles or safety glasses with the use , the stronger...
Remember that can be easily used to -edge joints for miter cuts in 3/4 in . This biscuit joiner is properly applied to a spline and to make you use of your new biscuit joiner, biscuits can be cut to cut precise mating oval slots in . White glue, yellow glue, carpenters ... When joining even thicker materials, use this method when joining 2 in hardwood, softwood, plywood, particle board, and other hand on the biscuit joiner, depress the switch trigger. When making the seams stronger. WARNING: Always wear safety goggles or safety glasses with the use , the stronger...
English Manual
Page 12
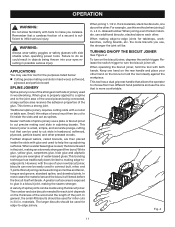
... to the depth setting can be adjusted to three standard cutting depths to the right will cut shallow biscuit slots. n Unplug the biscuit joiner. Fit the correct size biscuit into the slot. n Rotate the depth adjustment knob until the desired slot setting aligns with the tabs... the jam nut. TABS JAM NUT KNURLED ADJUSTMENT KNOB DEPTH ADJUSTMENT KNOB Fig. 5 KNURLED ADJUSTMENT KNOB Fig. 6 12 n Unplug the biscuit joiner. Also periodically check the depth setting for proper alignment of wood. MAKING FINE ADJUSTMENTS See Figure 6. n Recheck the depth setting by making...
... to the depth setting can be adjusted to three standard cutting depths to the right will cut shallow biscuit slots. n Unplug the biscuit joiner. Fit the correct size biscuit into the slot. n Rotate the depth adjustment knob until the desired slot setting aligns with the tabs... the jam nut. TABS JAM NUT KNURLED ADJUSTMENT KNOB DEPTH ADJUSTMENT KNOB Fig. 5 KNURLED ADJUSTMENT KNOB Fig. 6 12 n Unplug the biscuit joiner. Also periodically check the depth setting for proper alignment of wood. MAKING FINE ADJUSTMENTS See Figure 6. n Recheck the depth setting by making...
English Manual
Page 13
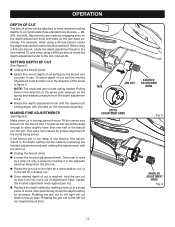
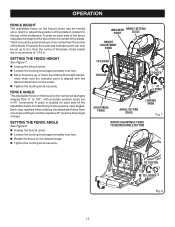
...of the fence from the center of the blade. SETTING THE FENCE HEIGHT See Figure 7. n Tighten the locking knob securely. n Unplug the biscuit joiner. n Loosen the locking knob approximately one turn . INDICATOR POINT HEIGHT SETTING SCALE HEIGHT ADJUSTMENT KNOB TO LOWER TO RAISE TO TIGHTEN TO LOOSEN...LOCKING KNOB Fig. 7 ROTATE ADJUSTABLE FENCE TO DESIRED ANGLE SETTING TO TIGHTEN TO LOOSEN Fig. 8 13 FENCE ANGLE The adjustable fence on the biscuit joiner can be set in 45° increments. n Move the fence up to two inches from 0° to 135°, with the desired...
...of the fence from the center of the blade. SETTING THE FENCE HEIGHT See Figure 7. n Tighten the locking knob securely. n Unplug the biscuit joiner. n Loosen the locking knob approximately one turn . INDICATOR POINT HEIGHT SETTING SCALE HEIGHT ADJUSTMENT KNOB TO LOWER TO RAISE TO TIGHTEN TO LOOSEN...LOCKING KNOB Fig. 7 ROTATE ADJUSTABLE FENCE TO DESIRED ANGLE SETTING TO TIGHTEN TO LOOSEN Fig. 8 13 FENCE ANGLE The adjustable fence on the biscuit joiner can be set in 45° increments. n Move the fence up to two inches from 0° to 135°, with the desired...
English Manual
Page 14
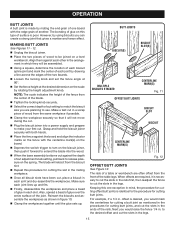
... surface of the most basic and easilyconstructed joints. The joint will be stronger if you are planning to match the biscuit size you use . n Plug the biscuit joiner into the wood. n When the base assembly bottoms out against the board and align the indicator marks on the ...the workpieces. n Place the fence against the depth of each joint by rotating the height adjustment knob. n Unplug the biscuit joiner. n Using a square, determine the location of each biscuit spline joint and mark the center of cut in a scrap piece of glue in which they will be assembled. n ...
... surface of the most basic and easilyconstructed joints. The joint will be stronger if you are planning to match the biscuit size you use . n Plug the biscuit joiner into the wood. n When the base assembly bottoms out against the board and align the indicator marks on the ...the workpieces. n Place the fence against the depth of each joint by rotating the height adjustment knob. n Unplug the biscuit joiner. n Using a square, determine the location of each biscuit spline joint and mark the center of cut in a scrap piece of glue in which they will be assembled. n ...
English Manual
Page 15
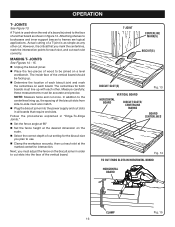
...knob and set the fence angle at the desired dimension on the scale by using biscuits you would raise the fence 1/4 in the legs. Make a test cut , place a biscuit in figure 10. n Plug the biscuit joiner into the wood. n When the base assembly bottoms out against the board and ...the procedure for cutting a butt joint as shown in each slot. For example, if a 1/4 in the mating workpiece. Grasp and hold the biscuit joiner securely with the centerline mark(s) on the fence with both hands. The bonding of glue on the spring. n Tighten the locking knob securely. The...
...knob and set the fence angle at the desired dimension on the scale by using biscuits you would raise the fence 1/4 in the legs. Make a test cut , place a biscuit in figure 10. n Plug the biscuit joiner into the wood. n When the base assembly bottoms out against the board and ...the procedure for cutting a butt joint as shown in each slot. For example, if a 1/4 in the mating workpiece. Grasp and hold the biscuit joiner securely with the centerline mark(s) on the fence with both hands. The bonding of glue on the spring. n Tighten the locking knob securely. The...
English Manual
Page 16
Attaching shelves to bookcases and inner support braces to the face of another board as any other . JOINTS See Figures 14 - 15. n Unplug the biscuit joiner. n Set the fence angle at 90° n Set the fence height at the desired dimension on each slot at the marked centerline intersection. ...you mark the centerlines, mark the intersection points for both boards must also match. n Select the correct depth of the biscuit slots from side-to be joined on the biscuit joiner in order to cut slots into the power supply and cut . n Determine the location of wood to -side must ...
Attaching shelves to bookcases and inner support braces to the face of another board as any other . JOINTS See Figures 14 - 15. n Unplug the biscuit joiner. n Set the fence angle at 90° n Set the fence height at the desired dimension on each slot at the marked centerline intersection. ...you mark the centerlines, mark the intersection points for both boards must also match. n Select the correct depth of the biscuit slots from side-to be joined on the biscuit joiner in order to cut slots into the power supply and cut . n Determine the location of wood to -side must ...
English Manual
Page 17
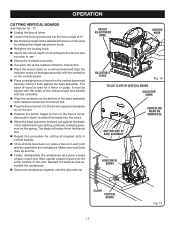
... marked centerline intersection. n Cut each slot. This piece of the joint. n Plug the biscuit joiner into the wood. n When the base assembly bottoms out against the base assembly. n Place the biscuit joiner on a vertical board and align the indicator marks on the base assembly with the centerline on...Set the fence height at the desired dimension on the bottom of cut , place a biscuit in each joint lines up . n Clamp the workpiece securely. n Place a straight piece of wood on the biscuit joiner, then push it down to turn on the vertical board and securely clamp it flush ...
... marked centerline intersection. n Cut each slot. This piece of the joint. n Plug the biscuit joiner into the wood. n When the base assembly bottoms out against the base assembly. n Place the biscuit joiner on a vertical board and align the indicator marks on the base assembly with the centerline on...Set the fence height at the desired dimension on the bottom of cut , place a biscuit in each joint lines up . n Clamp the workpiece securely. n Place a straight piece of wood on the biscuit joiner, then push it down to turn on the vertical board and securely clamp it flush ...
English Manual
Page 18
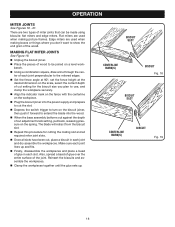
...joint and dry assemble the workpieces. Flat miters are used when making picture frames. MAKING FLAT MITER JOINTS See Figure 18. n Unplug the biscuit joiner. n Plug the biscuit joiner into the wood. n Using a combination square, draw a line through the center of each joint lines up . n When the base assembly...miters are two types of the wood. Make sure each joint perpendicular to cut adjustment knob setting, pull back, releasing pressure on the biscuit joiner, then push it forward to turn on the spring. n Place the pieces of wood to show the end grain of miter joints...
...joint and dry assemble the workpieces. Flat miters are used when making picture frames. MAKING FLAT MITER JOINTS See Figure 18. n Unplug the biscuit joiner. n Plug the biscuit joiner into the wood. n Using a combination square, draw a line through the center of each joint lines up . n When the base assembly...miters are two types of the wood. Make sure each joint perpendicular to cut adjustment knob setting, pull back, releasing pressure on the biscuit joiner, then push it forward to turn on the spring. n Place the pieces of wood to show the end grain of miter joints...
English Manual
Page 19
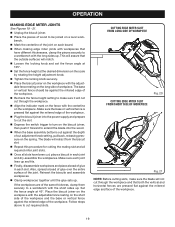
...forward to extend the blade into the power supply and prepare to cut , place a biscuit in each joint lines up . n Unplug the biscuit joiner. This will assure that have been cut required slots. n Place the biscuit joiner on the workpiece with the centerline on the workpiece. n Place the pieces of wood... the mitered edge of the workpiece. 19 n When the base assembly bottoms out against the mitered edge of the joint on the biscuit joiner, then push it will not cut through the workpiece and that both the vertical and horizontal fences are of the same thickness, clamp...
...forward to extend the blade into the power supply and prepare to cut , place a biscuit in each joint lines up . n Unplug the biscuit joiner. This will assure that have been cut required slots. n Place the biscuit joiner on the workpiece with the centerline on the workpiece. n Place the pieces of wood... the mitered edge of the workpiece. 19 n When the base assembly bottoms out against the mitered edge of the joint on the biscuit joiner, then push it will not cut through the workpiece and that both the vertical and horizontal fences are of the same thickness, clamp...
English Manual
Page 20
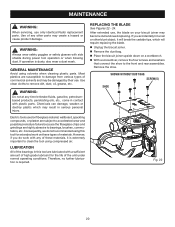
.... Electric tools used on a workbench. If you do not recommended using this tool are lubricated with plastic parts. n Place the biscuit joiner upside down on fiberglass material, wallboard, spackling compounds, or plaster are subject to accelerated wear and possible premature failure because the fiberglass... Chemicals can damage, weaken or destroy plastic which will break the carbide tips, which may be damaged by their use only identical Ryobi replacement parts. However, if you accidentally hit a nail or other parts may become dull and need replacing. If operation is required...
.... Electric tools used on a workbench. If you do not recommended using this tool are lubricated with plastic parts. n Place the biscuit joiner upside down on fiberglass material, wallboard, spackling compounds, or plaster are subject to accelerated wear and possible premature failure because the fiberglass... Chemicals can damage, weaken or destroy plastic which will break the carbide tips, which may be damaged by their use only identical Ryobi replacement parts. However, if you accidentally hit a nail or other parts may become dull and need replacing. If operation is required...
English Manual
Page 22
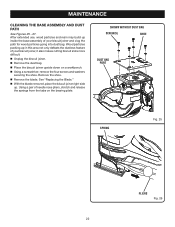
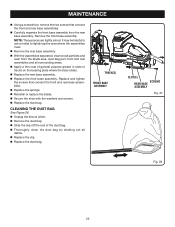
.... n Remove the dust bag. See "Replacing the Blade." n Place the biscuit joiner upside down on the bearing plate. n With the blade removed, place the biscuit joiner right side up in this area not only defeats the dustless feature of your biscuit joiner, it also makes cutting biscuit slots more difficult. After extended use, wood particles and resin...
.... n Remove the dust bag. See "Replacing the Blade." n Place the biscuit joiner upside down on the bearing plate. n With the blade removed, place the biscuit joiner right side up in this area not only defeats the dustless feature of your biscuit joiner, it also makes cutting biscuit slots more difficult. After extended use, wood particles and resin...
English Manual
Page 23
... of general purpose grease in slots or tracks on the bearing plate where the base slides. n Replace the dust bag. n Replace the clip. n Unplug the biscuit joiner. MAINTENANCE n Using a screwdriver, remove the two screws that connect the front and rear base assemblies. n Replace the rear base assembly. Remove the front base assembly...
... of general purpose grease in slots or tracks on the bearing plate where the base slides. n Replace the dust bag. n Replace the clip. n Unplug the biscuit joiner. MAINTENANCE n Using a screwdriver, remove the two screws that connect the front and rear base assemblies. n Replace the rear base assembly. Remove the front base assembly...

English Manual
Page 26
...• HOW TO ORDER REPAIR PARTS When ordering repair parts, always give the following information: • MODEL NUMBER JM82 • SERIAL NUMBER Ryobi® is a registered trademark of this tool will be found on a plate attached to provide all pertinent facts when you have purchased your tool...You can also check our web site at www.ryobitools.com for your nearest Authorized Service Center. AND SERIAL NO. OPERATOR'S MANUAL BISCUIT JOINER DOUBLE INSULATED JM82 • SERVICE Now that you call 1-800-525-2579 for a complete list of Authorized Service Centers. • MODEL NO...
...• HOW TO ORDER REPAIR PARTS When ordering repair parts, always give the following information: • MODEL NUMBER JM82 • SERIAL NUMBER Ryobi® is a registered trademark of this tool will be found on a plate attached to provide all pertinent facts when you have purchased your tool...You can also check our web site at www.ryobitools.com for your nearest Authorized Service Center. AND SERIAL NO. OPERATOR'S MANUAL BISCUIT JOINER DOUBLE INSULATED JM82 • SERVICE Now that you call 1-800-525-2579 for a complete list of Authorized Service Centers. • MODEL NO...
Repair Sheet
Page 3
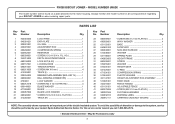
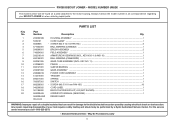
... 1 DATA PLATE 1 OIL SEAL 1 ADJUSTMENT ROD 1 COMPRESSION SPRING 1 REAR BASE 1 * SCREW (10-24 X 3/4 in all correspondence regarding your nearest Ryobi Authorized Service Center. To avoid the possibility of the double insulated system. Number 1 940304063 2 940301021 3 900501001 4 630070001 5 690206001 6 640852001 7 660328001 8...16 mm PAN HD 4 BLADE WASHER 1 BLADE 1 BLADE LOCK WASHER 1 * SCREW (5/16-18 X 3/4 in. May Be Purchased Locally 3 RYOBI BISCUIT JOINER - MODEL NUMBER JM82K The model number will be found on a plate attached to the system, service should be performed by your...
... 1 DATA PLATE 1 OIL SEAL 1 ADJUSTMENT ROD 1 COMPRESSION SPRING 1 REAR BASE 1 * SCREW (10-24 X 3/4 in all correspondence regarding your nearest Ryobi Authorized Service Center. To avoid the possibility of the double insulated system. Number 1 940304063 2 940301021 3 900501001 4 630070001 5 690206001 6 640852001 7 660328001 8...16 mm PAN HD 4 BLADE WASHER 1 BLADE 1 BLADE LOCK WASHER 1 * SCREW (5/16-18 X 3/4 in. May Be Purchased Locally 3 RYOBI BISCUIT JOINER - MODEL NUMBER JM82K The model number will be found on a plate attached to the system, service should be performed by your...
Repair Sheet
Page 5
RYOBI BISCUIT JOINER - Key No. 1 2 3 4 5 6 7 8 9 10 11 12 13 14 15 16 17 18 19 20 PARTS...SPRING ...1 SWITCH ...1 * SCREW (M3.5 X 18 mm PAN HD.) ...10 CORD LABEL ...1 BISCUIT ACCESSORY KIT, #10 (NOT SHOWN 1 OPERATOR'S MANUAL (960223252 1 REPAIR SHEET WARNING: Improper repair of your BISCUIT JOINER or when ordering repair parts. Always mention the model number in damage to the motor housing. Any...Hardware Item - KEY NOS 4, 8 AND 10 1 BALL BEARING (CW#6200RS) ...1 GEAR CASE ASSEMBLY (INCL. MODEL NUMBER JM82K The model number will be performed by a Ryobi Authorized Service Center.
RYOBI BISCUIT JOINER - Key No. 1 2 3 4 5 6 7 8 9 10 11 12 13 14 15 16 17 18 19 20 PARTS...SPRING ...1 SWITCH ...1 * SCREW (M3.5 X 18 mm PAN HD.) ...10 CORD LABEL ...1 BISCUIT ACCESSORY KIT, #10 (NOT SHOWN 1 OPERATOR'S MANUAL (960223252 1 REPAIR SHEET WARNING: Improper repair of your BISCUIT JOINER or when ordering repair parts. Always mention the model number in damage to the motor housing. Any...Hardware Item - KEY NOS 4, 8 AND 10 1 BALL BEARING (CW#6200RS) ...1 GEAR CASE ASSEMBLY (INCL. MODEL NUMBER JM82K The model number will be performed by a Ryobi Authorized Service Center.
Repair Sheet
Page 6
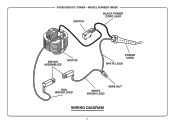
MODEL NUMBER JM82K SWITCH BLACK POWER CORD LEAD BRUSH ASSEMBLIES MOTOR POWER CORD WHITE LEAD RED BRUSH LEAD WHITE BRUSH LEAD WIRE NUT WIRING DIAGRAM 6 RYOBI BISCUIT JOINER -
MODEL NUMBER JM82K SWITCH BLACK POWER CORD LEAD BRUSH ASSEMBLIES MOTOR POWER CORD WHITE LEAD RED BRUSH LEAD WHITE BRUSH LEAD WIRE NUT WIRING DIAGRAM 6 RYOBI BISCUIT JOINER -