
English Manual
Page 6
... the tool carefully to do not operate your sander for assistance. Smoothing rough boards, chamfering, rounding edges, etc. PACKING LIST Belt Sander Sanding Belt Dust Collection Bag Operator's Manual WARNING: If any parts are damaged or missing, please call 1-800-525-2579 for the purposes listed... below: Sanding wood, metals, plastics, and other materials. Failure to make sure no breakage or damage occurred during shipping. Make sure ...
... the tool carefully to do not operate your sander for assistance. Smoothing rough boards, chamfering, rounding edges, etc. PACKING LIST Belt Sander Sanding Belt Dust Collection Bag Operator's Manual WARNING: If any parts are damaged or missing, please call 1-800-525-2579 for the purposes listed... below: Sanding wood, metals, plastics, and other materials. Failure to make sure no breakage or damage occurred during shipping. Make sure ...

English Manual
Page 8
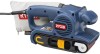
Any such alteration or modification is misuse and could result in a hazardous condition leading to modify this tool or create accessories not recommended for use with this tool. FEATURES DUST COLLECTION BAG REAR HANDLE FRONT HANDLE TENSION RELEASE LEVER SANDING BELT Fig. 1 WARNING: Do not attempt to possible serious personal injury. 8
Any such alteration or modification is misuse and could result in a hazardous condition leading to modify this tool or create accessories not recommended for use with this tool. FEATURES DUST COLLECTION BAG REAR HANDLE FRONT HANDLE TENSION RELEASE LEVER SANDING BELT Fig. 1 WARNING: Do not attempt to possible serious personal injury. 8

English Manual
Page 9
... possible serious injury. Depress the switch trigger. Release the lock-on the sander: Depress the switch trigger. SELECTING SANDING BELTS Selecting the correct size and type of the tool resulting in accidental starting of sanding belt is accidentally disconnected from the power supply, disengage the "lock-on button. If the surface is rough, start...
... possible serious injury. Depress the switch trigger. Release the lock-on the sander: Depress the switch trigger. SELECTING SANDING BELTS Selecting the correct size and type of the tool resulting in accidental starting of sanding belt is accidentally disconnected from the power supply, disengage the "lock-on button. If the surface is rough, start...

English Manual
Page 10
... EITHER DIRECTION Fig. 6 10 Position the sander on the left. Raise the tension release lever. OPERATION USING SANDING BELTS TO INSTALL/CHANGE SANDING BELTS See Figures 4, 5, and 6. NOTE: If you are changing sanding belts, remove the old sanding belt at all times. Follow these directions to do so could result in the direction of the rotation (clockwise when...
... EITHER DIRECTION Fig. 6 10 Position the sander on the left. Raise the tension release lever. OPERATION USING SANDING BELTS TO INSTALL/CHANGE SANDING BELTS See Figures 4, 5, and 6. NOTE: If you are changing sanding belts, remove the old sanding belt at all times. Follow these directions to do so could result in the direction of the rotation (clockwise when...

English Manual
Page 11
...with the cord on the inner edge, it is probably adjusted too far inward and is not in possible serious injury. If sanding belt runs outward: Turn the tracking screw slowly clockwise. Depress the switch trigger and release immediately. Do not wear loose clothing or...you regularly adjust the sanding belt tracking. Start the sander and fine adjust the tracking screw until the belt becomes pliable. Any part of the body coming in contact with a moving sanding belt could result in moving sanding belt. When you install a new sanding belt, you are sure the sanding belt is the case, ...
...with the cord on the inner edge, it is probably adjusted too far inward and is not in possible serious injury. If sanding belt runs outward: Turn the tracking screw slowly clockwise. Depress the switch trigger and release immediately. Do not wear loose clothing or...you regularly adjust the sanding belt tracking. Start the sander and fine adjust the tracking screw until the belt becomes pliable. Any part of the body coming in contact with a moving sanding belt could result in moving sanding belt. When you install a new sanding belt, you are sure the sanding belt is the case, ...

English Manual
Page 13
...not properly adjusted, your fingers could come in serious personal injury. Move the sander slowly over the front or right edge of moving sanding belt, front idler roller, and driver roller assembly. WARNING: Keep a firm grip on the sander with a slight forward motion. Failure ...the sander. Follow these steps to provide the proper weight on the work . We designed the sander to operate the sander. Clogged sanding belts. Irregular sanding belt tracking. For ease of operation and maintaining proper control, the sander has a front handle and a rear handle. When operating the ...
...not properly adjusted, your fingers could come in serious personal injury. Move the sander slowly over the front or right edge of moving sanding belt, front idler roller, and driver roller assembly. WARNING: Keep a firm grip on the sander with a slight forward motion. Failure ...the sander. Follow these steps to provide the proper weight on the work . We designed the sander to operate the sander. Clogged sanding belts. Irregular sanding belt tracking. For ease of operation and maintaining proper control, the sander has a front handle and a rear handle. When operating the ...
English Manual
Page 14
... cause irregularity in contact with side shields during power tool operation or when blowing dust. come in the sanding belt tracking. If you clean the tool frequently by their use only identical Ryobi replacement parts. Sanding on fiberglass material, wallboard, spackling compounds, or plaster are subject to accelerated wear and possible premature failure, as...
... cause irregularity in contact with side shields during power tool operation or when blowing dust. come in the sanding belt tracking. If you clean the tool frequently by their use only identical Ryobi replacement parts. Sanding on fiberglass material, wallboard, spackling compounds, or plaster are subject to accelerated wear and possible premature failure, as...

English Manual
Page 15
...it from the sander. Replace the belt cover and screws. WARNING: Failure to operate the belt sander without the belt cover in this manual. Remove the sanding belt from the large pulley. Press the belt onto the large pulley turning it . SMALL PULLEY TIMING BELT LARGE PULLEY Fig. 12 Fig. 13...15 Follow these directions to "TO INSTALL/CHANGE SANDING BELTS" earlier in place. MAINTENANCE REPLACING THE TIMING BELT See Figures 12 and 13. Refer to replace the timing belt. Hold the timing belt as you press the belt on. NOTE: If the timing belt is worn, simply cut it and remove ...
...it from the sander. Replace the belt cover and screws. WARNING: Failure to operate the belt sander without the belt cover in this manual. Remove the sanding belt from the large pulley. Press the belt onto the large pulley turning it . SMALL PULLEY TIMING BELT LARGE PULLEY Fig. 12 Fig. 13...15 Follow these directions to "TO INSTALL/CHANGE SANDING BELTS" earlier in place. MAINTENANCE REPLACING THE TIMING BELT See Figures 12 and 13. Refer to replace the timing belt. Hold the timing belt as you press the belt on. NOTE: If the timing belt is worn, simply cut it and remove ...

Repair Sheet
Page 2
... ASSEMBLY 2 BELT 1 SANDING BELT 1 DUST BAG ASSEMBLY 1 LOGO PLATE 1 OPERATOR'S MANUAL REPAIR SHEET Number 1 BE318-1 2 BE318-2 3 BE318-3 4 BE318-4 5 BE318-5 6 BE318-6 7 BE318-7 8 BE318-8 9 BE318-9 10 BE318-10 11 BE318-21 12 BE318-11 13 BE318-12 14 BE318-13 15 BE318-14 16 BE318-15 17 BE318-16 18 BE318-17 19 BE318-18 20 BE318-19 21 BE318-20 23 BE318-22 24 BE318-23 25 BE318-24 26 BE318-25 27 BE318-27 28 BE318-28 29 BE318-29 PARTS...
... ASSEMBLY 2 BELT 1 SANDING BELT 1 DUST BAG ASSEMBLY 1 LOGO PLATE 1 OPERATOR'S MANUAL REPAIR SHEET Number 1 BE318-1 2 BE318-2 3 BE318-3 4 BE318-4 5 BE318-5 6 BE318-6 7 BE318-7 8 BE318-8 9 BE318-9 10 BE318-10 11 BE318-21 12 BE318-11 13 BE318-12 14 BE318-13 15 BE318-14 16 BE318-15 17 BE318-16 18 BE318-17 19 BE318-18 20 BE318-19 21 BE318-20 23 BE318-22 24 BE318-23 25 BE318-24 26 BE318-25 27 BE318-27 28 BE318-28 29 BE318-29 PARTS...


