English Manual
Page 2
...service under this product making its use more pleasant and enjoyable. Safety, performance, and dependability have other than those specifically stated in your RYOBI® power tool for example, a bill of sale). We will be transferred. We will do so without any defective part, at...obtain the location of the Service Center nearest you . Batteries are warranted for ninety (90) days. With the exception of batteries, power tool accessories are warranted for two years. Box 1207, Anderson, SC 29622-1207, by calling 1-800-525-2579 or by contacting a service representative at ...
...service under this product making its use more pleasant and enjoyable. Safety, performance, and dependability have other than those specifically stated in your RYOBI® power tool for example, a bill of sale). We will be transferred. We will do so without any defective part, at...obtain the location of the Service Center nearest you . Batteries are warranted for ninety (90) days. With the exception of batteries, power tool accessories are warranted for two years. Box 1207, Anderson, SC 29622-1207, by calling 1-800-525-2579 or by contacting a service representative at ...
English Manual
Page 3
... cords immediately. Always wear eye protection. Contain long hair. The correct tool will increase the risk of drugs, alcohol, or medication. Accessories that cannot be controlled with grounded surfaces such as in the outlet, reverse the plug. Keep your tool. TOOL USE AND CARE &#...from heat, oil, sharp edges, or moving parts, breakage of electric shock if your work by poorly maintained tools. Use only accessories that have the tool serviced before plugging in explosive atmospheres, such as pipes, radiators, ranges, and refrigerators. Do not use a clean ...
... cords immediately. Always wear eye protection. Contain long hair. The correct tool will increase the risk of drugs, alcohol, or medication. Accessories that cannot be controlled with grounded surfaces such as in the outlet, reverse the plug. Keep your tool. TOOL USE AND CARE &#...from heat, oil, sharp edges, or moving parts, breakage of electric shock if your work by poorly maintained tools. Use only accessories that have the tool serviced before plugging in explosive atmospheres, such as pipes, radiators, ranges, and refrigerators. Do not use a clean ...
English Manual
Page 4
... fire, or serious injury. Always wear safety glasses. Check for and remove all nails from broken wheel fragments. Accessories must be rated for an extension cord 50 feet or less in doubt, use proper guard with the tool. Following this rule will make...61550; Check damaged parts. Following this rule will cause a drop in line voltage resulting in a risk of parts, mounting, and any other accessories running over rated speed can cause personal injury. Know your nearest Authorized Service Center. Before further use one heavy enough to instruct ...
... fire, or serious injury. Always wear safety glasses. Check for and remove all nails from broken wheel fragments. Accessories must be rated for an extension cord 50 feet or less in doubt, use proper guard with the tool. Following this rule will make...61550; Check damaged parts. Following this rule will cause a drop in line voltage resulting in a risk of parts, mounting, and any other accessories running over rated speed can cause personal injury. Know your nearest Authorized Service Center. Before further use one heavy enough to instruct ...
English Manual
Page 9
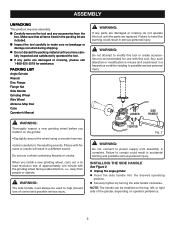
n Carefully remove the tool and any accessories from people or objects. WARNING: Do not attempt to modify this tool until the parts are included. TO TIGHTEN Fig. 2 WARNING: Do not connect to ... Grinding Wheel Wire Wheel Abrasive Mop Disc Case Operator's Manual WARNING: If any parts are damaged or missing do not operate this tool or create accessories not recommended for assistance. NOTE: The handle can be used to help prevent loss of approximately one minute with this warning could result in a hazardous...
n Carefully remove the tool and any accessories from people or objects. WARNING: Do not attempt to modify this tool until the parts are included. TO TIGHTEN Fig. 2 WARNING: Do not connect to ... Grinding Wheel Wire Wheel Abrasive Mop Disc Case Operator's Manual WARNING: If any parts are damaged or missing do not operate this tool or create accessories not recommended for assistance. NOTE: The handle can be used to help prevent loss of approximately one minute with this warning could result in a hazardous...
English Manual
Page 10
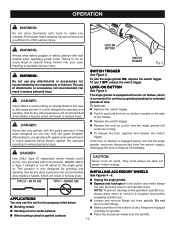
...to use and the angle grinder becomes disconnected from spindle. If the lock-on button and the angle grinder will result in serious injury. INSTALLING accessory wheels See Figures 4 - 6. Unplug the angle grinder. Depress and hold the lock-on button, located on the side ...serious injury. It is engaged during use grinder with side shields when operating power tools. To lock-on spindle. Place the accessory wheel over the spindle. 10 NOTE: To prevent damage to the spindle or spindle lock, always allow familiarity with tools to inflict ...
...to use and the angle grinder becomes disconnected from spindle. If the lock-on button and the angle grinder will result in serious injury. INSTALLING accessory wheels See Figures 4 - 6. Unplug the angle grinder. Depress and hold the lock-on button, located on the side ...serious injury. It is engaged during use grinder with side shields when operating power tools. To lock-on spindle. Place the accessory wheel over the spindle. 10 NOTE: To prevent damage to the spindle or spindle lock, always allow familiarity with tools to inflict ...
English Manual
Page 11
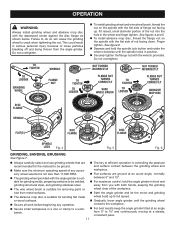
... not overtighten. to tighten to loosen Grinding Wheel Wrench Flange Nut to tighten to be ground. Make sure the minimum operating speed of any accessory wheel selected is not less than 11,000 RPM. The grinding wheel provided with the wrench provided. Finger tighten. See figure 6. Depress and...
... not overtighten. to tighten to loosen Grinding Wheel Wrench Flange Nut to tighten to be ground. Make sure the minimum operating speed of any accessory wheel selected is not less than 11,000 RPM. The grinding wheel provided with the wrench provided. Finger tighten. See figure 6. Depress and...

English Manual
Page 13
... the angle grinder without the guard in place and properly adjusted. Unplug the angle grinder. Using the wrench provided, loosen and remove nut, accessory wheel, and disc flange from the power supply and the switch is unplugged from spindle if necessary. Unlock the guard clamp lever. Rotate...
... the angle grinder without the guard in place and properly adjusted. Unplug the angle grinder. Using the wrench provided, loosen and remove nut, accessory wheel, and disc flange from the power supply and the switch is unplugged from spindle if necessary. Unlock the guard clamp lever. Rotate...
English Manual
Page 15
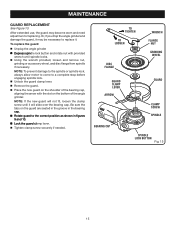
...: If the new guard will not fit, loosen the clamp screw until spindle locks. Using the wrench provided, loosen and remove nut, grinding or accessory wheel, and disc flange from spindle if necessary. to tighten to replace it will slide over the bearing cap. MAINTENANCE GUARD REPLACEMENT See Figure 13.
...: If the new guard will not fit, loosen the clamp screw until spindle locks. Using the wrench provided, loosen and remove nut, grinding or accessory wheel, and disc flange from spindle if necessary. to tighten to replace it will slide over the bearing cap. MAINTENANCE GUARD REPLACEMENT See Figure 13.

