
Warranty (English)
Page 1
... the product, including the antenna This warranty also does not cover: • Damage due to incorrect operation or maintenance • Connection to the store you purchased it from the purchase of the product ("Warranty Period"). This warranty is printed on the receipt you ...Set up adjustments • Cosmetic damage • Damage due to acts of God, such as the original packaging. 1 Year Limited Warranty Rocketfish Products ("Rocketfish") warrants to you, the original purchaser of this new product, that the product shall be defective by this warranty that requires service, terms...
... the product, including the antenna This warranty also does not cover: • Damage due to incorrect operation or maintenance • Connection to the store you purchased it from the purchase of the product ("Warranty Period"). This warranty is printed on the receipt you ...Set up adjustments • Cosmetic damage • Damage due to acts of God, such as the original packaging. 1 Year Limited Warranty Rocketfish Products ("Rocketfish") warrants to you, the original purchaser of this new product, that the product shall be defective by this warranty that requires service, terms...

User Manual (English)
Page 5
Front view Back view 1 2 34 5 Bottom view 6 # Feature 1 Power indicator LED 2 Power button 3 Right speaker input terminals 4 Left speaker input terminals 5 DC IN jack 6 Manual connect button RF-WHTIB 5 Package contents Examine the contents of the box for the sender unit) • Two 2-foot speaker wires • A User Guide Sender unit The sender transmits... the receiver. The box should contain: • A sender unit • A receiver unit • A holder for the receiver unit • An AC power adapter (for your RF-WHTIB Universal Wireless Rear Speaker Kit.
Front view Back view 1 2 34 5 Bottom view 6 # Feature 1 Power indicator LED 2 Power button 3 Right speaker input terminals 4 Left speaker input terminals 5 DC IN jack 6 Manual connect button RF-WHTIB 5 Package contents Examine the contents of the box for the sender unit) • Two 2-foot speaker wires • A User Guide Sender unit The sender transmits... the receiver. The box should contain: • A sender unit • A receiver unit • A holder for the receiver unit • An AC power adapter (for your RF-WHTIB Universal Wireless Rear Speaker Kit.
User Manual (English)
Page 6
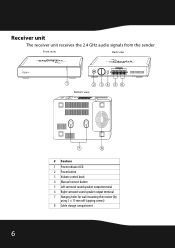
Receiver unit The receiver unit receives the 2.4 GHz audio signals from the sender. Front view Back view 1 2 34 5 6 Bottom view 7 8 # Feature 1 Power indicator LED 2 Power button 3 Volume control knob 4 Manual connect button 5 Left surround sound speaker output terminal 6 Right surround sound speaker output terminal 7 Hanging holes for wall mounting the receiver (by using 3 × 15 mm self-tapping screws) 8 Cable storage compartment 6
Receiver unit The receiver unit receives the 2.4 GHz audio signals from the sender. Front view Back view 1 2 34 5 6 Bottom view 7 8 # Feature 1 Power indicator LED 2 Power button 3 Volume control knob 4 Manual connect button 5 Left surround sound speaker output terminal 6 Right surround sound speaker output terminal 7 Hanging holes for wall mounting the receiver (by using 3 × 15 mm self-tapping screws) 8 Cable storage compartment 6

User Manual (English)
Page 7
RF-WHTIB 7 Setting up your universal wireless rear speaker kit Left speaker Center speaker Right speaker Right surround Receiver Left surround Amplifier Subwoofer Left surround Receiver Sender Right surround Note: If you need to mount the receiver, make sure that the left and right speaker cords are correctly connected to the speaker terminals of the receiver by checking the labels on the rear panel of the receiver.
RF-WHTIB 7 Setting up your universal wireless rear speaker kit Left speaker Center speaker Right speaker Right surround Receiver Left surround Amplifier Subwoofer Left surround Receiver Sender Right surround Note: If you need to mount the receiver, make sure that the left and right speaker cords are correctly connected to the speaker terminals of the receiver by checking the labels on the rear panel of the receiver.

User Manual (English)
Page 8
... different speaker systems. Make sure you connect your amplifier while connecting the units. Notes: Make sure the exposed tips of the amplifier the same way. To connect the amplifier to the sender: 1 Using the 2-foot speaker cords (provided), connect the right surround speaker terminals of your... panel Press and hold Release Caution: Turn off your amplifier using the surround speaker terminals only. 8 Connecting the sender Connecting the sender to the Black (-) terminals. 2 Connect the left surround speaker terminals of each cord do not touch each other, and that they are fully...
... different speaker systems. Make sure you connect your amplifier while connecting the units. Notes: Make sure the exposed tips of the amplifier the same way. To connect the amplifier to the sender: 1 Using the 2-foot speaker cords (provided), connect the right surround speaker terminals of your... panel Press and hold Release Caution: Turn off your amplifier using the surround speaker terminals only. 8 Connecting the sender Connecting the sender to the Black (-) terminals. 2 Connect the left surround speaker terminals of each cord do not touch each other, and that they are fully...

User Manual (English)
Page 9
...the sender is also turned On or Off. Connecting the AC adapter To a wall power outlet. OR Sender back panel To the SWITCHED AC outlet of your amplifier (on the back panel). RF-WHTIB 9 Connecting the receiver Connecting the receiver to your surround speakers Left surround... speaker Right surround speaker To connect the surround speakers to the receiver: 1 Connect the right speaker to the right speaker terminals of the ...
...the sender is also turned On or Off. Connecting the AC adapter To a wall power outlet. OR Sender back panel To the SWITCHED AC outlet of your amplifier (on the back panel). RF-WHTIB 9 Connecting the receiver Connecting the receiver to your surround speakers Left surround... speaker Right surround speaker To connect the surround speakers to the receiver: 1 Connect the right speaker to the right speaker terminals of the ...
User Manual (English)
Page 10
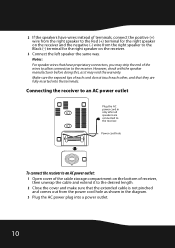
... cord do not touch each other, and that have wires instead of the wires to allow connection to the desired length. 2 Close the cover and make sure that the extended cable is not...power cord in the diagram. 3 Plug the AC power plug into the terminals. Power cord hole To connect the receiver to an AC power outlet: 1 Open cover of the cable storage compartment on the bottom... of receiver, then unwrap the cable and extend it may strip the end of terminals, connect the positive (+) wire from the right speaker to the Red (+) terminal for the right speaker on the receiver...
... cord do not touch each other, and that have wires instead of the wires to allow connection to the desired length. 2 Close the cover and make sure that the extended cable is not...power cord in the diagram. 3 Plug the AC power plug into the terminals. Power cord hole To connect the receiver to an AC power outlet: 1 Open cover of the cable storage compartment on the bottom... of receiver, then unwrap the cable and extend it may strip the end of terminals, connect the positive (+) wire from the right speaker to the Red (+) terminal for the right speaker on the receiver...

User Manual (English)
Page 12
Note: In case the indicators continue to connect the system manually using the CONNECT button. Try to blink after 30 seconds, it means there is no active link between the sender and receiver. Listening to the system To listen ... LED indicator blinks to the SWITCHED AC outlet of the sender. Blinking LED Note: The sender can be turned On and Off automatically when you connect the sender's AC power adapter to indicate that there is established between the sender and receiver. 2 Turn on your amplifier, then play the audio or...
Note: In case the indicators continue to connect the system manually using the CONNECT button. Try to blink after 30 seconds, it means there is no active link between the sender and receiver. Listening to the system To listen ... LED indicator blinks to the SWITCHED AC outlet of the sender. Blinking LED Note: The sender can be turned On and Off automatically when you connect the sender's AC power adapter to indicate that there is established between the sender and receiver. 2 Turn on your amplifier, then play the audio or...

User Manual (English)
Page 14
...has been successfully established between your universal wireless rear speaker kit. No communication between the sender and receiver. Note: Try pressing the CONNECT buttons again if the LED indicators keep blinking after 30 seconds. 14 Check this list for a possible troubleshooting solution before using ... obvious radio frequency interference sources near your system. • Shorten the distance between the units. The system proceeds with the connection process between the sender and • Make sure that all speaker wires and the amplifier operation should light. If the LEDs...
...has been successfully established between your universal wireless rear speaker kit. No communication between the sender and receiver. Note: Try pressing the CONNECT buttons again if the LED indicators keep blinking after 30 seconds. 14 Check this list for a possible troubleshooting solution before using ... obvious radio frequency interference sources near your system. • Shorten the distance between the units. The system proceeds with the connection process between the sender and • Make sure that all speaker wires and the amplifier operation should light. If the LEDs...

User Manual (English)
Page 18
...ARE LIMITED IN DURATION TO THE WARRANTY PERIOD SET FORTH ABOVE AND NO WARRANTIES, WHETHER EXPRESS OR IMPLIED, WILL APPLY AFTER THE WARRANTY PERIOD. ROCKETFISH is or with all faults • Consumables, such as lightning strikes • Accident • Misuse • Abuse • Negligence •...• Damage due to incorrect operation or maintenance • Connection to an incorrect voltage supply • Attempted repair by anyone other products and brand names are trademarks of their respective owners. 18 ROCKETFISH SHALL NOT BE LIABLE FOR ANY INCIDENTAL OR CONSEQUENTIAL DAMAGES FOR ...
...ARE LIMITED IN DURATION TO THE WARRANTY PERIOD SET FORTH ABOVE AND NO WARRANTIES, WHETHER EXPRESS OR IMPLIED, WILL APPLY AFTER THE WARRANTY PERIOD. ROCKETFISH is or with all faults • Consumables, such as lightning strikes • Accident • Misuse • Abuse • Negligence •...• Damage due to incorrect operation or maintenance • Connection to an incorrect voltage supply • Attempted repair by anyone other products and brand names are trademarks of their respective owners. 18 ROCKETFISH SHALL NOT BE LIABLE FOR ANY INCIDENTAL OR CONSEQUENTIAL DAMAGES FOR ...

