
Warranty (English)
Page 1
... notify Rocketfish during the Warranty Period. WHAT DOES THIS WARRANTY COVER? If you purchased the product at no charge with new or rebuilt parts; or (2) replace the product at a retail store location, take your original receipt and the product to the store you purchased it from an online web site, mail your Rocketfish product during the Warranty Period of a defect covered by an authorized Rocketfish repair center or...
... notify Rocketfish during the Warranty Period. WHAT DOES THIS WARRANTY COVER? If you purchased the product at no charge with new or rebuilt parts; or (2) replace the product at a retail store location, take your original receipt and the product to the store you purchased it from an online web site, mail your Rocketfish product during the Warranty Period of a defect covered by an authorized Rocketfish repair center or...
Warranty (English)
Page 2
..., LOST DATA, LOSS OF USE OF YOUR PRODUCT, LOST BUSINESS OR LOST PROFITS. Contact Rocketfish: For customer service please call 1-800-620-2790 www.rocketfishproducts.com ROCKETFISH™ is or with all faults • Consumables, such as fuses or batteries • Products where the factory applied serial number has been altered or removed REPAIR REPLACEMENT AS PROVIDED UNDER THIS WARRANTY IS YOUR EXCLUSIVE REMEDY.
..., LOST DATA, LOSS OF USE OF YOUR PRODUCT, LOST BUSINESS OR LOST PROFITS. Contact Rocketfish: For customer service please call 1-800-620-2790 www.rocketfishproducts.com ROCKETFISH™ is or with all faults • Consumables, such as fuses or batteries • Products where the factory applied serial number has been altered or removed REPAIR REPLACEMENT AS PROVIDED UNDER THIS WARRANTY IS YOUR EXCLUSIVE REMEDY.

User Manual (English)
Page 3
... of the art in 2.4 GHz wireless headphone design that gives you complete freedom while enjoying your purchase of headphone cables. 08-1077 RF-WHP01-WHP02.book Page 3 Thursday, March 27, 2008 1:29 PM Rocketfish RF-WHP01/RF-WHP02 Digital Wireless Stereo Headphones Contents Introduction 3 Safety information 4 Features 6 Setting up your system 12 Using your system 17 Maintaining your system 23 Troubleshooting 23 Specifications 24 Legal notices 25 One...
... of the art in 2.4 GHz wireless headphone design that gives you complete freedom while enjoying your purchase of headphone cables. 08-1077 RF-WHP01-WHP02.book Page 3 Thursday, March 27, 2008 1:29 PM Rocketfish RF-WHP01/RF-WHP02 Digital Wireless Stereo Headphones Contents Introduction 3 Safety information 4 Features 6 Setting up your system 12 Using your system 17 Maintaining your system 23 Troubleshooting 23 Specifications 24 Legal notices 25 One...

User Manual (English)
Page 4
... (WHP01) as well as a strong immunity to external interference and static. This User Guide explains how to correctly install, operate, and get the best performance from your headphones to be easily recharged when they are no user-serviceable parts inside. CAUTION To reduce the risk of Electric Shock Do Not Open This lightning flash with your TV, CD player, DVD player, home-theater...
... (WHP01) as well as a strong immunity to external interference and static. This User Guide explains how to correctly install, operate, and get the best performance from your headphones to be easily recharged when they are no user-serviceable parts inside. CAUTION To reduce the risk of Electric Shock Do Not Open This lightning flash with your TV, CD player, DVD player, home-theater...
User Manual (English)
Page 5
... an appliance coupler is used as the disconnect device. Install in any heat sources such as power-supply cord or plug is provided for replacement of time. • Refer all instructions. • Do not use this apparatus to rain or moisture. • The Shock Hazard Marking and Associated Graphical Symbol are provided on the supplied AC adapter. • The apparatus shall...
... an appliance coupler is used as the disconnect device. Install in any heat sources such as power-supply cord or plug is provided for replacement of time. • Refer all instructions. • Do not use this apparatus to rain or moisture. • The Shock Hazard Marking and Associated Graphical Symbol are provided on the supplied AC adapter. • The apparatus shall...

User Manual (English)
Page 6
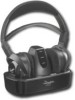
... external interference • Low power consumption with 15 hours (WHP02) or 8 hours (WHP01) of continuous operating time Package contents Examine the contents of the box for your digital wireless stereo headphones. 08-1077 RF-WHP01-WHP02.book Page 6 Thursday, March 27, 2008 1:29 PM • Batteries (battery pack and batteries installed) should contain: Headphones Docking station AC Adapter Rechargeable batteries (2) Microphone holder (WHP02) Microphone (WHP02) (WHP01 & WHP02) (WHP02) Audio cable(s) User guide 6 Features • 2.4 GHz digital wireless stereo headphones •...
... external interference • Low power consumption with 15 hours (WHP02) or 8 hours (WHP01) of continuous operating time Package contents Examine the contents of the box for your digital wireless stereo headphones. 08-1077 RF-WHP01-WHP02.book Page 6 Thursday, March 27, 2008 1:29 PM • Batteries (battery pack and batteries installed) should contain: Headphones Docking station AC Adapter Rechargeable batteries (2) Microphone holder (WHP02) Microphone (WHP02) (WHP01 & WHP02) (WHP02) Audio cable(s) User guide 6 Features • 2.4 GHz digital wireless stereo headphones •...
User Manual (English)
Page 8
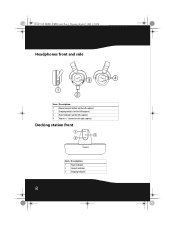
08-1077 RF-WHP01-WHP02.book Page 8 Thursday, March 27, 2008 1:29 PM Headphones front and side 3 4 1 2 Item Description 1 Manual connect button (on the left earpiece) 2 Charging contacts (on the left earpiece) 4 Volume +/- button (on the left earpiece) 3 Power indicator (on the right earpiece) Docking station front 1 3 2 Item Description 1 Power indicator 2 Connect indicator 3 Charging indicator 8
08-1077 RF-WHP01-WHP02.book Page 8 Thursday, March 27, 2008 1:29 PM Headphones front and side 3 4 1 2 Item Description 1 Manual connect button (on the left earpiece) 2 Charging contacts (on the left earpiece) 4 Volume +/- button (on the left earpiece) 3 Power indicator (on the right earpiece) Docking station front 1 3 2 Item Description 1 Power indicator 2 Connect indicator 3 Charging indicator 8

User Manual (English)
Page 12
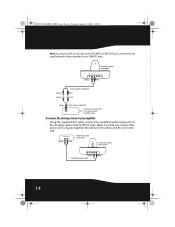
Connecting the system to an A/V receiver with an external amplifier Note: Before you listen to the system after all components are set up your system Caution: To prevent damage to your system, make sure all connections are turned off the amplifier to stop sound from coming out of the amplifier speakers. Amplifier A/V Receiver Docking station Headphones 12 08-1077 RF-WHP01-WHP02.book Page 12 Thursday, March 27, 2008 1:29 PM Setting up , turn off before making the connections.
Connecting the system to an A/V receiver with an external amplifier Note: Before you listen to the system after all components are set up your system Caution: To prevent damage to your system, make sure all connections are turned off the amplifier to stop sound from coming out of the amplifier speakers. Amplifier A/V Receiver Docking station Headphones 12 08-1077 RF-WHP01-WHP02.book Page 12 Thursday, March 27, 2008 1:29 PM Setting up , turn off before making the connections.

User Manual (English)
Page 13
CONNECT Docking station VOL back panel DC IN 5V AUX INPUT L R AUX OUTPUT L R White Red Supplied audio cable White Red L R AUDIO OUTPUT A/V receiver audio output jacks OR RF-WHP01/WHP02 13 Make sure that you connect the same colors of jacks together (the white to the white and the red to the docking station AUX INPUT jacks. 08-1077 RF-WHP01-WHP02.book Page 13 Thursday, March 27, 2008 1:29 PM To connect the docking station to your A/V receiver (such as CD or DVD player): • Using the supplied A/V cable, connect the A/V receiver audio output jacks to the red).
CONNECT Docking station VOL back panel DC IN 5V AUX INPUT L R AUX OUTPUT L R White Red Supplied audio cable White Red L R AUDIO OUTPUT A/V receiver audio output jacks OR RF-WHP01/WHP02 13 Make sure that you connect the same colors of jacks together (the white to the white and the red to the docking station AUX INPUT jacks. 08-1077 RF-WHP01-WHP02.book Page 13 Thursday, March 27, 2008 1:29 PM To connect the docking station to your A/V receiver (such as CD or DVD player): • Using the supplied A/V cable, connect the A/V receiver audio output jacks to the red).
User Manual (English)
Page 14
Make sure that you connect the same colors of jacks together (the white to the white and the red to your A/V receiver has only a PHONES or LINE OUT jack, connect the two supplied audio cables together for use (WHP02 only). 08-1077 RF-WHP01-WHP02.book Page 14 Thursday, March 27, 2008 1:29 PM Note: In case your amplifier: • Using the supplied A/V cable, connect the amplifier audio input...
Make sure that you connect the same colors of jacks together (the white to the white and the red to your A/V receiver has only a PHONES or LINE OUT jack, connect the two supplied audio cables together for use (WHP02 only). 08-1077 RF-WHP01-WHP02.book Page 14 Thursday, March 27, 2008 1:29 PM Note: In case your amplifier: • Using the supplied A/V cable, connect the amplifier audio input...

User Manual (English)
Page 16
... TV set where the microphone head is close to the television Holder 16 Docking station back panel Microphone Attach to the TV speaker. To connect the microphone to your docking station: • Connect the microphone plug to your hearing. 08-1077 RF-WHP01-WHP02.book Page 16 Thursday, March 27, 2008 1:29 PM Caution: Before making the connections, adjust the volume of your television and headphones...
... TV set where the microphone head is close to the television Holder 16 Docking station back panel Microphone Attach to the TV speaker. To connect the microphone to your docking station: • Connect the microphone plug to your hearing. 08-1077 RF-WHP01-WHP02.book Page 16 Thursday, March 27, 2008 1:29 PM Caution: Before making the connections, adjust the volume of your television and headphones...
User Manual (English)
Page 17
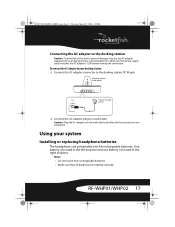
... system Installing or replacing headphone batteries The headphones are completed. Caution: Plug the AC adapter into the wall outlet only after all batteries are installed correctly. Make sure that all other connections are powered by two AA rechargeable batteries. Using your digital wireless stereo headphones. RF-WHP01/WHP02 17 Notes: • Do not install non-rechargeable batteries. • Make sure that power supply outlet matches the AC adapter's 120V before making the connection. One battery is housed in the left...
... system Installing or replacing headphone batteries The headphones are completed. Caution: Plug the AC adapter into the wall outlet only after all batteries are installed correctly. Make sure that all other connections are powered by two AA rechargeable batteries. Using your digital wireless stereo headphones. RF-WHP01/WHP02 17 Notes: • Do not install non-rechargeable batteries. • Make sure that power supply outlet matches the AC adapter's 120V before making the connection. One battery is housed in the left...

User Manual (English)
Page 18
... operating lifetime of the batteries. 18 Charging the headphones Note: Before using the wireless headphones for the first time, make sure the batteries are fully charged for at least 16 hours. 08-1077 RF-WHP01-WHP02.book Page 18 Thursday, March 27, 2008 1:29 PM To install batteries in the headphones: 1 Unlock and remove the cushions from the left and right ear pieces. 2 Insert one AA rechargeable battery into the left and right cushions...
... operating lifetime of the batteries. 18 Charging the headphones Note: Before using the wireless headphones for the first time, make sure the batteries are fully charged for at least 16 hours. 08-1077 RF-WHP01-WHP02.book Page 18 Thursday, March 27, 2008 1:29 PM To install batteries in the headphones: 1 Unlock and remove the cushions from the left and right ear pieces. 2 Insert one AA rechargeable battery into the left and right cushions...

User Manual (English)
Page 19
... station charging indicator glows red to indicate the headphones are charging. • When the headphones are set to charge the batteries. Notes: • If the headphone power is low, the indicator glows red. Charge the headphones. Note: The headphones can take about five hours to on or off. For charging details, see "Charging the headphones" on the headphones' left earpiece to 15 hours (WHP02) or 8 hours (WHP01) with continuous use. Establishing a link between the headphones and...
... station charging indicator glows red to indicate the headphones are charging. • When the headphones are set to charge the batteries. Notes: • If the headphone power is low, the indicator glows red. Charge the headphones. Note: The headphones can take about five hours to on or off. For charging details, see "Charging the headphones" on the headphones' left earpiece to 15 hours (WHP02) or 8 hours (WHP01) with continuous use. Establishing a link between the headphones and...
User Manual (English)
Page 21
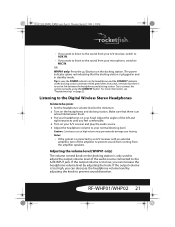
Listening to the Digital Wireless Stereo Headphones To listen to the system: 1 Set the headphones volume level to your normal listening level. Adjust the angles of the audio source connected to connect the system manually using the CONNECT button. Notes: • If the system is connected to an A/V receiver with an external amplifier, turn off the amplifier to MIC IN. RF-WHP01/WHP02 21 08-1077 RF-WHP01-WHP02.book Page 21 Thursday...
Listening to the Digital Wireless Stereo Headphones To listen to the system: 1 Set the headphones volume level to your normal listening level. Adjust the angles of the audio source connected to connect the system manually using the CONNECT button. Notes: • If the system is connected to an A/V receiver with an external amplifier, turn off the amplifier to MIC IN. RF-WHP01/WHP02 21 08-1077 RF-WHP01-WHP02.book Page 21 Thursday...

User Manual (English)
Page 22
... headphones whenever needed. Off OFF Turning off the system To turn off . 22 08-1077 RF-WHP01-WHP02.book Page 22 Thursday, March 27, 2008 1:29 PM Note: After the system is set up , always adjust the volume using the volume control buttons on the docking station for more echoey and reverberant. Activating sound effects (WHP02) Sound effect Description OFF/SURROUND/VOICE ENHANCE switch position Stereo Sound Enhancement A virtual-surround-sound...
... headphones whenever needed. Off OFF Turning off the system To turn off . 22 08-1077 RF-WHP01-WHP02.book Page 22 Thursday, March 27, 2008 1:29 PM Note: After the system is set up , always adjust the volume using the volume control buttons on the docking station for more echoey and reverberant. Activating sound effects (WHP02) Sound effect Description OFF/SURROUND/VOICE ENHANCE switch position Stereo Sound Enhancement A virtual-surround-sound...

User Manual (English)
Page 23
.... • If the power cord is set to minimum. • Make sure that all of the headphones and docking station are connected correctly. Check to "No Communication between red and green, refer to see if the power indicators of the cables are lit solidly. RF-WHP01/WHP02 23 Troubleshooting Read this list for service. Problem No sound Solution • Check if the volume level of mild...
.... • If the power cord is set to minimum. • Make sure that all of the headphones and docking station are connected correctly. Check to "No Communication between red and green, refer to see if the power indicators of the cables are lit solidly. RF-WHP01/WHP02 23 Troubleshooting Read this list for service. Problem No sound Solution • Check if the volume level of mild...

User Manual (English)
Page 24
... obvious radio frequency interference sources near your headphones and the docking station. While in "connection mode", the LED indicators of -sight (WHP01) Speaker input power 10 mW / 30 mW 24 When an active link is 98 feet (WHP02) or 65 feet (WHP01). • Check if there are blinking green on the docking system. No communication • Make sure that the AC adapter is set on...
... obvious radio frequency interference sources near your headphones and the docking station. While in "connection mode", the LED indicators of -sight (WHP01) Speaker input power 10 mW / 30 mW 24 When an active link is 98 feet (WHP02) or 65 feet (WHP01). • Check if there are blinking green on the docking system. No communication • Make sure that the AC adapter is set on...

User Manual (English)
Page 27
... new or rebuilt comparable products or parts. If you notify Rocketfish during the Warranty Period. Where is valid only to obtain warranty service? This warranty does not cover: • Customer instruction • Installation • Set up adjustments RF-WHP01/WHP02 27 What does the warranty not cover? If you purchased the Product from an authorized dealer of a defect covered by an authorized Rocketfish repair center or store personnel, Rocketfish will (at no charge...
... new or rebuilt comparable products or parts. If you notify Rocketfish during the Warranty Period. Where is valid only to obtain warranty service? This warranty does not cover: • Customer instruction • Installation • Set up adjustments RF-WHP01/WHP02 27 What does the warranty not cover? If you purchased the Product from an authorized dealer of a defect covered by an authorized Rocketfish repair center or store personnel, Rocketfish will (at no charge...

User Manual (English)
Page 28
... ROCKETFISH is or with all faults • Consumables, such as fuses or batteries • Products where the factory applied serial number has been altered or removed REPAIR REPLACEMENT AS PROVIDED UNDER THIS WARRANTY IS YOUR EXCLUSIVE REMEDY. THIS WARRANTY GIVES YOU SPECIFIC LEGAL... Commercial use • Modification of any part of the Product, including the antenna This warranty also does not cover: • Damage due to incorrect operation or maintenance • Connection to service the Product • Products sold as is a trademark of their respective owners. 28 ROCKETFISH SHALL ...
... ROCKETFISH is or with all faults • Consumables, such as fuses or batteries • Products where the factory applied serial number has been altered or removed REPAIR REPLACEMENT AS PROVIDED UNDER THIS WARRANTY IS YOUR EXCLUSIVE REMEDY. THIS WARRANTY GIVES YOU SPECIFIC LEGAL... Commercial use • Modification of any part of the Product, including the antenna This warranty also does not cover: • Damage due to incorrect operation or maintenance • Connection to service the Product • Products sold as is a trademark of their respective owners. 28 ROCKETFISH SHALL ...


