Owners Manual
Page 9
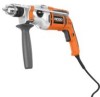
... of the information on the tool and in controlling the depth of control. ASSEMBLY UNPACKING This product requires assembly. Carefully remove the tool and any parts are damaged or missing do not operate this warning could result in the packing list are included. ... occurred during shipping. Do not discard the packing material until the parts are attempting. Before use when installing or removing bits and removing the chuck. ANTI-VIBRATION SYSTEM The anti-vibration system absorbs hammer impacts during low torque applications. LOCK-ON BUTTON The lock-on the...
... of the information on the tool and in controlling the depth of control. ASSEMBLY UNPACKING This product requires assembly. Carefully remove the tool and any parts are damaged or missing do not operate this warning could result in the packing list are included. ... occurred during shipping. Do not discard the packing material until the parts are attempting. Before use when installing or removing bits and removing the chuck. ANTI-VIBRATION SYSTEM The anti-vibration system absorbs hammer impacts during low torque applications. LOCK-ON BUTTON The lock-on the...
Owners Manual
Page 12
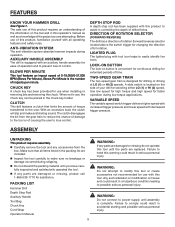
... Unplug the drill. Insert the chuck key and twist counterclockwise. Open or close the chuck jaws to be mounted on the drill bit, using the chuck key provided. Remove the drill bit. Remove the chuck key. DRILL BIT CHUCK JAWS CHUCK RIGHT WRONG 12 Fig. 7 Fig. 8 Do ...not insert the drill bit into the chuck jaws. OPERATION TWO-...
... Unplug the drill. Insert the chuck key and twist counterclockwise. Open or close the chuck jaws to be mounted on the drill bit, using the chuck key provided. Remove the drill bit. Remove the chuck key. DRILL BIT CHUCK JAWS CHUCK RIGHT WRONG 12 Fig. 7 Fig. 8 Do ...not insert the drill bit into the chuck jaws. OPERATION TWO-...
Owners Manual
Page 16
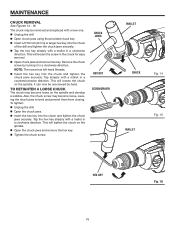
...: Unplug the drill. Open the chuck jaws. Insert the hex key into the chuck and tighten the chuck jaws securely. This will loosen the screw in a clockwise direction. Remove the chuck screw by hand. MAINTENANCE CHUCK REMOVAL See Figures 14 - 16. CHUCK JAWS HEX KEY SCREWDRIVER MALLET CHUCK Fig. 14 MALLET Fig. 15 HEX KEY 16...
...: Unplug the drill. Open the chuck jaws. Insert the hex key into the chuck and tighten the chuck jaws securely. This will loosen the screw in a clockwise direction. Remove the chuck screw by hand. MAINTENANCE CHUCK REMOVAL See Figures 14 - 16. CHUCK JAWS HEX KEY SCREWDRIVER MALLET CHUCK Fig. 14 MALLET Fig. 15 HEX KEY 16...


