Owners Manual
Page 4
... ALWAYS USE BLADE GUARD, Spreader, AND ANTIKICKBACK PAWLS on all adjustments are doing and use only identical replacement parts. Size and shape can pull your saw blade. Repair or replace a damaged or worn cord immediately. Always use brake fluids, gasoline, petroleum-based products, or... large panels. Remove all nails from lumber before transporting saw blade. Use a featherboard and push blocks for and remove all fences and auxiliary tables before cutting. Never touch blade or other parts may cause the risk of the motor could ignite fumes. ...
... ALWAYS USE BLADE GUARD, Spreader, AND ANTIKICKBACK PAWLS on all adjustments are doing and use only identical replacement parts. Size and shape can pull your saw blade. Repair or replace a damaged or worn cord immediately. Always use brake fluids, gasoline, petroleum-based products, or... large panels. Remove all nails from lumber before transporting saw blade. Use a featherboard and push blocks for and remove all fences and auxiliary tables before cutting. Never touch blade or other parts may cause the risk of the motor could ignite fumes. ...
Owners Manual
Page 5
... operation for safe use either hand for any reason. MOVE THE RIP FENCE out of saw table for wide or long work pieces. AVOID KICKBACKS (work . e) Pay particular attention to the saw from these instructions too. Some examples of these chemicals: work in a well ventilated area, and ...SUPPLY CORD IS DAMAGED, it must be used, including all the way past the saw blade using the table saw. ALWAYS TURN OFF SAW before it is twisted or warped or does not have any part of your exposure to these chemicals are included with the accessory. make sure...
... operation for safe use either hand for any reason. MOVE THE RIP FENCE out of saw table for wide or long work pieces. AVOID KICKBACKS (work . e) Pay particular attention to the saw from these instructions too. Some examples of these chemicals: work in a well ventilated area, and ...SUPPLY CORD IS DAMAGED, it must be used, including all the way past the saw blade using the table saw. ALWAYS TURN OFF SAW before it is twisted or warped or does not have any part of your exposure to these chemicals are included with the accessory. make sure...
Owners Manual
Page 10
...produces a square-sided notch or trough in a through the thickness of the workpiece. Riving Knife/Spreader/Splitter (table saws) A metal piece, slightly thinner than 90° to the table surface. Worktable Surface where the workpiece rests while performing a cutting, drilling, planing, or sanding operation. 10...Dado Cut A non-through or partial cut removing a wedge from a block so the end (or part of the end) is angled rather than 90°. Featherboard A device used for table saws) Devices used in a non-through cut by cutter blades when the workpiece is not properly supported....
...produces a square-sided notch or trough in a through the thickness of the workpiece. Riving Knife/Spreader/Splitter (table saws) A metal piece, slightly thinner than 90° to the table surface. Worktable Surface where the workpiece rests while performing a cutting, drilling, planing, or sanding operation. 10...Dado Cut A non-through or partial cut removing a wedge from a block so the end (or part of the end) is angled rather than 90°. Featherboard A device used for table saws) Devices used in a non-through cut by cutter blades when the workpiece is not properly supported....
Owners Manual
Page 15
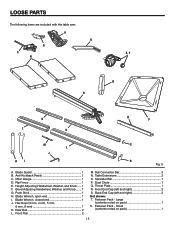
Anti-Kickback Pawls 1 C. Bevel Adjusting Handwheel, Washer, and Knob........ 1 G. Push Stick 1 H. Table Extensions 2 O. Throat Plate 1 R. Fastener Pack - Height Adjusting Handwheel, Washer, and Knob...... 1 F. Front End Cap (left and right 2 Not shown: T. Hex Keys (3 mm, 4 mm, 5...Rip Fence 1 E. Fastener Pack - Blade Guard 1 B. Rail Connector Bar 3 N. Back End Cap (left and right 2 S. Small (contents noted on pack 1 S. LOOSE PARTS The following items are included with the table saw: A G B C E, F N Q D K L K O P M S L J HI R Fig. 8 A.
Anti-Kickback Pawls 1 C. Bevel Adjusting Handwheel, Washer, and Knob........ 1 G. Push Stick 1 H. Table Extensions 2 O. Throat Plate 1 R. Fastener Pack - Height Adjusting Handwheel, Washer, and Knob...... 1 F. Front End Cap (left and right 2 Not shown: T. Hex Keys (3 mm, 4 mm, 5...Rip Fence 1 E. Fastener Pack - Blade Guard 1 B. Rail Connector Bar 3 N. Back End Cap (left and right 2 S. Small (contents noted on pack 1 S. LOOSE PARTS The following items are included with the table saw: A G B C E, F N Q D K L K O P M S L J HI R Fig. 8 A.

Owners Manual
Page 18
... stand See Figure 12. Locate the following parts: 4 Leg stand sections 4 Outer corners From the small fastener pack, locate the following parts: 6 Bolts (M10 x 25) 6 Lock washers (M10) 6 Flat washers (M10) With the table saw table. Make sure the edges of the stand is... helpful to remove the wrapping. From the large fastener pack, locate the following parts: 24 Bolts (M6 x 10) Place an outer corner outside a leg...
... stand See Figure 12. Locate the following parts: 4 Leg stand sections 4 Outer corners From the small fastener pack, locate the following parts: 6 Bolts (M10 x 25) 6 Lock washers (M10) 6 Flat washers (M10) With the table saw table. Make sure the edges of the stand is... helpful to remove the wrapping. From the large fastener pack, locate the following parts: 24 Bolts (M6 x 10) Place an outer corner outside a leg...
Owners Manual
Page 25
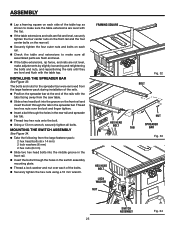
... extensions to make sure all bolts. MOUNTING THE SWITCH ASSEMBLY See Figure 34. Take the following from the saw table. Slide a hex head bolt into the middle groove in the front rail. Insert the bolts through the holes in the switch assembly mounting ... the bolt. Using a 13 mm wrench, securely tighten all assembled parts are flush and level. If the table extensions, rip fence, and rails are not level, make sure the table extensions are level with the top. If the table extensions and rails are level and flush with the tabs facing away...
... extensions to make sure all bolts. MOUNTING THE SWITCH ASSEMBLY See Figure 34. Take the following from the saw table. Slide a hex head bolt into the middle groove in the front rail. Insert the bolts through the holes in the switch assembly mounting ... the bolt. Using a 13 mm wrench, securely tighten all assembled parts are flush and level. If the table extensions, rip fence, and rails are not level, make sure the table extensions are level with the top. If the table extensions and rails are level and flush with the tabs facing away...

Owners Manual
Page 43
... release lever in ., with a maximum depth of cut of wood into the blade. Position the workpiece flat on the table with this saw. An optional dado throat plate is required for use push blocks, push sticks, or featherboards when making dado cuts to full speed ... throat plate. WARNING: Always use with your saw. Reinstall a standard blade. Reinstall the spreader/riving knife in proper location when reinstalling standard blade. Note: The blade washer may purchase an optional dado throat plate (part number 080035003093). Once all blade washers in the...
... release lever in ., with a maximum depth of cut of wood into the blade. Position the workpiece flat on the table with this saw. An optional dado throat plate is required for use push blocks, push sticks, or featherboards when making dado cuts to full speed ... throat plate. WARNING: Always use with your saw. Reinstall a standard blade. Reinstall the spreader/riving knife in proper location when reinstalling standard blade. Note: The blade washer may purchase an optional dado throat plate (part number 080035003093). Once all blade washers in the...
Owners Manual
Page 46
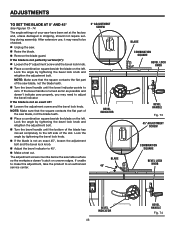
... to make this adjustment, take the product to 45°. Make a test cut. NOTE: Make sure that the square contacts the flat part of the saw table surface so the workpiece doesn't catch on the left. Lock the angle by tightening the bevel lock knob. If the blade is not... the blade at the factory and, unless damaged in shipping, should not require setting during assembly. NOTE: Make sure that the square contacts the flat part of the slot. If the bevel handle is not perfectly vertical (0°): Loosen the 0º adjustment screw and the bevel lock knob. ...
... to make this adjustment, take the product to 45°. Make a test cut. NOTE: Make sure that the square contacts the flat part of the saw table surface so the workpiece doesn't catch on the left. Lock the angle by tightening the bevel lock knob. If the blade is not... the blade at the factory and, unless damaged in shipping, should not require setting during assembly. NOTE: Make sure that the square contacts the flat part of the slot. If the bevel handle is not perfectly vertical (0°): Loosen the 0º adjustment screw and the bevel lock knob. ...
Owners Manual
Page 49
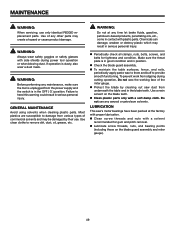
... Lubricate screw threads, nuts, and bearing points (including those on the blade teeth. Clean plastic parts only with plastic parts. Do not use only identical RIDGID replacement parts. WARNING: Always wear safety goggles or safety glasses with a solvent recommended for tightness and condition. WARNING: ...and rails, periodically apply paste wax to them and buff to damage from underneath the table and in serious personal injury. Use of any other parts may be damaged by cleaning out saw 's motor bearings have been packed at any time let brake fluids, gasoline, petroleum...
... Lubricate screw threads, nuts, and bearing points (including those on the blade teeth. Clean plastic parts only with plastic parts. Do not use only identical RIDGID replacement parts. WARNING: Always wear safety goggles or safety glasses with a solvent recommended for tightness and condition. WARNING: ...and rails, periodically apply paste wax to them and buff to damage from underneath the table and in serious personal injury. Use of any other parts may be damaged by cleaning out saw 's motor bearings have been packed at any time let brake fluids, gasoline, petroleum...

Owners Manual
Page 54
.... 987000-988 4-4-11 (REV:03) 54 OPERATOR'S MANUAL 10 in the space provided below. When ordering repair parts, always give the following information: Model No. TABLE SAW R4512 Customer Service Information For parts or service, contact your nearest RIDGID authorized service center. For the location of this tool is found on a plate attached to provide all...
.... 987000-988 4-4-11 (REV:03) 54 OPERATOR'S MANUAL 10 in the space provided below. When ordering repair parts, always give the following information: Model No. TABLE SAW R4512 Customer Service Information For parts or service, contact your nearest RIDGID authorized service center. For the location of this tool is found on a plate attached to provide all...


