
Owners Manual
Page 3
... AWAY. READ ALL INSTRUCTIONS KNOW YOUR POWER TOOL. Do not let visitors contact tool or extension cord while operating. MAKE WORKSHOP CHILDPROOF with sufficient set. Use only a cord heavy enough to carry the current your hand and frees both hands to determine that is recommended for outdoor use it on the saw 's applications and limitations as well as the specific potential hazards related...
... AWAY. READ ALL INSTRUCTIONS KNOW YOUR POWER TOOL. Do not let visitors contact tool or extension cord while operating. MAKE WORKSHOP CHILDPROOF with sufficient set. Use only a cord heavy enough to carry the current your hand and frees both hands to determine that is recommended for outdoor use it on the saw 's applications and limitations as well as the specific potential hazards related...
Owners Manual
Page 4
... through cuts. 4 Always use a fence or straight edge guide when ripping. SUPPORT LARGE PANELS. Never use only identical replacement parts. Instructions for non-through the blade instead of the motor could ignite fumes. Inspect TOOL CORDS periodically. If repair or replacement of the electric cord or plug is a device used to whether the tool is moving parts during use of personal injury. A push stick is necessary, do so can pull your hands. Use...
... through cuts. 4 Always use a fence or straight edge guide when ripping. SUPPORT LARGE PANELS. Never use only identical replacement parts. Instructions for non-through the blade instead of the motor could ignite fumes. Inspect TOOL CORDS periodically. If repair or replacement of the electric cord or plug is a device used to whether the tool is moving parts during use of personal injury. A push stick is necessary, do so can pull your hands. Use...
Owners Manual
Page 5
..., and work with approved safety equipment, such as cutoff gauge when cross cutting. NEVER attempt to free a stalled saw blade without first turning the saw OFF and disconnecting the saw from the power source. PROVIDE ADEQUATE SUPPORT to the rear and sides of the saw blade. b) Keeping rip fence parallel to support or guide the workpiece. To reduce your hands to the saw table for wide or long work pieces. ...
..., and work with approved safety equipment, such as cutoff gauge when cross cutting. NEVER attempt to free a stalled saw blade without first turning the saw OFF and disconnecting the saw from the power source. PROVIDE ADEQUATE SUPPORT to the rear and sides of the saw blade. b) Keeping rip fence parallel to support or guide the workpiece. To reduce your hands to the saw table for wide or long work pieces. ...
Owners Manual
Page 7
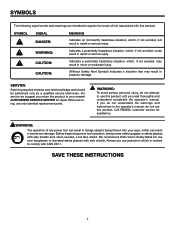
...: To avoid serious personal injury, do not use only identical replacement parts. We recommend Wide Vision Safety Mask for use eye protection which is marked to comply with this product. SAVE THESE INSTRUCTIONS 7 Call RIDGID® customer service for assistance. Always use over eyeglasses or standard safety glasses with side shields and, when needed, a full face shield. CAUTION: CAUTION: Indicates a potentially...
...: To avoid serious personal injury, do not use only identical replacement parts. We recommend Wide Vision Safety Mask for use eye protection which is marked to comply with this product. SAVE THESE INSTRUCTIONS 7 Call RIDGID® customer service for assistance. Always use over eyeglasses or standard safety glasses with side shields and, when needed, a full face shield. CAUTION: CAUTION: Indicates a potentially...
Owners Manual
Page 8
... use an extension cord that can support one power tool may not be grounded. If the saw does not operate when plugged into a matching outlet that is heavy enough for a short distance will not get caught on 12 gauge - 20 amp circuit. This is properly installed and grounded in serious personal injury. A line intended only for loose or exposed wires and cut...
... use an extension cord that can support one power tool may not be grounded. If the saw does not operate when plugged into a matching outlet that is heavy enough for a short distance will not get caught on 12 gauge - 20 amp circuit. This is properly installed and grounded in serious personal injury. A line intended only for loose or exposed wires and cut...
Owners Manual
Page 10
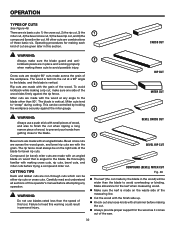
... the saw blade during any operation. Miter Cut A cutting operation made with the workpiece at any angle to prevent kickback. Pilot Hole (drill presses) A small hole drilled in contact with adjustable blades or knives. Push Blocks (for jointer planers) Device used in reference to the fence. Resin A sticky, sap-based substance that serves as a guide for narrow ripping operations. Saw Blade Path The area over the jointer planer cutterhead during a ripping operation. Bevel Cut A cutting operation...
... the saw blade during any operation. Miter Cut A cutting operation made with the workpiece at any angle to prevent kickback. Pilot Hole (drill presses) A small hole drilled in contact with adjustable blades or knives. Push Blocks (for jointer planers) Device used in reference to the fence. Resin A sticky, sap-based substance that serves as a guide for narrow ripping operations. Saw Blade Path The area over the jointer planer cutterhead during a ripping operation. Bevel Cut A cutting operation...
Owners Manual
Page 12
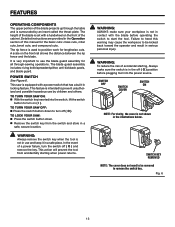
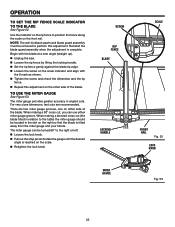
... operating features and safety rules. Failure to adjust the bevel angle of the blade.The bevel lock knob locks the angle setting of kickback. When in which helps keep the removable blade guard down " position, it is used to heed this product, familiarize yourself with a 36-tooth, 10 in the OFF position, remove the switch key from the workpiece. ANTI-KICKBACK PAWLS - BEVEL SCALE - The miter gauge aligns the wood for use the tool. RIP FENCE - A removable...
... operating features and safety rules. Failure to adjust the bevel angle of the blade.The bevel lock knob locks the angle setting of kickback. When in which helps keep the removable blade guard down " position, it is used to heed this product, familiarize yourself with a 36-tooth, 10 in the OFF position, remove the switch key from the workpiece. ANTI-KICKBACK PAWLS - BEVEL SCALE - The miter gauge aligns the wood for use the tool. RIP FENCE - A removable...
Owners Manual
Page 13
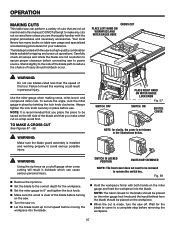
... of a power failure, turn off ( O ) and remove the key. This saw : Press the switch button down to remove the switch key. SWITCH KEY REMOVED NOTE: The cover does not need to be kicked back toward the operator and result in use the blade guard assembly for the basic cuts: cross cuts, miter cuts, bevel cuts, and compound cuts. The height of the blade is set with a power switch that has a built-in the off ( O ) position before operating the switch to use and keep...
... of a power failure, turn off ( O ) and remove the key. This saw : Press the switch button down to remove the switch key. SWITCH KEY REMOVED NOTE: The cover does not need to be kicked back toward the operator and result in use the blade guard assembly for the basic cuts: cross cuts, miter cuts, bevel cuts, and compound cuts. The height of the blade is set with a power switch that has a built-in the off ( O ) position before operating the switch to use and keep...

Owners Manual
Page 26
... spring-loaded riving clamp. Pull the spreader up until it up " position for non-through cutting or "down" position (riving knife position). To place in riving knife position (or "down" position for all other cutting operations. Unplug the saw blade by turning the height adjusting handwheel clockwise. Unlock the release lever by pushing the lever down. Reinstall the throat plate...
... spring-loaded riving clamp. Pull the spreader up until it up " position for non-through cutting or "down" position (riving knife position). To place in riving knife position (or "down" position for all other cutting operations. Unplug the saw blade by turning the height adjusting handwheel clockwise. Unlock the release lever by pushing the lever down. Reinstall the throat plate...
Owners Manual
Page 29
... cut , use clean, sharp, and properly-set blade AVOIDING KICKBACK Always use the correct blade depth setting. Never saw Failing to avoid the risks. Keep your hands are shown with the blade guard removed for clarity, do not operate the saw without the blade guard unless specifically instructed to 1/4 in the wood such as cross cutting, ripping, mitering, beveling, and compound cutting Dado cuts with optional accessories Cabinet making a cut Failing to support work for the type...
... cut , use clean, sharp, and properly-set blade AVOIDING KICKBACK Always use the correct blade depth setting. Never saw Failing to avoid the risks. Keep your hands are shown with the blade guard removed for clarity, do not operate the saw without the blade guard unless specifically instructed to 1/4 in the wood such as cross cutting, ripping, mitering, beveling, and compound cutting Dado cuts with optional accessories Cabinet making a cut Failing to support work for the type...
Owners Manual
Page 32
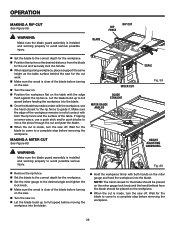
... the speed of cut made with an angled blade. Miter cuts are combinations of wood, to prevent your hands from getting close to avoid overheating or binding. The rip fence must always be either rip cuts or cross cuts. CUTTING TIPS Dado and rabbet cuts are six basic cuts: 1) the cross cut, 2) the rip cut, 3) the 1 miter cut, 4) the bevel cross cut, 5) the bevel rip cut, and 6) the compound (bevel) miter cut when ripping a long narrow piece of these cuts to "creep" during cutting. OPERATION types...
... the speed of cut made with an angled blade. Miter cuts are combinations of wood, to prevent your hands from getting close to avoid overheating or binding. The rip fence must always be either rip cuts or cross cuts. CUTTING TIPS Dado and rabbet cuts are six basic cuts: 1) the cross cut, 2) the rip cut, 3) the 1 miter cut, 4) the bevel cross cut, 5) the bevel rip cut, and 6) the compound (bevel) miter cut when ripping a long narrow piece of these cuts to "creep" during cutting. OPERATION types...
Owners Manual
Page 35
... stop pin and rotate the gauge until the desired angle is complete. Reinstall the blade guard assembly when the adjustment is reached on the scale. Retighten the lock knob. When making a beveled cross cut , you can be removed to the table) the miter gauge should be located in angled cuts. Begin with the blade at a zero angle (straight up). Unplug the saw. Loosen the rip fence by lifting the locking handle. Set...
... stop pin and rotate the gauge until the desired angle is complete. Reinstall the blade guard assembly when the adjustment is reached on the scale. Retighten the lock knob. When making a beveled cross cut , you can be removed to the table) the miter gauge should be located in angled cuts. Begin with the blade at a zero angle (straight up). Unplug the saw. Loosen the rip fence by lifting the locking handle. Set...
Owners Manual
Page 37
... switch key. Failure to heed this tool. Use the miter gauge when making cross, miter, bevel, and compound miter cuts. Fig. 58 Hold the workpiece firmly with both hands on the miter gauge and feed the workpiece into the blade. The blade provided with the proper procedures and necessary accessories. WARNING: Using the rip fence as a cutoff gauge when cross cutting will result in place by twisting the lock knob clockwise. SWITCH IN LOCKED POSITION SWITCH KEY REMOVED...
... switch key. Failure to heed this tool. Use the miter gauge when making cross, miter, bevel, and compound miter cuts. Fig. 58 Hold the workpiece firmly with both hands on the miter gauge and feed the workpiece into the blade. The blade provided with the proper procedures and necessary accessories. WARNING: Using the rip fence as a cutoff gauge when cross cutting will result in place by twisting the lock knob clockwise. SWITCH IN LOCKED POSITION SWITCH KEY REMOVED...
Owners Manual
Page 38
... the rip fence to full speed before turning on the saw. Turn the saw on. Let the blade build up to guide it. Note: The hand closest to the correct depth for the cut is installed and working properly to avoid possible serious injury. SCALE Fig. 59 HEight ADJUSTING HANDWHEEL Fig. 60 Remove the rip fence. Set the blade to the blade should be placed on the miter gauge lock knob...
... the rip fence to full speed before turning on the saw. Turn the saw on. Let the blade build up to guide it. Note: The hand closest to the correct depth for the cut is installed and working properly to avoid possible serious injury. SCALE Fig. 59 HEight ADJUSTING HANDWHEEL Fig. 60 Remove the rip fence. Set the blade to the blade should be placed on the miter gauge lock knob...
Owners Manual
Page 40
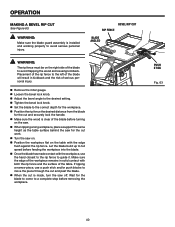
... to guide it. If ripping a narrow piece, use the hand closest to the rip fence to move the piece through the cut and past the blade. When the cut See Figure 63. Let the blade build up to avoid serious personal injury. WARNING: Make sure the blade guard assembly is installed and working properly to full speed before removing the workpiece. Wait for the cut work. Turn the saw off. OPERATION making a bevel rip cut...
... to guide it. If ripping a narrow piece, use the hand closest to the rip fence to move the piece through the cut and past the blade. When the cut See Figure 63. Let the blade build up to avoid serious personal injury. WARNING: Make sure the blade guard assembly is installed and working properly to full speed before removing the workpiece. Wait for the cut work. Turn the saw off. OPERATION making a bevel rip cut...
Owners Manual
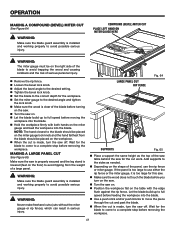
Page 41
... with the edge flush against the rip fence. Add supports to the sides as the top of serious personal injury. Remove the rip fence. Loosen the bevel lock knob. Adjust the bevel angle to the desired setting. Tighten the bevel lock knob. Set the blade to the correct depth for the blade to come to avoid possible serious injury. COMPOUND (BEVEL) MITER CUT PLACE Left HAND ON MITER Gauge HERE WARNING: The miter gauge must be...
... with the edge flush against the rip fence. Add supports to the sides as the top of serious personal injury. Remove the rip fence. Loosen the bevel lock knob. Adjust the bevel angle to the desired setting. Tighten the bevel lock knob. Set the blade to the correct depth for the blade to come to avoid possible serious injury. COMPOUND (BEVEL) MITER CUT PLACE Left HAND ON MITER Gauge HERE WARNING: The miter gauge must be...

Owners Manual
Page 43
... hand, always use either the rip fence or miter gauge, you turn the saw off. OPERATION making a DADO cut is made, turn on the saw. Note: The blade washer may purchase an optional dado throat plate (part number 080035003093). Wait for the desired width of the wood, use a push stick. stack dado (up to move the wood through cuts. When the cut See Figure 67. NOTE: If you cannot use an adjustable dado on this tool...
... hand, always use either the rip fence or miter gauge, you turn the saw off. OPERATION making a DADO cut is made, turn on the saw. Note: The blade washer may purchase an optional dado throat plate (part number 080035003093). Wait for the desired width of the wood, use a push stick. stack dado (up to move the wood through cuts. When the cut See Figure 67. NOTE: If you cannot use an adjustable dado on this tool...
Owners Manual
Page 45
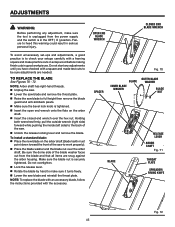
... square and make sure it turns freely. Lower the saw . Unlock the release locking lever and remove the blade. TO replace the blade See Figures 70 - 72. Do not start any adjustment, make sure the tool is tightened. Insert the open end wrench onto the flats on the arbor shaft (blade teeth must point down toward the front of the saw blade and reinstall the throat plate. To...
... square and make sure it turns freely. Lower the saw . Unlock the release locking lever and remove the blade. TO replace the blade See Figures 70 - 72. Do not start any adjustment, make sure the tool is tightened. Insert the open end wrench onto the flats on the arbor shaft (blade teeth must point down toward the front of the saw blade and reinstall the throat plate. To...
Owners Manual
Page 46
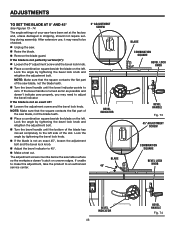
.... The adjustment screws must be checked. Unplug the saw. Raise the blade. Remove the blade guard. The angle settings of the slot. NOTE: Make sure that the square contacts the flat part of the saw blade, not the blade teeth. Turn the bevel handle until the bottom of the saw blade, not the blade teeth. Place a combination square beside the blade on uneven edges. Lock the angle by tightening the bevel lock knob and...
.... The adjustment screws must be checked. Unplug the saw. Raise the blade. Remove the blade guard. The angle settings of the slot. NOTE: Make sure that the square contacts the flat part of the saw blade, not the blade teeth. Turn the bevel handle until the bottom of the saw blade, not the blade teeth. Place a combination square beside the blade on uneven edges. Lock the angle by tightening the bevel lock knob and...
Owners Manual
Page 49
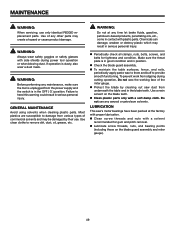
... ( O ) position. LUBRICATION This saw dust from slipping during power tool operation or when blowing dust. Make sure the throat plate is in good condition and in serious personal injury. Periodically check all clamps, nuts, bolts, screws, and belts for gum and pitch removal. Lubricate screw threads, nuts, and bearing points (including those on the blade teeth. Clean plastic parts only with a solvent recommended...
... ( O ) position. LUBRICATION This saw dust from slipping during power tool operation or when blowing dust. Make sure the throat plate is in good condition and in serious personal injury. Periodically check all clamps, nuts, bolts, screws, and belts for gum and pitch removal. Lubricate screw threads, nuts, and bearing points (including those on the blade teeth. Clean plastic parts only with a solvent recommended...


