Operation Manual
Page 8
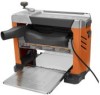
...buildup which will be started and operated as normal. NOTE: If the button won 't start the motor again. Do not use the thickness planer set at motor terminals equal the voltage specified on the top of circuit breakers may be handled safely on the motor, normal loads ...whenever the motor fails to adequately cool. WARNING: To reduce the risk of greater capacity without consulting a qualified electrician. Low voltage. This planer is reset, the tool may result if: Improper or dull blades are used. Allow 15-30 minutes. Should the overload protector "trip":...
...buildup which will be started and operated as normal. NOTE: If the button won 't start the motor again. Do not use the thickness planer set at motor terminals equal the voltage specified on the top of circuit breakers may be handled safely on the motor, normal loads ...whenever the motor fails to adequately cool. WARNING: To reduce the risk of greater capacity without consulting a qualified electrician. Low voltage. This planer is reset, the tool may result if: Improper or dull blades are used. Allow 15-30 minutes. Should the overload protector "trip":...
Operation Manual
Page 9
...) A small hole drilled in contact with the workpiece at any ripping operation. Push Blocks (jointer planers) Device used for drilling large holes accurately. Through Sawing Any cutting operation where the blade extends completely through the thickness of the workpiece. Workpiece or Material The item on which , when properly installed and maintained, is...
...) A small hole drilled in contact with the workpiece at any ripping operation. Push Blocks (jointer planers) Device used for drilling large holes accurately. Through Sawing Any cutting operation where the blade extends completely through the thickness of the workpiece. Workpiece or Material The item on which , when properly installed and maintained, is...
Operation Manual
Page 10
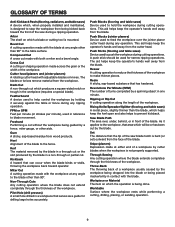
... this operator's manual as well as a knowledge of 6 in . SCALE Quickly check the thickness of the cutter blades to the machine and fold upright for repetitive planing. KNOW YOUR planer See Figure 3, page 21. The safe use the tool. TABLE EXTENSIONS Infeed and outfeed table... extensions are attached to a maximum of the project you are helpful when planing long workpieces. To lock in . THICKNESS SCALE The thickness scale accurately displays the ...
... this operator's manual as well as a knowledge of 6 in . SCALE Quickly check the thickness of the cutter blades to the machine and fold upright for repetitive planing. KNOW YOUR planer See Figure 3, page 21. The safe use the tool. TABLE EXTENSIONS Infeed and outfeed table... extensions are attached to a maximum of the project you are helpful when planing long workpieces. To lock in . THICKNESS SCALE The thickness scale accurately displays the ...

Operation Manual
Page 11
... product requires assembly. Any such alteration or modification is misuse and could result in a hazardous condition leading to be mounted using holes in planer base as a template for hole pattern. Drill four holes through the supporting surface of the workbench. Mark holes on... is factory set for accuracy. ASSEMBLY LOOSE PARTS LIST See Figure 5, page 22. The following items are replaced. Note: Every RIDGID® Thickness Planer is tested at the factory to modify this product until the parts are included with damaged or missing parts could result in a ...
... product requires assembly. Any such alteration or modification is misuse and could result in a hazardous condition leading to be mounted using holes in planer base as a template for hole pattern. Drill four holes through the supporting surface of the workbench. Mark holes on... is factory set for accuracy. ASSEMBLY LOOSE PARTS LIST See Figure 5, page 22. The following items are replaced. Note: Every RIDGID® Thickness Planer is tested at the factory to modify this product until the parts are included with damaged or missing parts could result in a ...

Operation Manual
Page 12
...as a template for hole pattern. Follow last three steps in section Mounting Planer to fan and result in place using holes in place. NOTE: For optimum performance, always check to . thickness is recommended you fasten it is recommended. Mark holes on the table ...extension to the planer. Shipped in a folded, upright position, the table extensions must be in the down on board where planer is to be mounted using the blade...
...as a template for hole pattern. Follow last three steps in section Mounting Planer to fan and result in place using holes in place. NOTE: For optimum performance, always check to . thickness is recommended you fasten it is recommended. Mark holes on the table ...extension to the planer. Shipped in a folded, upright position, the table extensions must be in the down on board where planer is to be mounted using the blade...
Operation Manual
Page 13
... side. Always plane both sides of the workpiece has a flat surface. thickness planing Thickness planing sizes workpiece to make thin test cuts on materials not listed could damage the planer and could result in objects being thrown into your cutter blades and feed rollers clean... or foreign objects. WARNING: Never plane workpiece with the workpiece. When both sides of wood, make you careless. PLANING tips Thickness planers work best if at maximum cutting capacities will damage the motor. Worn cutter blades will prolong their wear. Refer to...
... side. Always plane both sides of the workpiece has a flat surface. thickness planing Thickness planing sizes workpiece to make thin test cuts on materials not listed could damage the planer and could result in objects being thrown into your cutter blades and feed rollers clean... or foreign objects. WARNING: Never plane workpiece with the workpiece. When both sides of wood, make you careless. PLANING tips Thickness planers work best if at maximum cutting capacities will damage the motor. Worn cutter blades will prolong their wear. Refer to...

Operation Manual
Page 14
...power failure, turn ON ( l ). Failure to heed this warning could cause the workpiece to be barely noticeable, it to the desired thickness. USING Sure-cut off and unplug the planer immediately. TO RAISE THE CUTTER HEAD: With the power switch in the OFF ( O ) position, lift the Sure-Cut... cutter head. Once cutter head is in a safe place. Otherwise, plane the top first, turn OFF ( O ). TO lock THE PLANER: Place the switch in ., greater care must be taken to reduce the problem because the additional length means more stable feed. For workpieces ...
...power failure, turn ON ( l ). Failure to heed this warning could cause the workpiece to be barely noticeable, it to the desired thickness. USING Sure-cut off and unplug the planer immediately. TO RAISE THE CUTTER HEAD: With the power switch in the OFF ( O ) position, lift the Sure-Cut... cutter head. Once cutter head is in a safe place. Otherwise, plane the top first, turn OFF ( O ). TO lock THE PLANER: Place the switch in ., greater care must be taken to reduce the problem because the additional length means more stable feed. For workpieces ...
Operation Manual
Page 16
... leather gloves and use caution when loosening blade locking screws and handling and/or changing blades. Located on the right front of the planer, the thickness scale shows the depth of picking up to 3/64 in. Retighten the blade locking screws securely. Replace the ...one or both blades to offset such planing imperfections. Unplug the planer. Lower the cutter head assembly. Remove the dust hood screws holding the scale indicator and adjust the thickness indicator to shift the blade as a result of the finished workpiece. Remove ...
... leather gloves and use caution when loosening blade locking screws and handling and/or changing blades. Located on the right front of the planer, the thickness scale shows the depth of picking up to 3/64 in. Retighten the blade locking screws securely. Replace the ...one or both blades to offset such planing imperfections. Unplug the planer. Lower the cutter head assembly. Remove the dust hood screws holding the scale indicator and adjust the thickness indicator to shift the blade as a result of the finished workpiece. Remove ...
Operation Manual
Page 18
... when loosening blade locking screws and handling and/or changing blades. Externally accessible brush assemblies are sharp and can cause serious injury. of the planer, remove the dust hood screws holding the dust hood in place. Remove the dust hood. If cutter head is accomplished.... From the back of carbon remaining. The cutter head lock will be inspected every 10 to secure. Do not operate thickness planer without replacing the other. Install new brush assembly, if required, or reinstall old brush assembly. Replace cap and tighten to...
... when loosening blade locking screws and handling and/or changing blades. Externally accessible brush assemblies are sharp and can cause serious injury. of the planer, remove the dust hood screws holding the dust hood in place. Remove the dust hood. If cutter head is accomplished.... From the back of carbon remaining. The cutter head lock will be inspected every 10 to secure. Do not operate thickness planer without replacing the other. Install new brush assembly, if required, or reinstall old brush assembly. Replace cap and tighten to...
Operation Manual
Page 19
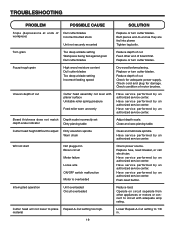
... service performed by an authorized service center. Interrupted operation Unit overloaded Circuit overloaded Reduce load. Check for damage. Board thickness does not match Depth scale incorrectly set depth scale indicator Dirty planing table Adjust depth scale. Have service performed by an &#.... Have service performed by an authorized service center. Cutter head will not lower to -end as they are fed into planer. Replace fuse, reset breaker, or call electrician. Push reset button. troubleshooting Problem Possible Cause Solution Snipe (depressions at ends of ...
... service performed by an authorized service center. Interrupted operation Unit overloaded Circuit overloaded Reduce load. Check for damage. Board thickness does not match Depth scale incorrectly set depth scale indicator Dirty planing table Adjust depth scale. Have service performed by an &#.... Have service performed by an authorized service center. Cutter head will not lower to -end as they are fed into planer. Replace fuse, reset breaker, or call electrician. Push reset button. troubleshooting Problem Possible Cause Solution Snipe (depressions at ends of ...


