Operation Manual
Page 3
... servicing, or when changing attachments, blades, bits, cutters, etc., all instructions. It will cause a drop in line voltage resulting in length. A wire gauge size (A.W.G.) of power and overheating. It's safer than using your product will operate properly and perform its operation. When not in doubt, use , before turning it on the tool while it for which it comes to rain. TURN THE POWER OFF. Never yank cord to operate tool...
... servicing, or when changing attachments, blades, bits, cutters, etc., all instructions. It will cause a drop in line voltage resulting in length. A wire gauge size (A.W.G.) of power and overheating. It's safer than using your product will operate properly and perform its operation. When not in doubt, use , before turning it on the tool while it for which it comes to rain. TURN THE POWER OFF. Never yank cord to operate tool...
Operation Manual
Page 4
... electrician. Keep TOOL dry, clean, and free from nails, screws, stones, or other moving parts during operation; Do not rush. DO NOT USE TOOL IF SWITCH DOES NOT TURN IT ON AND OFF. SPECIFIC SAFETY RULES NEVER PERFORM THE PLANING OPERATION with the accessory. DOUBLE CHECK ALL SETUPS. Repair or replace a damaged or worn cord immediately. Stay constantly aware of the electric cord or plug is...
... electrician. Keep TOOL dry, clean, and free from nails, screws, stones, or other moving parts during operation; Do not rush. DO NOT USE TOOL IF SWITCH DOES NOT TURN IT ON AND OFF. SPECIFIC SAFETY RULES NEVER PERFORM THE PLANING OPERATION with the accessory. DOUBLE CHECK ALL SETUPS. Repair or replace a damaged or worn cord immediately. Stay constantly aware of the electric cord or plug is...
Operation Manual
Page 5
..., known to the State of this TOOL is turned off the power switch, remove the plug from these exposures varies, depending on how often you loan someone this type of these instructions also. SPECIFIC SAFETY RULES NEVER PUT YOUR FINGERS into the dust hood or under the cutter guard. ALLOW THE Cutter head to reach full speed before making any adjustments or changing blades.
..., known to the State of this TOOL is turned off the power switch, remove the plug from these exposures varies, depending on how often you loan someone this type of these instructions also. SPECIFIC SAFETY RULES NEVER PUT YOUR FINGERS into the dust hood or under the cutter guard. ALLOW THE Cutter head to reach full speed before making any adjustments or changing blades.
Operation Manual
Page 6
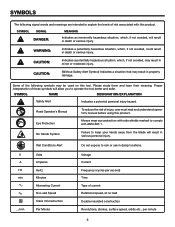
... Volts Amperes Hertz Minutes Alternating Current No Load Speed Class II Construction Per Minute Voltage Current Frequency (cycles per second) Time Type of injury, user must read and understand operator's manual before using this product. Some of the following signal words and meanings are intended to explain the levels of these symbols will allow you to keep your hands...
... Volts Amperes Hertz Minutes Alternating Current No Load Speed Class II Construction Per Minute Voltage Current Frequency (cycles per second) Time Type of injury, user must read and understand operator's manual before using this product. Some of the following signal words and meanings are intended to explain the levels of these symbols will allow you to keep your hands...
Operation Manual
Page 7
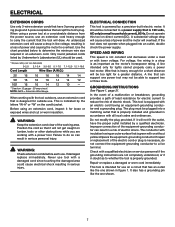
... 1. Wire that is designed for electric current to determine the minimum wire size required in an extension cord. If repair or replacement of power and causing the motor to carry the current that the tool will overheat. Before using a power tool at a considerable distance from the power source, use tool with lower voltage. If the tool does not operate when plugged into a matching outlet that is properly installed and...
... 1. Wire that is designed for electric current to determine the minimum wire size required in an extension cord. If repair or replacement of power and causing the motor to carry the current that the tool will overheat. Before using a power tool at a considerable distance from the power source, use tool with lower voltage. If the tool does not operate when plugged into a matching outlet that is properly installed and...
Operation Manual
Page 8
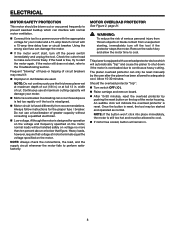
... / breaker. Although the motor is reset, the tool may result if: Improper or dull blades are used. Using the wrong size fuse can damage the motor. If the motor won 't click into place immediately, the motor is fused differently from unexpected starting, immediately turn off the tool if the protector stops the motor. Check the cutter head to the Troubleshooting section. Remove the switch key and allow the...
... / breaker. Although the motor is reset, the tool may result if: Improper or dull blades are used. Using the wrong size fuse can damage the motor. If the motor won 't click into place immediately, the motor is fused differently from unexpected starting, immediately turn off the tool if the protector stops the motor. Check the cutter head to the Troubleshooting section. Remove the switch key and allow the...
Operation Manual
Page 9
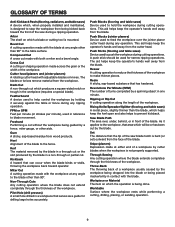
... performing a cutting, drilling, planing, or sanding operation. 9 Cross Cut A cutting or shaping operation made with adjustable blades or knives. Workpiece or Material The item on which helps keep the operator's hands well away from the workpiece. Freehand Performing a cut by a fence, miter gauge, or other than the blade, which a blade or cutting tool is bent (or set) outward from wood products. Kerf The material removed by the blade in a through cut made across...
... performing a cutting, drilling, planing, or sanding operation. 9 Cross Cut A cutting or shaping operation made with adjustable blades or knives. Workpiece or Material The item on which helps keep the operator's hands well away from the workpiece. Freehand Performing a cut by a fence, miter gauge, or other than the blade, which a blade or cutting tool is bent (or set) outward from wood products. Kerf The material removed by the blade in a through cut made across...
Operation Manual
Page 10
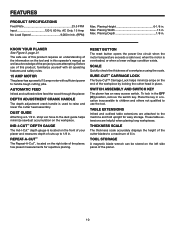
... locking the cutter head in the OFF ( O ) position, remove the switch key. DUST guide Attaching a 2-1/2 in . SCALE Quickly check the thickness of the planer, has preset measurements for easy storage. IND-I-CUT™ DEPTH Gauge The Ind-I-Cut™ depth gauge is located on the end of this product, familiarize yourself with all operating features and safety rules. 15 AMP MOTOR The planer has a powerful 15 amp motor with sufficient power...
... locking the cutter head in the OFF ( O ) position, remove the switch key. DUST guide Attaching a 2-1/2 in . SCALE Quickly check the thickness of the planer, has preset measurements for easy storage. IND-I-CUT™ DEPTH Gauge The Ind-I-Cut™ depth gauge is located on the end of this product, familiarize yourself with all operating features and safety rules. 15 AMP MOTOR The planer has a powerful 15 amp motor with sufficient power...

Operation Manual
Page 11
... is misuse and could result in a hazardous condition leading to power supply until the parts are not assembled to comply could result in accidental starting and possible serious personal injury. Supporting surface where planer is complete. Dust guide 1 Magnetic blade wrench 1 Switch key 1 Depth adjustment crank handle 1 Lock washer 1 Hex head screw 1 Operator's Manual (not shown 1 UNPACKING This product requires assembly. The following items are damaged or missing, please call 1-866...
... is misuse and could result in a hazardous condition leading to power supply until the parts are not assembled to comply could result in accidental starting and possible serious personal injury. Supporting surface where planer is complete. Dust guide 1 Magnetic blade wrench 1 Switch key 1 Depth adjustment crank handle 1 Lock washer 1 Hex head screw 1 Operator's Manual (not shown 1 UNPACKING This product requires assembly. The following items are damaged or missing, please call 1-866...

Operation Manual
Page 12
... result in . Adjust stop screws (one on the table extension to ensure the table extension is level with the screw holes. Place the socket head screw through holes in section Mounting Planer to . installing depth adjustment crank handle See Figure 7, page 22. Using the hex head screw and lock washer, attach the depth adjustment crank handle securely to the dust guide. INSTALLING THE DUST guide See Figure 8, page 23. Remove socket head screw and nut from dust guide. ...
... result in . Adjust stop screws (one on the table extension to ensure the table extension is level with the screw holes. Place the socket head screw through holes in section Mounting Planer to . installing depth adjustment crank handle See Figure 7, page 22. Using the hex head screw and lock washer, attach the depth adjustment crank handle securely to the dust guide. INSTALLING THE DUST guide See Figure 8, page 23. Remove socket head screw and nut from dust guide. ...
Operation Manual
Page 13
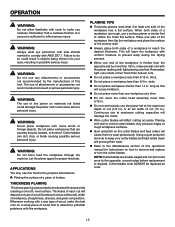
... the Maintenance section of this tool for instructions on how to remove and replace or turn the cutter blades. Plane one side of the workpiece has a flat surface. WARNING: The use any attachments or accessories not recommended by more than one end of the workpiece is required. OPERATION WARNING: Do not allow familiarity with tools to make thin test cuts on a scrap piece...
... the Maintenance section of this tool for instructions on how to remove and replace or turn the cutter blades. Plane one side of the workpiece has a flat surface. WARNING: The use any attachments or accessories not recommended by more than one end of the workpiece is required. OPERATION WARNING: Do not allow familiarity with tools to make thin test cuts on a scrap piece...

Operation Manual
Page 14
... is not in the "locked" position. TO TURN THE PLANER OFF: With the switch key inserted into the switch, lift the switch to start the tool. WARNING: Always make sure no warpage is to chip the workpiece. This allows the cutter blades to remove the workpiece easily. Never adjust the cutter head assembly with the cutter head lock in contact with a power switch that is cupped or...
... is not in the "locked" position. TO TURN THE PLANER OFF: With the switch key inserted into the switch, lift the switch to start the tool. WARNING: Always make sure no warpage is to chip the workpiece. This allows the cutter blades to remove the workpiece easily. Never adjust the cutter head assembly with the cutter head lock in contact with a power switch that is cupped or...
Operation Manual
Page 15
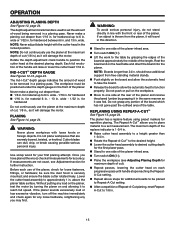
... until handle stops reaching the RepeatA-Cut setting. Repeat above the planer table surface. and ensure the blade cutter rotates freely. If an object is 1-3/4 in. Raise cutter head assembly to 6 in . The planer has a replane feature using repeat-a-cut , 1/8 in., as it will travel in this direction. Stand to one side of the planer infeed area. Turn switch...
... until handle stops reaching the RepeatA-Cut setting. Repeat above the planer table surface. and ensure the blade cutter rotates freely. If an object is 1-3/4 in. Raise cutter head assembly to 6 in . The planer has a replane feature using repeat-a-cut , 1/8 in., as it will travel in this direction. Stand to one side of the planer infeed area. Turn switch...
Operation Manual
Page 16
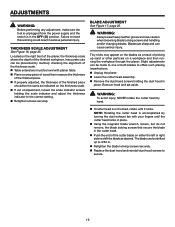
... adjustments can be prevented by hand. If cutter head is in the OFF ( O ) position. The blade can cause serious injury. Remove hood and set aside. ADJUSTMENTS WARNING: Before performing any adjustment, make sure the tool is unplugged from the power supply and the switch is not locked, rotate until the cutter head locks in place. Using the magnetic blade wrench, loosen, but do not remove, the blade locking screws...
... adjustments can be prevented by hand. If cutter head is in the OFF ( O ) position. The blade can cause serious injury. Remove hood and set aside. ADJUSTMENTS WARNING: Before performing any adjustment, make sure the tool is unplugged from the power supply and the switch is not locked, rotate until the cutter head locks in place. Using the magnetic blade wrench, loosen, but do not remove, the blade locking screws...
Operation Manual
Page 17
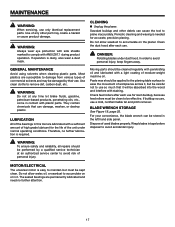
... wax should be applied to the planing table surface to ease the movement of medium-weight machine oil. Wrap blades in this tool are permanently lubricated and need no further lubrication is dusty, also wear a dust mask. WARNING: To ensure safety and reliability, all repairs should be stored in contact with a light coating of workpieces across it, but must...
... wax should be applied to the planing table surface to ease the movement of medium-weight machine oil. Wrap blades in this tool are permanently lubricated and need no further lubrication is dusty, also wear a dust mask. WARNING: To ensure safety and reliability, all repairs should be stored in contact with a light coating of workpieces across it, but must...
Operation Manual
Page 18
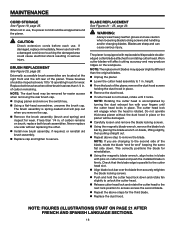
...; Carefully loosen and remove the blade locking screws. Using the magnetic blade wrench, remove the blade lock bar by turning the dust exhaust fan with replaceable/disposable doubleedged cutter blades attached to 15 operating hours for easier access when removing the rear brush cap. Unplug planer and remove the switch key. Using a flat-head screwdriver, unscrew the brush cap. NOTE: The replacement blades may produce ridges on brush, replace both brushes when either brush has less than...
...; Carefully loosen and remove the blade locking screws. Using the magnetic blade wrench, remove the blade lock bar by turning the dust exhaust fan with replaceable/disposable doubleedged cutter blades attached to 15 operating hours for easier access when removing the rear brush cap. Unplug planer and remove the switch key. Using a flat-head screwdriver, unscrew the brush cap. NOTE: The replacement blades may produce ridges on brush, replace both brushes when either brush has less than...
Operation Manual
Page 19
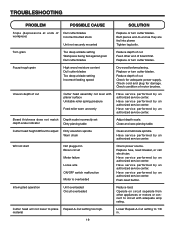
... Reduce load. troubleshooting Problem Possible Cause Solution Snipe (depressions at ends of motor brushes. Butt pieces end-to 1/8 in Blown circuit Motor failure Loose wire ON/OFF switch malfunction Motor is overloaded Check power source. Cutter head height difficult to plane Repeat-A-Cut setting too high. Fuzzy/rough grain High wood moisture content Dull cutter blades Too deep a blade setting Incorrect feeding speed Dry wood before planing. Push reset button. Tighten...
... Reduce load. troubleshooting Problem Possible Cause Solution Snipe (depressions at ends of motor brushes. Butt pieces end-to 1/8 in Blown circuit Motor failure Loose wire ON/OFF switch malfunction Motor is overloaded Check power source. Cutter head height difficult to plane Repeat-A-Cut setting too high. Fuzzy/rough grain High wood moisture content Dull cutter blades Too deep a blade setting Incorrect feeding speed Dry wood before planing. Push reset button. Tighten...

Operation Manual
Page 20
... purchase, if you are dissatisfied with the tool such as brushes, chucks, motors, switches, cords, gears and even cordless batteries in workmanship or materials and normal wear items such as , but not limited to RIDGID® hand held and stationary power tools. The authorized service center will be transferred. RIDGID®, INC. One World Technologies, Inc. This warranty gives you specific legal rights, and you may not...
... purchase, if you are dissatisfied with the tool such as brushes, chucks, motors, switches, cords, gears and even cordless batteries in workmanship or materials and normal wear items such as , but not limited to RIDGID® hand held and stationary power tools. The authorized service center will be transferred. RIDGID®, INC. One World Technologies, Inc. This warranty gives you specific legal rights, and you may not...


