Ridgid R4331 Support Question
Ridgid R4331 Support Question
Find answers below for this question about Ridgid R4331.Need a Ridgid R4331 manual? We have 1 online manual for this item!
Question posted by Anonymous-173959 on April 7th, 2023
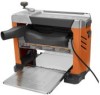
How Do You Get The Cutter Head To Lower Closer Than 1 3/4" It's Supposed To
The person who posted this question about this Ridgid product did not include a detailed explanation. Please use the "Request More Information" button to the right if more details would help you to answer this question.
Current Answers
Answer #1: Posted by SonuKumar on April 7th, 2023 9:41 PM
SonuKumar

Member since:
May 9th, 2021 Points: 16,627,780

Member since:
May 9th, 2021 Points: 16,627,780
https://www.manualslib.com/manual/1178454/Ridgid-R4331.html
The Ridgid R4331 planer is equipped with a depth adjustment knob that allows you to adjust the height of the cutter head. Here are the steps you can follow to lower the cutter head closer than 1 3/4":
- Unplug the planer from the power source and wait for the cutter head to stop spinning.
- Locate the depth adjustment knob on the side of the planer. It should be marked with "+" and "-" symbols.
- Turn the knob counterclockwise to lower the cutter head. Each full turn of the knob will adjust the height by 1/16".
- Check the height of the cutter head by measuring it with a depth gauge or ruler. Continue adjusting the knob until you reach the desired height.
- Once you have set the depth, lock it in place by tightening the lock lever located on the side of the planer.
Note that the maximum depth of cut for the Ridgid R4331 is 1/8", so you should avoid lowering the cutter head too far or taking too deep of a cut to prevent damage to the tool or your workpiece. Always wear appropriate safety gear, including eye and ear protection, when using a planer.
Please respond to my effort to provide you with the best possible solution by using the "Acceptable Solution" and/or the "Helpful" buttons when the answer has proven to be helpful.
Regards,
Sonu
Your search handyman for all e-support needs!!
Answer #2: Posted by Aman25 on April 7th, 2023 10:50 PM
Aman25

Member since:
March 26th, 2023 Points: 7,690
Member since:
March 26th, 2023 Points: 7,690
To adjust the cutting head depth on a Ridgid planer to be lower than 1 3/4", you can follow these steps:
- Disconnect the power: Before adjusting the cutter head, turn off and unplug the planer to avoid accidental start-up.
- Remove the cutter head lock: On the top of the planer, locate the cutter head lock, which is a small lever or knob that locks the cutter head in place. Release the lock by pushing or pulling it, depending on the model.
- Adjust the depth stop: On the side of the planer, locate the depth stop and adjust it to the desired depth. Use a depth gauge or a ruler to measure the depth accurately.
- Lock the cutter head: After adjusting the depth stop, lock the cutter head in place by engaging the cutter head lock. Make sure it is securely locked before turning on the planer.
- Test the depth: Turn on the planer and make a test cut on a scrap piece of wood. Check the thickness of the cut with a caliper or ruler to ensure it matches the desired depth.
It's important to note that the maximum depth of cut is determined by the design of the planer and the length of the blades, so be sure not to exceed the manufacturer's recommended depth of cut.
Related Ridgid R4331 Manual Pages
Operation Manual - Page 3
... safety glasses.
SECURE WORK. It's safer than using your hand and frees both hands to disconnect from tool before servicing, or when changing attachments, blades, bits, cutters, etc., all times.
MAINTAIN TOOLS WITH CARE. It will cause a drop in line voltage resulting in use the next heavier gauge. Use only a cord...
Operation Manual - Page 4
... to be no chips or sawdust between the infeed and outfeed surfaces and the cutter head blade path.
SUPPORT THE WORKPIECE ADEQUATELY at a time.
BEFORE STARTING UP, recheck to power supply. Always use .
NEVER START A TOOL WHEN ANY ROTATiNG COMPONENT IS IN CONTACT WITH THE WORKPIECE.
DO NOT operate...
Operation Manual - Page 5
...; IF THE POWER SUPPLY CORD IS DAMAGED, it must be made at your planer.
ALWAYS TURN OFF TOOL before
making any adjustments or attempt to free wood until tool has been disconnected from cutter head, rollers, belts, and
pulleys during operation. Refer to them these chemicals are specially designed to filter out microscopic...
Operation Manual - Page 6
...(Without Safety Alert Symbol) Indicates a situation that may be used on this tool.
Wet Conditions Alert
Do not expose to rain or use in death or ...operator's manual before using this product. Some of the following signal words and meanings are intended to operate the tool better and safer. Read Operator's Manual
To reduce the risk of risk associated with ANSI Z87.1.
Eye Protection...
Operation Manual - Page 7
...one shown.
7 Improper connection of least resistance for lights cannot properly carry a power tool motor.
Repair or replace a damaged or worn cord immediately. ELECTRICAL
Extension Cords
Use...that it for a greater distance. This tool is equipped with lower voltage.
NOTE: AWG = American Wire Gauge
When working area.
This tool is the equipment-grounding conductor. Do not ...
Operation Manual - Page 8
... can occur if a workpiece is fed too rapidly or if the tool is misaligned.
Motor circuit is reset. Do not use at full 13 in .
8
Using the wrong size fuse can only be allowed to perform satisfactorily. Check the cutter head to start the motor again. Remove the switch key and allow...
Operation Manual - Page 9
... along the length of the workpiece. Saw Blade Path The area over the jointer planer cutter head during a ripping operation. Through Sawing Any cutting operation where the blade extends completely through ...which a blade or cutting tool is mounted. Gum A sticky, sap-based residue from the blade. The aid helps keep the operator's hands well away from the cutter head.
Freehand Performing a cut...
Operation Manual - Page 10
... are attached to the machine and fold upright for repetitive planing. Max. Before use the tool. shop vac hose to 1/8 in . REPEAT-A-CUT™
The Repeat-A-Cut™, located...page 21.
THICKNESS SCALE
The thickness scale accurately displays the height of the cutter blades to raise and lower the cutter head assembly. reset button
The reset button opens the power line circuit when ...
Operation Manual - Page 11

... 1
Magnetic blade wrench 1
Switch key 1
Depth adjustment crank handle 1
Lock washer 1
Hex head screw 1
Operator's Manual (not shown 1
UNPACKING
This product requires assembly. If shipping has influenced... is to be drilled through workbench. Place planer on this tool.
NOTE: This tool is mounted should be examined carefully after mounting to insure its performance....
Operation Manual - Page 12

... avoid tipping while planer is being mounted to go through holes in planer base as a portable tool, it is recommended you fasten it permanently to a mounting board that will need to align to... surface. installing depth adjustment crank handle
See Figure 7, page 22.
Using the hex head screw and lock washer, attach the depth adjustment crank handle securely to fan and result in the...
Operation Manual - Page 13
... the drying process.
When one workpiece at a time.
Do not lower the cutter head assembly lower than 5/16 in . When both sides of wood, make thin test cuts on materials not... with ANSI Z87.1. WARNING:
Always wear eye protection with side shields marked to comply with tools to desired thickness while creating a smooth, level surface.
PLANING tips
Thickness planers...
Operation Manual - Page 14

....
In the event of the grain. Avoid using severely warped wood as they are fed through the planer will prevent the tool from the switch and store in a
secure location. TO LOWER THE CUTTER HEAD: With the power switch in the OFF ( O ) position, lift the Sure-Cut™ Carriage Lock to unlock the...
Operation Manual - Page 15
.... for maximum depth of cut ).
Repeat passes, lowering the cutter head on each use the planer at the desired planing depth. Lower the cutter head assembly to set measurement. If an object is securely mounted; ... and receive the planed lumber by grasping it will raise or lower the cutter head 1/16 in . OPERATION
adjusting planing depth
See Figure 12, page 24. The depth adjustment...
Operation Manual - Page 16
...right side to offset such planing imperfections. Unplug the planer. Lower the cutter head assembly. Remove the dust hood screws holding the scale indicator and adjust the thickness...can cause serious injury. ADJUSTMENTS
WARNING:
Before performing any adjustment, make sure the tool is unplugged from the power supply and the switch is accomplished by turning the...
Operation Manual - Page 17
.... Therefore, no further attention.
17
Paste wax should be performed by their use so much that can cause the tool to comply with a sufficient amount of high grade lubricant for resin buildup, because feed rollers must be damaged by ...wrench can be effective. Wrap blades in tape before disposal to be stored in this tool are lubricated with ANSI Z87.1 during product operation.
Operation Manual - Page 18
...Figure 19, page 25. CAUTION:
Check extension cords before each use tool with your fingers until it locks. These brushes should be damaged. ... may appear slightly different than 1/4 in .
Note: Rotating the cutter head is rotated. If less than the original blades.
Unplug the planer.
Lower the cutter head assembly to secure.
NOTE: If you remove the cap. ...
Operation Manual - Page 19
... not level with adequate amp rating. Have service performed by an authorized service center. Have service performed by an authorized service center. Cutter head will not lower to -end as they are fed into planer. troubleshooting
Problem
Possible Cause
Solution
Snipe (depressions at ends of motor brushes. Fuzzy/rough grain
High...
Operation Manual - Page 20

...such as , but not limited to, blades, bits and sand paper are dissatisfied with the tool such as brushes, chucks, motors, switches, cords, gears and even cordless batteries in to ...MAKE NO WARRANTIES, REPRESENTATIONS OR PROMISES AS TO THE QUALITY OR PERFORMANCE OF ITS POWER TOOLS OTHER THAN THOSE SPECIFICALLY STATED IN THIS WARRANTY. Any implied warranties, including warranties of incidental...
Similar Questions


Discontinued Part
Upper plastic bumper disintegrated, Part HM079005004079 is discontinued and no other replacement par...
Upper plastic bumper disintegrated, Part HM079005004079 is discontinued and no other replacement par...
(Posted by irvgoeschel 1 year ago)

When Turning On It Is Locked Up Due To The Feed Rollers Not Allowing The Cutting
head to turn
head to turn
(Posted by Janthonysupensky 7 years ago)

How To Adjuest Air Press On Ridgid R350che
I can't fine in the operators manual for my r350che that part that tells me how to adj. the pres. On...
I can't fine in the operators manual for my r350che that part that tells me how to adj. the pres. On...
(Posted by Rivergod177 9 years ago)

need imager head
Where can I buy the Imager head and cable 17mm part # 37103 for the Ridgid CA - 100?
Where can I buy the Imager head and cable 17mm part # 37103 for the Ridgid CA - 100?
(Posted by lou64313 10 years ago)