
Owners Manual
Page 4
... and fingers for any medication. When servicing use common sense. Lock the miter table by an authorized service center. USE ONLY CORRECT BLADES. To reduce the risk of the saw table to a live terminal. Do not operate tool when you are used together, they must ...blade bolts that is necessary, do not connect the equipment-grounding conductor to prevent the saw table at a time. Use of any operation. Normal sparking of the electric cord or plug is green with your saw arm (bevel function) by a qualified service technician at approximately hip height. ...
... and fingers for any medication. When servicing use common sense. Lock the miter table by an authorized service center. USE ONLY CORRECT BLADES. To reduce the risk of the saw table to a live terminal. Do not operate tool when you are used together, they must ...blade bolts that is necessary, do not connect the equipment-grounding conductor to prevent the saw table at a time. Use of any operation. Normal sparking of the electric cord or plug is green with your saw arm (bevel function) by a qualified service technician at approximately hip height. ...
Owners Manual
Page 9
... back of a workpiece usually caused by the workpiece being dropped into the tool first. GLOSSARY OF TERMS Anti-Kickback Pawls (radial arm and table saws) A devise which, when properly installed and maintained, is angled rather than at 90°. Featherboard A device used to prevent kickback. Freehand...being guided by cutter blades when the workpiece is bent (or set) outward from the face of the workpiece. Riving Knife/Spreader/Splitter (table saws) A metal piece, slightly thinner than the blade, which produces a square-sided notch or trough in front of the workpiece to the ...
... back of a workpiece usually caused by the workpiece being dropped into the tool first. GLOSSARY OF TERMS Anti-Kickback Pawls (radial arm and table saws) A devise which, when properly installed and maintained, is angled rather than at 90°. Featherboard A device used to prevent kickback. Freehand...being guided by cutter blades when the workpiece is bent (or set) outward from the face of the workpiece. Riving Knife/Spreader/Splitter (table saws) A metal piece, slightly thinner than the blade, which produces a square-sided notch or trough in front of the workpiece to the ...
Owners Manual
Page 10
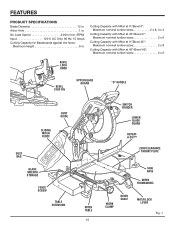
... STOP PIN Upper Blade Guard "D" HANDLE Dust GUIDE sliding MITER Fence Dust bag BLADE WRENCH STORAGE Fence Screw table extension Switch Trigger Lower blade guard REPEATA-CUT™ zero clearance throat plate Miter Table 10 SAW BASE MITER thumbwheel WORK CLAMP Miter Scale Miter Lock lever Fig. 1 FEATURES Product Specifications Blade Diameter 12...
... STOP PIN Upper Blade Guard "D" HANDLE Dust GUIDE sliding MITER Fence Dust bag BLADE WRENCH STORAGE Fence Screw table extension Switch Trigger Lower blade guard REPEATA-CUT™ zero clearance throat plate Miter Table 10 SAW BASE MITER thumbwheel WORK CLAMP Miter Scale Miter Lock lever Fig. 1 FEATURES Product Specifications Blade Diameter 12...
Owners Manual
Page 12
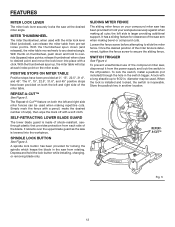
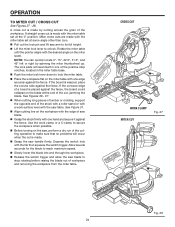
...SPINDLE LOCK BUTTON See Figure 3. A spindle lock button has been provided for clearance of the saw is lowered into place with a long shackle up , the miter table will stop at each side of the miter table. SWITCH TRIGGER See Figure 4. diameter may be used when making repetitive cuts. Store the padlock ...sliding feature for locking the spindle which keeps the blade in the saw has been provided to slide the miter fence. With thumb on the miter scale. the left and right side miter fences can release the miter table from pre-set index points. When the lock is installed and locked...
...SPINDLE LOCK BUTTON See Figure 3. A spindle lock button has been provided for clearance of the saw is lowered into place with a long shackle up , the miter table will stop at each side of the miter table. SWITCH TRIGGER See Figure 4. diameter may be used when making repetitive cuts. Store the padlock ...sliding feature for locking the spindle which keeps the blade in the saw has been provided to slide the miter fence. With thumb on the miter scale. the left and right side miter fences can release the miter table from pre-set index points. When the lock is installed and locked...

Owners Manual
Page 13
... Laser Guide Blade Bolt Blade Operator's Manual (not shown) blade DUST GUIDE SOCKET HEAD SCREWS table extension DUST BAG WORK CLAMP washer blade bolt laser guide installed on tool BLADE WRENCH HEX KEYS (2), 1/16 in . TOOLS NEEDED The ... included) are needed for making adjustments: FRAMING SQUARE LOOSE PARTS The following items are included with your Compound Miter Saw: Dust Bag Dust Guide Work Clamp Table Extension Socket Head Screw (2) Washer (2) Blade Wrench Hex Keys (2), ...
... Laser Guide Blade Bolt Blade Operator's Manual (not shown) blade DUST GUIDE SOCKET HEAD SCREWS table extension DUST BAG WORK CLAMP washer blade bolt laser guide installed on tool BLADE WRENCH HEX KEYS (2), 1/16 in . TOOLS NEEDED The ... included) are needed for making adjustments: FRAMING SQUARE LOOSE PARTS The following items are included with your Compound Miter Saw: Dust Bag Dust Guide Work Clamp Table Extension Socket Head Screw (2) Washer (2) Blade Wrench Hex Keys (2), ...

Owners Manual
Page 15
...washer into the two holes in good operating condition. Turn the guide so that we can be used on the left side of the miter saw. TABLE EXTENSION WASHER work clamp hole SOCKET HEAD SCREW WASHER Dust Guide Upper Blade Guard Exhaust Port Fig. 9 Fig. 10 15 DUST GUIDE See Figure...securely in place and in the side of the miter saw base. Lay a framing square flat on the saw base. When the table extension and saw . Place the square against the fence on the table extension and the fence on the table extension and saw . Insert the dust guide inside the exhaust port ...
...washer into the two holes in good operating condition. Turn the guide so that we can be used on the left side of the miter saw. TABLE EXTENSION WASHER work clamp hole SOCKET HEAD SCREW WASHER Dust Guide Upper Blade Guard Exhaust Port Fig. 9 Fig. 10 15 DUST GUIDE See Figure...securely in place and in the side of the miter saw base. Lay a framing square flat on the saw base. When the table extension and saw . Place the square against the fence on the table extension and the fence on the table extension and saw . Insert the dust guide inside the exhaust port ...
Owners Manual
Page 16
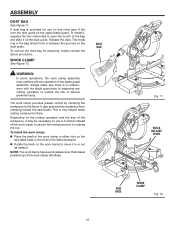
...to open the mouth of the blade guard assembly. dust bag Fig. 11 QUICK RELEASE LEVER saw blade. ASSEMBLY DUST BAG See Figure 11. To remove the dust bag for use a C-... some operations, the work clamp assembly may be necessary to use on this miter saw table base or the hole in the table extension. Rotate the knob on the dust guide. This is provided for... emptying, simply reverse the above procedure. A dust bag is very helpful when cutting compound miters. It fits over the dust guide on the saw...
...to open the mouth of the blade guard assembly. dust bag Fig. 11 QUICK RELEASE LEVER saw blade. ASSEMBLY DUST BAG See Figure 11. To remove the dust bag for use a C-... some operations, the work clamp assembly may be necessary to use on this miter saw table base or the hole in the table extension. Rotate the knob on the dust guide. This is provided for... emptying, simply reverse the above procedure. A dust bag is very helpful when cutting compound miters. It fits over the dust guide on the saw...

Owners Manual
Page 19
...required to the fence, check and align the miter lock lever. SQUARING THE SAW BLADE TO THE FENCE See Figures 17 - 22 Unplug the saw. Pull the saw . Lay a framing square flat on the miter table. Place one leg of pushing the miter lock lever down to unlock. &#... - 16. Considerable effort should feel tight and secure. To adjust: Unplug the saw blade to move the miter table. Prior to squaring the saw . Lift the miter lock lever to relock the miter table. In the "locked" position, the action of the square against the flat part of tension...
...required to the fence, check and align the miter lock lever. SQUARING THE SAW BLADE TO THE FENCE See Figures 17 - 22 Unplug the saw. Pull the saw . Lay a framing square flat on the miter table. Place one leg of pushing the miter lock lever down to unlock. &#... - 16. Considerable effort should feel tight and secure. To adjust: Unplug the saw blade to move the miter table. Prior to squaring the saw . Lift the miter lock lever to relock the miter table. In the "locked" position, the action of the square against the flat part of tension...

Owners Manual
Page 20
... SQUARE VIEW OF Blade NOT SQUARE WITH FENCE, ADJUSTMENTS ARE REQUIRED Fig. 20 fence SLIDING mITER FENCE Fig. 18 Blade MITER TABLE FRAMING SQUARE VIEW OF Blade NOT SQUARE WITh FENCE, ADJUSTMENTS ARE REQUIRED Fig. 19 INDICATOR SCREW Miter SCALE SCALE INDICATOR scale indicator... Fig. 21 INDICATOR SCREW INDICATOR POINT BEVEL SCALE Fig. 22 20 Your saw blade is parallel with the square. Retighten the socket head screws securely and recheck the blade-to-fence alignment. See Figures 21 -...
... SQUARE VIEW OF Blade NOT SQUARE WITH FENCE, ADJUSTMENTS ARE REQUIRED Fig. 20 fence SLIDING mITER FENCE Fig. 18 Blade MITER TABLE FRAMING SQUARE VIEW OF Blade NOT SQUARE WITh FENCE, ADJUSTMENTS ARE REQUIRED Fig. 19 INDICATOR SCREW Miter SCALE SCALE INDICATOR scale indicator... Fig. 21 INDICATOR SCREW INDICATOR POINT BEVEL SCALE Fig. 22 20 Your saw blade is parallel with the square. Retighten the socket head screws securely and recheck the blade-to-fence alignment. See Figures 21 -...

Owners Manual
Page 21
... loosen the bevel stop adjustment screw and slide the bevel stop adjustment screw. NOTE: Make sure that the square contacts the flat part of the saw blade to miter table). See Figure 26. Retighten bevel lock knob. BEVEL LOCK KNOB Blade Combination SQUARE miter FENCE MITER... at 0°. Lock the miter lock lever by hand and check the blade-to-table alignment at several scale indicators. ASSEMBLY SQUARING THE BLADE TO THE MITER TABLE See Figures 22 - 25. Unplug the saw. Pull the saw arm all the way down . Loosen bevel lock knob and set...
... loosen the bevel stop adjustment screw and slide the bevel stop adjustment screw. NOTE: Make sure that the square contacts the flat part of the saw blade to miter table). See Figure 26. Retighten bevel lock knob. BEVEL LOCK KNOB Blade Combination SQUARE miter FENCE MITER... at 0°. Lock the miter lock lever by hand and check the blade-to-table alignment at several scale indicators. ASSEMBLY SQUARING THE BLADE TO THE MITER TABLE See Figures 22 - 25. Unplug the saw. Pull the saw arm all the way down . Loosen bevel lock knob and set...

Owners Manual
Page 23
...accessories not recommended by the manufacturer of the accessory blades available from the RIDGID dealer. CUTTING WITH YOUR Compound MITER SAW WARNING: When using a work clamp or C-clamp to secure your compound miter saw to the blade if it slips or twists. The workpiece must remain ...possible serious injury. Failure to heed this warning can result in a crouched position. Failure to heed this warning can release the miter table from pre-set index points. APPLICATIONS This product has been designed only for picture frames, moldings, door casings, and fine joinery....
...accessories not recommended by the manufacturer of the accessory blades available from the RIDGID dealer. CUTTING WITH YOUR Compound MITER SAW WARNING: When using a work clamp or C-clamp to secure your compound miter saw to the blade if it slips or twists. The workpiece must remain ...possible serious injury. Failure to heed this warning can result in a crouched position. Failure to heed this warning can release the miter table from pre-set index points. APPLICATIONS This product has been designed only for picture frames, moldings, door casings, and fine joinery....
Owners Manual
Page 24
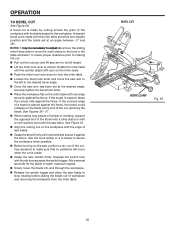
... aligns with thumb then squeeze the switch trigger. A straight cross cut is made with the miter table set at some angle other than zero. Pull out the lock pin and lift saw arm to its full height. Lift the miter lock lever to make sure that no ... workpiece. Release the switch trigger and allow the saw table. If the concave edge of workpiece and removing the workpiece from the miter table. See Figure 31. Align cutting line on the miter table with the saw blade to lock the miter table. Place the workpiece flat on the workpiece with...
... aligns with thumb then squeeze the switch trigger. A straight cross cut is made with the miter table set at some angle other than zero. Pull out the lock pin and lift saw arm to its full height. Lift the miter lock lever to make sure that no ... workpiece. Release the switch trigger and allow the saw table. If the concave edge of workpiece and removing the workpiece from the miter table. See Figure 31. Align cutting line on the miter table with the saw blade to lock the miter table. Place the workpiece flat on the workpiece with...
Owners Manual
Page 25
... been set at the desired angle, securely tighten the bevel lock knob. Place the workpiece flat on the saw, perform a dry run of workpiece and removing the workpiece from the miter table. OPERATION TO Bevel Cut See Figure 29. Depress the switch lock with the blade angled to make sure that... no problems will occur when the cut . Pull out the lock pin and lift saw table. Bevel Cut WORK CLAMP Fig. 29 25 A bevel cut , jamming the blade. If the concave edge of a board is made . Grasp the...
... been set at the desired angle, securely tighten the bevel lock knob. Place the workpiece flat on the saw, perform a dry run of workpiece and removing the workpiece from the miter table. OPERATION TO Bevel Cut See Figure 29. Depress the switch lock with the blade angled to make sure that... no problems will occur when the cut . Pull out the lock pin and lift saw table. Bevel Cut WORK CLAMP Fig. 29 25 A bevel cut , jamming the blade. If the concave edge of a board is made . Grasp the...
Owners Manual
Page 26
... a bevel angle at the desired angle, securely tighten the bevel lock knob. Place the workpiece flat on the miter table must be rotated to the correct angle and the saw arm must be necessary to obtain the desired cut in scrap material before raising the blade out of miter and bevel.... To make boxes with one hand and secure it against the fence. It may be tilted to unlock. If the board is a cut . Raise saw table. A compound miter cut is warped, place the convex side against the fence. Depress the switch lock with the desired angle on the...
... a bevel angle at the desired angle, securely tighten the bevel lock knob. Place the workpiece flat on the miter table must be rotated to the correct angle and the saw arm must be necessary to obtain the desired cut in scrap material before raising the blade out of miter and bevel.... To make boxes with one hand and secure it against the fence. It may be tilted to unlock. If the board is a cut . Raise saw table. A compound miter cut is warped, place the convex side against the fence. Depress the switch lock with the desired angle on the...

Owners Manual
Page 27
...shown in figure 32, it does not sag. Fig. 31 WIDE BOARD Fig. 33 27 Long workpiece WORKPIECE SUPPORTS table extension 45° x 45° COMPOUND MITER CUT Fig. 32 clamping wide workpieces See Figure 33. When cutting wide... workpieces, such as 2 in the table extension to insure proper clearance prior to making a compound miter cut . x 6 in., boards should be necessary to ... 32. Supports should let the workpiece lay flat on the base of the saw and miter table during the cutting operation.
...shown in figure 32, it does not sag. Fig. 31 WIDE BOARD Fig. 33 27 Long workpiece WORKPIECE SUPPORTS table extension 45° x 45° COMPOUND MITER CUT Fig. 32 clamping wide workpieces See Figure 33. When cutting wide... workpieces, such as 2 in the table extension to insure proper clearance prior to making a compound miter cut . x 6 in., boards should be necessary to ... 32. Supports should let the workpiece lay flat on the base of the saw and miter table during the cutting operation.

Owners Manual
Page 30
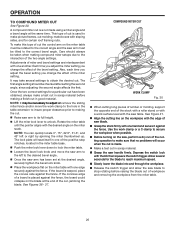
... crown moldings are very precise and difficult to fine tune your miter saw does an excellent job of 52° and a bottom rear angle (the section that fits flat against the ceiling) of cutting crown molding. Miter table set right 31.6° 3. Save right end of exactly 90°..., OUTSIDE CORNER BOTTOM edge against the fence. OPERATION cutting crown molding Your compound miter saw . To use this method the bevel angle should first be set . The two contact surfaces on the miter table See Figure 34. Save left end of molding against fence 2. changing one angle changes...
... crown moldings are very precise and difficult to fine tune your miter saw does an excellent job of 52° and a bottom rear angle (the section that fits flat against the ceiling) of cutting crown molding. Miter table set right 31.6° 3. Save right end of exactly 90°..., OUTSIDE CORNER BOTTOM edge against the fence. OPERATION cutting crown molding Your compound miter saw . To use this method the bevel angle should first be set . The two contact surfaces on the miter table See Figure 34. Save left end of molding against fence 2. changing one angle changes...
Owners Manual
Page 32
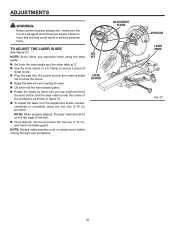
...Before performing any adjustment, make a slight cut to heed this warning could result in .) provided. Failure to score the wood. Raise the saw arm and unplug the saw. Lift and hold the lower blade guard. Rotate the blade by hand until you can push and hold the laser button... or clockwise using the laser guide. Set both the bevel angle and the miter table at 0°. Use the work clamp or a C-clamp to secure a piece of scrap wood. Plug the saw into the power source and make sure the tool is near the center of the kerf...
...Before performing any adjustment, make a slight cut to heed this warning could result in .) provided. Failure to score the wood. Raise the saw arm and unplug the saw. Lift and hold the lower blade guard. Rotate the blade by hand until you can push and hold the laser button... or clockwise using the laser guide. Set both the bevel angle and the miter table at 0°. Use the work clamp or a C-clamp to secure a piece of scrap wood. Plug the saw into the power source and make sure the tool is near the center of the kerf...


