
Owners Manual
Page 1
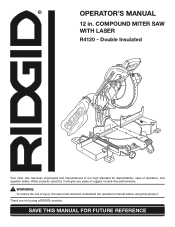
Thank you years of rugged, trouble-free performance. SAVE THIS MANUAL FOR FUTURE REFERENCE Double Insulated Your miter saw has been engineered and manufactured to our high standard for buying a RIDGID® product. WARNING: To reduce the risk of operation, and operator safety. OPERATOR'S MANUAL 12 in. COMPOUND MITER SAW with Laser R4120 - When properly cared for, it will give you for dependability, ease of injury, the user must read and understand the operator's manual before using this product.
Thank you years of rugged, trouble-free performance. SAVE THIS MANUAL FOR FUTURE REFERENCE Double Insulated Your miter saw has been engineered and manufactured to our high standard for buying a RIDGID® product. WARNING: To reduce the risk of operation, and operator safety. OPERATOR'S MANUAL 12 in. COMPOUND MITER SAW with Laser R4120 - When properly cared for, it will give you for dependability, ease of injury, the user must read and understand the operator's manual before using this product.
Owners Manual
Page 5
... and other masonry products, and • arsenic and chromium from the power supply and securely retighten the blade bolt. If any work using the laser guide. This saw can tip over if the saw head is released suddenly and the saw blade to loosen and could cause your saw...
... and other masonry products, and • arsenic and chromium from the power supply and securely retighten the blade bolt. If any work using the laser guide. This saw can tip over if the saw head is released suddenly and the saw blade to loosen and could cause your saw...
Owners Manual
Page 11
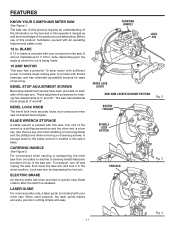
...arm Locked in . wide, depending upon the angle at 3° and 48°. The saw at 0° and 45°. LASER GUIDE For more accurate cuts, a laser guide is released. FEATURES KNOW YOUR COMPOUND MITER SAW See Figure 1. The safe use of this operator's manual as well as a knowledge.... 4 11 To transport, turn off and unplug the saw, then lower the saw arm by depressing the lock pin. When used properly, the laser guide makes accurate, precision cutting simple and easy. A storage area for making fine adjustments at desired bevel angles. It will cut is packed with sufficient...
...arm Locked in . wide, depending upon the angle at 3° and 48°. The saw at 0° and 45°. LASER GUIDE For more accurate cuts, a laser guide is released. FEATURES KNOW YOUR COMPOUND MITER SAW See Figure 1. The safe use of this operator's manual as well as a knowledge.... 4 11 To transport, turn off and unplug the saw, then lower the saw arm by depressing the lock pin. When used properly, the laser guide makes accurate, precision cutting simple and easy. A storage area for making fine adjustments at desired bevel angles. It will cut is packed with sufficient...

Owners Manual
Page 13
... Table Extension Socket Head Screw (2) Washer (2) Blade Wrench Hex Keys (2), 1/16 in., 5/32 in ., 5/32 IN. COMBINATION SQUARE Fig. 6 Laser Guide Blade Bolt Blade Operator's Manual (not shown) blade DUST GUIDE SOCKET HEAD SCREWS table extension DUST BAG WORK CLAMP washer blade...
... Table Extension Socket Head Screw (2) Washer (2) Blade Wrench Hex Keys (2), 1/16 in., 5/32 in ., 5/32 IN. COMBINATION SQUARE Fig. 6 Laser Guide Blade Bolt Blade Operator's Manual (not shown) blade DUST GUIDE SOCKET HEAD SCREWS table extension DUST BAG WORK CLAMP washer blade...
Owners Manual
Page 17
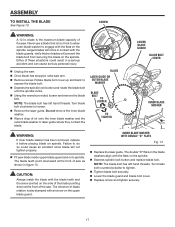
Larger blades will come in figure 13. Either of oil onto the inner blade washer and the outer blade washer or laser guide where they contact the blade. NOTE: The blade bolt has left hand threads. The direction of the saw. NOTE: The blade bolt has left ... on the side of the blade pointing down at the front of the saw as shown in contact with an arrow on the spindle. Blade LASER GUIDE or outer blade washer blade bolt To loosen To TIGHTEN Inner Blade Washer WARNING: If inner blade washer has been removed, replace it before...
Larger blades will come in figure 13. Either of oil onto the inner blade washer and the outer blade washer or laser guide where they contact the blade. NOTE: The blade bolt has left hand threads. The direction of the saw. NOTE: The blade bolt has left ... on the side of the blade pointing down at the front of the saw as shown in contact with an arrow on the spindle. Blade LASER GUIDE or outer blade washer blade bolt To loosen To TIGHTEN Inner Blade Washer WARNING: If inner blade washer has been removed, replace it before...

Owners Manual
Page 18
...clearance throat plate. Never engage spindle lock button when blade is not engaged before raising the saw blade gets closer to remove the mark. Danger: Laser radiation. The blade will generate a colored line on the work surface in alignment, do not move the workpiece while making a cut , or ...leave your compound miter saw into power source. To Remove Your Mark: Position the laser line near the right edge of your saw on and allow for more accurate cutting of material. Once both lines are in order to remove...
...clearance throat plate. Never engage spindle lock button when blade is not engaged before raising the saw blade gets closer to remove the mark. Danger: Laser radiation. The blade will generate a colored line on the work surface in alignment, do not move the workpiece while making a cut , or ...leave your compound miter saw into power source. To Remove Your Mark: Position the laser line near the right edge of your saw on and allow for more accurate cutting of material. Once both lines are in order to remove...
Owners Manual
Page 32
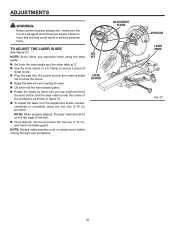
... hold the lower blade guard. Rotate the blade by hand until you can push and hold the laser button and the laser mark is unplugged from the power supply. TO ADJUST THE LASER GUIDE See Figure 37. NOTE: Always make a slight cut to heed this warning could result in serious personal... adjustment, make sure the tool is near the center of the workpiece as shown in figure 37. To adjust the laser, turn the adjustment screw counterclockwise or clockwise using the laser guide. Set both the bevel angle and the miter table at 0°. Use the work clamp or a C-...
... hold the lower blade guard. Rotate the blade by hand until you can push and hold the laser button and the laser mark is unplugged from the power supply. TO ADJUST THE LASER GUIDE See Figure 37. NOTE: Always make a slight cut to heed this warning could result in serious personal... adjustment, make sure the tool is near the center of the workpiece as shown in figure 37. To adjust the laser, turn the adjustment screw counterclockwise or clockwise using the laser guide. Set both the bevel angle and the miter table at 0°. Use the work clamp or a C-...
Owners Manual
Page 34
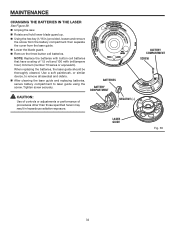
... the hex key (1/16 in hazardous radiation exposure. When replacing the batteries, the laser guide should be thoroughly cleaned. Tighten screw securely. BATTERIES Battery compartment NEGATIVE (-) mn Battery compartment SCREW LASER GUIDE Fig. 39 34 Note: Replace the batteries with button cell batteries that have...those specified herein may result in .) provided, loosen and remove the screw from the battery compartment then separate the cover from the laser guide. Lower the blade guard. Remove the three button cell batteries. Caution: Use of controls or adjustments or...
... the hex key (1/16 in hazardous radiation exposure. When replacing the batteries, the laser guide should be thoroughly cleaned. Tighten screw securely. BATTERIES Battery compartment NEGATIVE (-) mn Battery compartment SCREW LASER GUIDE Fig. 39 34 Note: Replace the batteries with button cell batteries that have...those specified herein may result in .) provided, loosen and remove the screw from the battery compartment then separate the cover from the laser guide. Lower the blade guard. Remove the three button cell batteries. Caution: Use of controls or adjustments or...

Owners Manual
Page 36
Be sure to the motor housing. When ordering repair parts, always give the following information: Model No. COMPOUND MITER SAW with Laser R4120 - For the location of this tool is found on a plate attached to provide all relevant information when you , please call or visit. Please record ... the space provided below. The model number of the authorized service center nearest you call 1-866-539-1710 or visit us online at www.ridgid.com. R4120 Serial No. 987000-319 1-15-09 (REV:04) 36 Double Insulated Customer Service Information For parts or service, contact your nearest...
Be sure to the motor housing. When ordering repair parts, always give the following information: Model No. COMPOUND MITER SAW with Laser R4120 - For the location of this tool is found on a plate attached to provide all relevant information when you , please call or visit. Please record ... the space provided below. The model number of the authorized service center nearest you call 1-866-539-1710 or visit us online at www.ridgid.com. R4120 Serial No. 987000-319 1-15-09 (REV:04) 36 Double Insulated Customer Service Information For parts or service, contact your nearest...

