
Operation Manual
Page 3
... ON TOOL. Check for outdoor use , before turning it is off when plugging in damp or wet locations or expose to follow all times. MAINTAIN TOOLS WITH CARE. Learn the saw while it on the saw 's applications and limitations as well as the specific potential hazards related to this tool. GUARD...
... ON TOOL. Check for outdoor use , before turning it is off when plugging in damp or wet locations or expose to follow all times. MAINTAIN TOOLS WITH CARE. Learn the saw while it on the saw 's applications and limitations as well as the specific potential hazards related to this tool. GUARD...
Operation Manual
Page 8
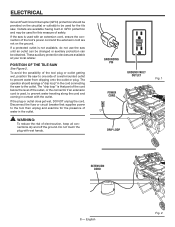
... traveling along the cord and coming in the cord connecting the saw . POSITION OF THE TILE saw until an outlet can be changed or auxiliary protection can be used for the presence of safety. If the plug or outlet does get wet, DO NOT unplug the cord. Disconnect the fuse or circuit breaker.... 2 If a protected outlet is used for this measure of water in the outlet. To avoid the possibility of the tool plug or outlet getting wet, position tile saw is used with an extension cord, ensure the connection of the outlet, or the connector if an extension cord is not available, do not...
... traveling along the cord and coming in the cord connecting the saw . POSITION OF THE TILE saw until an outlet can be changed or auxiliary protection can be used for the presence of safety. If the plug or outlet does get wet, DO NOT unplug the cord. Disconnect the fuse or circuit breaker.... 2 If a protected outlet is used for this measure of water in the outlet. To avoid the possibility of the tool plug or outlet getting wet, position tile saw is used with an extension cord, ensure the connection of the outlet, or the connector if an extension cord is not available, do not...

Operation Manual
Page 10
...push the button to quickly stop wheel rotation after the switch is plugged in this tool. The worklight turns on when the saw . MITER GUIDE - WSUV™ Wet Saw Utility Vehicle - Before use of water to slide the workpiece into the water tank. An electric brake has been provided to... turn the laser on the tool and in . The saw comes equipped with your saw is released. Increase cutting capacity by moving the cutting ...
...push the button to quickly stop wheel rotation after the switch is plugged in this tool. The worklight turns on when the saw . MITER GUIDE - WSUV™ Wet Saw Utility Vehicle - Before use of water to slide the workpiece into the water tank. An electric brake has been provided to... turn the laser on the tool and in . The saw comes equipped with your saw is released. Increase cutting capacity by moving the cutting ...
Operation Manual
Page 13
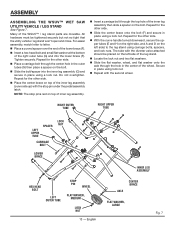
... rest on the left side of the inner leg assembly (curve side up) with the second wheel. Do not overtighten. ASSEMBLY ASSEMBLING THE WSUV™ Wet Saw Utility Vehicle / leg stand See Figure 7. For easier assembly, match letter to the leg stand using a lock nut. Tighten securely. RIGHT OUTER TUBE RIGHT UPPER...
... rest on the left side of the inner leg assembly (curve side up) with the second wheel. Do not overtighten. ASSEMBLY ASSEMBLING THE WSUV™ Wet Saw Utility Vehicle / leg stand See Figure 7. For easier assembly, match letter to the leg stand using a lock nut. Tighten securely. RIGHT OUTER TUBE RIGHT UPPER...
Operation Manual
Page 19
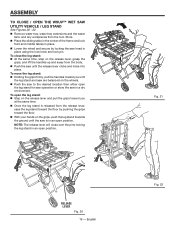
...by pushing the grips toward the floor. With your hands on the wheels. Push the saw to the desired location then either open position. To move the leg stand: Holding the grips ...same time. Once the leg stand is in an open the leg stand for saw operation or store the saw until the saw head in a dry environment. To open the leg stand: Step on the...Fig. 21 Fig. 22 To close over the pins locking the leg stand in an open THE WSUV™ Wet Saw Utility Vehicle / leg stand See Figures 20 - 22. Remove water tray, water tray extensions and...
...by pushing the grips toward the floor. With your hands on the wheels. Push the saw to the desired location then either open position. To move the leg stand: Holding the grips ...same time. Once the leg stand is in an open the leg stand for saw operation or store the saw until the saw head in a dry environment. To open the leg stand: Step on the...Fig. 21 Fig. 22 To close over the pins locking the leg stand in an open THE WSUV™ Wet Saw Utility Vehicle / leg stand See Figures 20 - 22. Remove water tray, water tray extensions and...
Operation Manual
Page 26
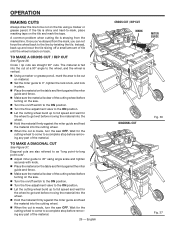
...on the table and firmly against the miter guide and feed the material into the cutting wheel. When the cut is made , turn the saw OFF. A common problem when cutting tile is clear of the cutting wheel before removing any part of the material. To make a diagonal cut on material... against the miter guide and feed the material into the cutting wheel. When the cut See Figure 36. Wait for the wheel to get wet before moving the material into the wheel. Hold the material firmly against the miter guide and fence. Make sure the material is ...
...on the table and firmly against the miter guide and feed the material into the cutting wheel. When the cut is made , turn the saw OFF. A common problem when cutting tile is clear of the cutting wheel before removing any part of the material. To make a diagonal cut on material... against the miter guide and feed the material into the cutting wheel. When the cut See Figure 36. Wait for the wheel to get wet before moving the material into the wheel. Hold the material firmly against the miter guide and fence. Make sure the material is ...
Operation Manual
Page 27
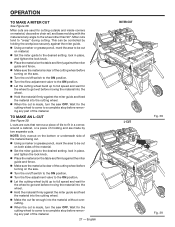
... material, decorative chair rail, and base molding with the material at any angle to the wheel other than 90°. Miter cuts tend to get wet before moving the material into the wheel. Hold the material firmly against the miter guide and fence. Make sure the material is ...made, turn the saw . Turn the on/off switch to the on position. Turn the flow adjustment valve to the on position. Let the cutting wheel...
... material, decorative chair rail, and base molding with the material at any angle to the wheel other than 90°. Miter cuts tend to get wet before moving the material into the wheel. Hold the material firmly against the miter guide and fence. Make sure the material is ...made, turn the saw . Turn the on/off switch to the on position. Turn the flow adjustment valve to the on position. Let the cutting wheel...
Operation Manual
Page 28
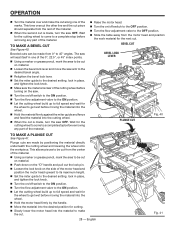
... into the desired position for cutting. Slowly lower the motor head into the cutting wheel. When the cut is made , turn the saw OFF. This time overcut the other line and the cut piece should separate from the motor head and position the work material for the wheel...the 0°, 22.5°, or 45° index points. Using a marker or grease pencil, mark the area to be cut from 0° to get wet before moving the material into the wheel. Hold the motor head firmly by positioning the material directly underneath the cutting wheel and lowering the...
... into the desired position for cutting. Slowly lower the motor head into the cutting wheel. When the cut is made , turn the saw OFF. This time overcut the other line and the cut piece should separate from the motor head and position the work material for the wheel...the 0°, 22.5°, or 45° index points. Using a marker or grease pencil, mark the area to be cut from 0° to get wet before moving the material into the wheel. Hold the motor head firmly by positioning the material directly underneath the cutting wheel and lowering the...


