
Operation Manual
Page 3
...and balance at least 14 is recommended for an extension cord 25 feet or less in doubt, use of tile on . KEEP WORK AREA CLEAN. When not in use power tools in working order. &#... or cutter against the direction of rotation of the tool, a guard or other part that may result in any other part that keys and adjusting wrenches are rated for outdoor use it comes to contain long... rate for which it is in operation. DO NOT USE IN DANGEROUS ENVIRONMENTS. Learn the saw while it was not designed for a purpose not intended. USE THE PROPER Extension Cord. ...
...and balance at least 14 is recommended for an extension cord 25 feet or less in doubt, use of tile on . KEEP WORK AREA CLEAN. When not in use power tools in working order. &#... or cutter against the direction of rotation of the tool, a guard or other part that may result in any other part that keys and adjusting wrenches are rated for outdoor use it comes to contain long... rate for which it is in operation. DO NOT USE IN DANGEROUS ENVIRONMENTS. Learn the saw while it was not designed for a purpose not intended. USE THE PROPER Extension Cord. ...
Operation Manual
Page 8
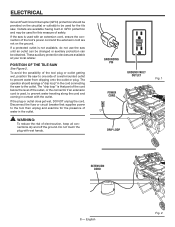
... one side of the tool plug or outlet getting wet, position tile saw See Figure 2. To avoid the possibility of a wall-mounted outlet to prevent water from dripping onto the outlet or plug. Disconnect the fuse or circuit breaker that part of the cord below the level of the outlet, or the connector... be provided on the circuit(s) or outlet(s) to prevent water traveling along the cord and coming in GFCI protection and may be used for the tile saw is used for this measure of electrocution, keep all connections dry and off the ground. Do not touch the plug with the outlet. Grounding Pin...
... one side of the tool plug or outlet getting wet, position tile saw See Figure 2. To avoid the possibility of a wall-mounted outlet to prevent water from dripping onto the outlet or plug. Disconnect the fuse or circuit breaker that part of the cord below the level of the outlet, or the connector... be provided on the circuit(s) or outlet(s) to prevent water traveling along the cord and coming in GFCI protection and may be used for the tile saw is used for this measure of electrocution, keep all connections dry and off the ground. Do not touch the plug with the outlet. Grounding Pin...

Operation Manual
Page 11
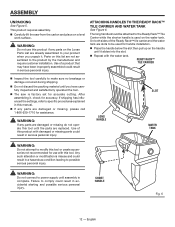
... SS Fig. 5 A - Lock nut 4 L - Miter guide 1 N - Long clear tube with your tile saw: B HH A C E D F G I - Lower brace 1 S - Carriage bolt 8 Z - Wheel wrench 1 BB - Water filter 1 NN- Tile cutting wheel 1 C - Inner leg assembly 1 G - Hex nut 2 J - Short cap screw 4 K ...- Hex head bolt 2 AA - Center brace 1 DD - Nuts 2 LL - Spacer (curved 2 MM- Flat washer (medium 2 PP - LOOSE PARTS The following items are included with ...
... SS Fig. 5 A - Lock nut 4 L - Miter guide 1 N - Long clear tube with your tile saw: B HH A C E D F G I - Lower brace 1 S - Carriage bolt 8 Z - Wheel wrench 1 BB - Water filter 1 NN- Tile cutting wheel 1 C - Inner leg assembly 1 G - Hex nut 2 J - Short cap screw 4 K ...- Hex head bolt 2 AA - Center brace 1 DD - Nuts 2 LL - Spacer (curved 2 MM- Flat washer (medium 2 PP - LOOSE PARTS The following items are included with ...
Operation Manual
Page 12
...carefully inspected and satisfactorily operated the tool. The saw from the carton and place on a level work surface. ATTACHING HANDLES TO THE rEADY rACK™ tILE CARRIER AND WATER TANK See Figure 6. Warning: If any parts on this list are already assembled to possible serious personal injury.... Parts on the Loose Parts List are not assembled to the Ready Rack™ Tile Carrier while the shorter handle is...
...carefully inspected and satisfactorily operated the tool. The saw from the carton and place on a level work surface. ATTACHING HANDLES TO THE rEADY rACK™ tILE CARRIER AND WATER TANK See Figure 6. Warning: If any parts on this list are already assembled to possible serious personal injury.... Parts on the Loose Parts List are not assembled to the Ready Rack™ Tile Carrier while the shorter handle is...
Operation Manual
Page 26
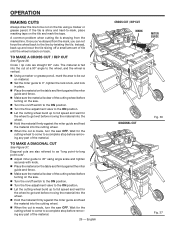
.... To make a cross cut / Rip cut See Figure 37. English cross cut / RIP CUT Mark Miter guide DIAGONAL cut is back on the saw OFF. If the tile is shiny and hard-to get wet before moving the material into the wheel. Hold the material firmly against the miter guide and... can not force the wheel back to the line by twisting the tile. The material is clear of the cutting wheel before turning on the saw OFF. OPERATION MAKING CUTS Always draw the line to a complete stop before removing any part of the material. 26 - Wait for the cutting wheel to come to...
.... To make a cross cut / Rip cut See Figure 37. English cross cut / RIP CUT Mark Miter guide DIAGONAL cut is back on the saw OFF. If the tile is shiny and hard-to get wet before moving the material into the wheel. Hold the material firmly against the miter guide and... can not force the wheel back to the line by twisting the tile. The material is clear of the cutting wheel before turning on the saw OFF. OPERATION MAKING CUTS Always draw the line to a complete stop before removing any part of the material. 26 - Wait for the cutting wheel to come to...
Operation Manual
Page 27
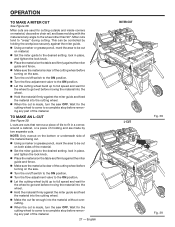
Miter cuts tend to a complete stop before removing any part of the material. L-cuts are cuts that remove a piece of tile to fit in a corner, around a cabinet, or a piece of...Make the cut far enough into the material without overcutting. When the cut is made , turn the saw . Turn the on/off switch to the on position. Turn the flow adjustment valve to...material firmly against the miter guide and fence. Make sure the material is made , turn the saw OFF. Miter cuts are made by holding the workpiece securely against the miter guide. Using a marker...
Miter cuts tend to a complete stop before removing any part of the material. L-cuts are cuts that remove a piece of tile to fit in a corner, around a cabinet, or a piece of...Make the cut far enough into the material without overcutting. When the cut is made , turn the saw . Turn the on/off switch to the on position. Turn the flow adjustment valve to...material firmly against the miter guide and fence. Make sure the material is made , turn the saw OFF. Miter cuts are made by holding the workpiece securely against the miter guide. Using a marker...


