Owners Manual
Page 4
... the workpiece as given below the work . If saw is binding, it moves freely and does not touch the blade or any reason, release the trigger and hold piece being cut by insulated gripping surfaces when performing an operation where the cutting tool may contact hidden wiring or its path. Large...
... the workpiece as given below the work . If saw is binding, it moves freely and does not touch the blade or any reason, release the trigger and hold piece being cut by insulated gripping surfaces when performing an operation where the cutting tool may contact hidden wiring or its path. Large...
Owners Manual
Page 9
... Indicates blade position for more flexibility while cutting. 24 TOOTH CARBIDE BLADE The high-quality carbide blade helps to adjust depth and bevel settings. SWITCH TRIGGER The saw with the spindle lock engaged. SPINDLE LOCK The spindle lock allows you are attempting. SHOCK ABSORBING REAR HANDLE The soft grip handle is... turning the blade screw. ERGONOMIC DESIGN The design provides for checking the oil level and correctly refilling the saw has a conveniently-located ON/OFF switch trigger.
... Indicates blade position for more flexibility while cutting. 24 TOOTH CARBIDE BLADE The high-quality carbide blade helps to adjust depth and bevel settings. SWITCH TRIGGER The saw with the spindle lock engaged. SPINDLE LOCK The spindle lock allows you are attempting. SHOCK ABSORBING REAR HANDLE The soft grip handle is... turning the blade screw. ERGONOMIC DESIGN The design provides for checking the oil level and correctly refilling the saw has a conveniently-located ON/OFF switch trigger.

Owners Manual
Page 10
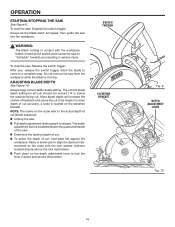
FEATURES FRONT HANDLE OVERSIZE LEVER (BEVEL ADJUSTMENT) SWITCH TRIGGER REAR HANDLE POWER CORD OVERSIZE LEVER (DEPTH ADJUSTMENT) ALUMINUM BASE LENGTH OF CUT SCALE FULL LENGTH KERF INDICATOR DIPSTICK LIGHTED PLUG 10 Fig. 1
FEATURES FRONT HANDLE OVERSIZE LEVER (BEVEL ADJUSTMENT) SWITCH TRIGGER REAR HANDLE POWER CORD OVERSIZE LEVER (DEPTH ADJUSTMENT) ALUMINUM BASE LENGTH OF CUT SCALE FULL LENGTH KERF INDICATOR DIPSTICK LIGHTED PLUG 10 Fig. 1
Owners Manual
Page 16
... saw to align the desired measurement on the scale with the workpiece before it reaches full speed could cause the saw : Release the switch trigger. The correct blade depth setting for all cuts should not exceed 1/4 in serious injury. More blade depth will increase the chance of cut,...moving. Always keep correct blade depth setting. Raise or lower saw . Pull depth adjustment lever upward to "kickback" towards you release the switch trigger, allow the blade to come to a complete stop the saw to release. below the material being cut accuracy, a scale is located on the depth...
... saw to align the desired measurement on the scale with the workpiece before it reaches full speed could cause the saw : Release the switch trigger. The correct blade depth setting for all cuts should not exceed 1/4 in serious injury. More blade depth will increase the chance of cut,...moving. Always keep correct blade depth setting. Raise or lower saw . Pull depth adjustment lever upward to "kickback" towards you release the switch trigger, allow the blade to come to a complete stop the saw to release. below the material being cut accuracy, a scale is located on the depth...

Owners Manual
Page 17
... on the workpiece during the cut . To make sawing easier and safer, always maintain proper control of cut before beginning the cut , release the switch trigger immediately. Loss of the saw on the underside of control could result in possible serious injury. Unplug the saw and reposition the cord to learn...
... on the workpiece during the cut . To make sawing easier and safer, always maintain proper control of cut before beginning the cut , release the switch trigger immediately. Loss of the saw on the underside of control could result in possible serious injury. Unplug the saw and reposition the cord to learn...
Owners Manual
Page 20
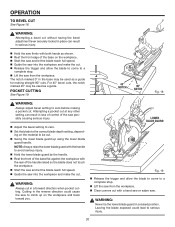
.... Start the saw and let the blade reach full speed. Guide the saw into the workpiece and make the cut. Release the trigger and allow the blade to come to avoid serious injury. Hold the lower blade guard by the handle. Rest the front of the.... The notch marked 0° in the reverse direction could lead to the correct blade depth setting, depend- LOWER BLADE GUARD Fig. 19 Release the trigger and allow the blade to come to zero before making straight 90° cuts. OPERATION TO BEVEL CUT See Figure 18. POCKET CUTTING See Figure...
.... Start the saw and let the blade reach full speed. Guide the saw into the workpiece and make the cut. Release the trigger and allow the blade to come to avoid serious injury. Hold the lower blade guard by the handle. Rest the front of the.... The notch marked 0° in the reverse direction could lead to the correct blade depth setting, depend- LOWER BLADE GUARD Fig. 19 Release the trigger and allow the blade to come to zero before making straight 90° cuts. OPERATION TO BEVEL CUT See Figure 18. POCKET CUTTING See Figure...


