
Owners Manual
Page 2
... Introduction ...2 General Safety Rules ...3-4 Specific Safety Rules...4-5 Symbols...6-7 Electrical ...8 Features...9-11 Unpacking ...11 Assembly ...12-13 Operation...14-21 Adjustments ...21 Maintenance ...22-23 Warranty ...25 Customer Service Information...26 INTRODUCTION This tool has many features for making it easy to maintain and operate. 2 Safety, performance, and dependability have been...
... Introduction ...2 General Safety Rules ...3-4 Specific Safety Rules...4-5 Symbols...6-7 Electrical ...8 Features...9-11 Unpacking ...11 Assembly ...12-13 Operation...14-21 Adjustments ...21 Maintenance ...22-23 Warranty ...25 Customer Service Information...26 INTRODUCTION This tool has many features for making it easy to maintain and operate. 2 Safety, performance, and dependability have been...
Owners Manual
Page 3
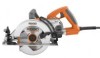
... away while operating a power tool. Never use brake fluids, gasoline, petroleum-based products, or any way. Keep cutting tools sharp the risk of starting . If damaged, have the switch on . ELECTRICAL SAFETY Double insulated tools are dangerous in the presence of the enclosure plastic. 3 Properly maintained tools with care. Fol- TOOL USE AND CARE Use clamps or other ). Use the correct tool for which may be repaired. ...
... away while operating a power tool. Never use brake fluids, gasoline, petroleum-based products, or any way. Keep cutting tools sharp the risk of starting . If damaged, have the switch on . ELECTRICAL SAFETY Double insulated tools are dangerous in the presence of the enclosure plastic. 3 Properly maintained tools with care. Fol- TOOL USE AND CARE Use clamps or other ). Use the correct tool for which may be repaired. ...
Owners Manual
Page 4
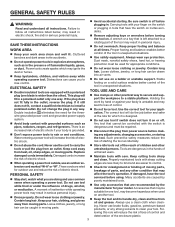
... guard spring. Blades that do not match the mounting hardware of the saw down , the blade stalls and the motor reaction drives the unit rapidly back toward the operator. Kickback is important to support the work or pull the saw if lower guard does not move freely and close instantly. Service or maintenance performed by qualified repair personnel. Keep hands away from the workpiece as "Pocket Cuts" and "Compound Cuts...
... guard spring. Blades that do not match the mounting hardware of the saw down , the blade stalls and the motor reaction drives the unit rapidly back toward the operator. Kickback is important to support the work or pull the saw if lower guard does not move freely and close instantly. Service or maintenance performed by qualified repair personnel. Keep hands away from the workpiece as "Pocket Cuts" and "Compound Cuts...
Owners Manual
Page 5
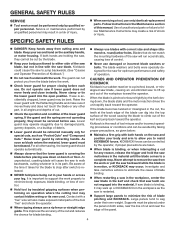
...: Some dust created by an authorized service center. A guard or other part that is recommended for and remove all nails from chemically-treated lumber. The smaller the gage number, the heavier the cord. Some examples of electric shock or fire. Check damaged parts. Unsharpened or improperly set blades produce narrow kerf causing excessive friction, blade binding and KICKBACK. Blade depth and bevel adjusting locking levers must be...
...: Some dust created by an authorized service center. A guard or other part that is recommended for and remove all nails from chemically-treated lumber. The smaller the gage number, the heavier the cord. Some examples of electric shock or fire. Check damaged parts. Unsharpened or improperly set blades produce narrow kerf causing excessive friction, blade binding and KICKBACK. Blade depth and bevel adjusting locking levers must be...

Owners Manual
Page 6
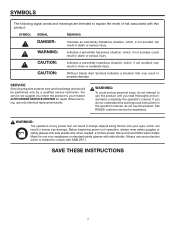
...-insulated construction Revolutions, strokes, surface speed, orbits etc., per second) W Watt Power min Minutes Time Alternating Current Type of current Direct Current Type or a characteristic of injury, user must read and understand operator's manual before using this product. Failure to keep your hands away from the blade will result in serious personal injury. SYMBOL NAME DESIGNATION/EXPLANATION V Volts Voltage A Amperes Current Hz...
...-insulated construction Revolutions, strokes, surface speed, orbits etc., per second) W Watt Power min Minutes Time Alternating Current Type of current Direct Current Type or a characteristic of injury, user must read and understand operator's manual before using this product. Failure to keep your hands away from the blade will result in serious personal injury. SYMBOL NAME DESIGNATION/EXPLANATION V Volts Voltage A Amperes Current Hz...
Owners Manual
Page 7
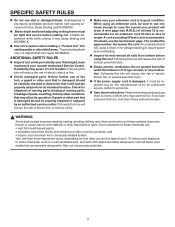
... in property damage. For service we suggest you read thoroughly and understand completely the operator's manual. SYMBOLS The following signal words and meanings are intended to explain the levels of any power tool can result in severe eye damage. If you do not understand the warnings and instructions in the operator's manual, do not attempt to use only identical replacement parts.
... in property damage. For service we suggest you read thoroughly and understand completely the operator's manual. SYMBOLS The following signal words and meanings are intended to explain the levels of any power tool can result in severe eye damage. If you do not understand the warnings and instructions in the operator's manual, do not attempt to use only identical replacement parts.

Owners Manual
Page 8
... each use original factory replacement parts when servicing. Position the cord so that is designed for repair. Never use tool with a tool, use an extension cord that is a concept in safety in serious personal injury. A substantial voltage drop will cause a loss of power and the motor will cause a drop in line voltage, resulting in an extension cord. Observe all normal safety precautions to determine the minimum wire size...
... each use original factory replacement parts when servicing. Position the cord so that is designed for repair. Never use tool with a tool, use an extension cord that is a concept in safety in serious personal injury. A substantial voltage drop will cause a loss of power and the motor will cause a drop in line voltage, resulting in an extension cord. Observe all normal safety precautions to determine the minimum wire size...
Owners Manual
Page 9
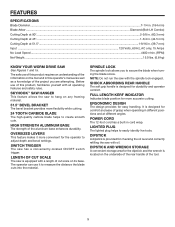
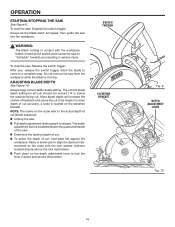
... tools. SWITCH TRIGGER The saw with the spindle lock engaged. OVERSIZED LEVERS This feature makes it to adjust depth and bevel settings. LIGHTED PLUG The lighted plug helps to secure the blade when turning the blade screw. Before use it more accurate cutting. The operator can use of this operator's manual as well as a knowledge of the tool. 9 SHOCK ABSORBING REAR HANDLE The soft grip handle is located on its base. NOTE: Do not run the saw with oil. POWER CORD...
... tools. SWITCH TRIGGER The saw with the spindle lock engaged. OVERSIZED LEVERS This feature makes it to adjust depth and bevel settings. LIGHTED PLUG The lighted plug helps to secure the blade when turning the blade screw. Before use it more accurate cutting. The operator can use of this operator's manual as well as a knowledge of the tool. 9 SHOCK ABSORBING REAR HANDLE The soft grip handle is located on its base. NOTE: Do not run the saw with oil. POWER CORD...

Owners Manual
Page 11
... shipping. Do not discard the packing material until the missing parts are damaged or missing, please call 1-866539-1710 for assistance. PACKING LIST 7-1/4 in possible serious personal injury. 11 FEATURES SKYHOOK™ SAW HANGER SPINDLE LOCK 51.5° BEVEL BUTTON DIPSTICK AND WRENCH STORAGE Fig. 1a UNPACKING INSTRUCTIONS: When unpacking the tool: Carefully remove the tool and accessories from the box.
... shipping. Do not discard the packing material until the missing parts are damaged or missing, please call 1-866539-1710 for assistance. PACKING LIST 7-1/4 in possible serious personal injury. 11 FEATURES SKYHOOK™ SAW HANGER SPINDLE LOCK 51.5° BEVEL BUTTON DIPSTICK AND WRENCH STORAGE Fig. 1a UNPACKING INSTRUCTIONS: When unpacking the tool: Carefully remove the tool and accessories from the box.

Owners Manual
Page 12
... FLANGE WASHER BLADE SPRING SCREW WASHER Fig. 2 Depress the spindle lock button. Remove the blade screw by turning it before engaging spindle lock. ATTACHING BLADE See Figures 2 and 2a. Unplug the saw blade inside the lower blade guard and onto the spindle. Also, never use a blade that the diamond key on the inner flange bushing aligns properly with the wrench. ASSEMBLY WARNING: Do not connect the tool to comply could result in accidental starting...
... FLANGE WASHER BLADE SPRING SCREW WASHER Fig. 2 Depress the spindle lock button. Remove the blade screw by turning it before engaging spindle lock. ATTACHING BLADE See Figures 2 and 2a. Unplug the saw blade inside the lower blade guard and onto the spindle. Also, never use a blade that the diamond key on the inner flange bushing aligns properly with the wrench. ASSEMBLY WARNING: Do not connect the tool to comply could result in accidental starting...
Owners Manual
Page 14
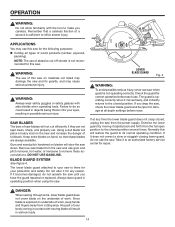
... into your protection and safety. If you careless. DANGER: When sawing through work . Any part of kickback. Using a dull blade will not cut -off wheels is there for your eyes, resulting in possible serious injury. Remove saw blade from the power supply. Do not alter it to an authorized factory service center for repair. Take it for any time the lower blade guard does not snap...
... into your protection and safety. If you careless. DANGER: When sawing through work . Any part of kickback. Using a dull blade will not cut -off wheels is there for your eyes, resulting in possible serious injury. Remove saw blade from the power supply. Do not alter it to an authorized factory service center for repair. Take it for any time the lower blade guard does not snap...
Owners Manual
Page 15
... workpiece for knots or nails before cutting. Always use a straight edge guide when rip cutting. Never force a cut. Hold the saw from the workpiece while the blade is moving. 15 Fig. 5 Fig. 6 Fig. 7 Fig. 8 Do not remove the saw firmly with a dull, gummed up, or improperly set blades. To guard against kickback, avoid dangerous practices such as to serious injury. OPERATION KICKBACK See Figures 5, 6, 7, and...
... workpiece for knots or nails before cutting. Always use a straight edge guide when rip cutting. Never force a cut. Hold the saw from the workpiece while the blade is moving. 15 Fig. 5 Fig. 6 Fig. 7 Fig. 8 Do not remove the saw firmly with a dull, gummed up, or improperly set blades. To guard against kickback, avoid dangerous practices such as to serious injury. OPERATION KICKBACK See Figures 5, 6, 7, and...
Owners Manual
Page 16
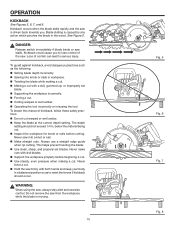
... lock washer indicator located directly above the lock mechanism. Push down on the depth adjustment lever to the actual depth of kickback and cause the cut . After you resulting in . SWITCH TRIGGER ELEVATION BRACKET Fig. 9 DEPTH ADJUSTMENT LEVER Fig. 10 16 Always keep correct blade depth setting. NOTE: The marks on the elevation bracket. Do not remove the saw : Release the switch trigger. For more depth of cut accuracy, a scale is moving. The depth adjustment lever...
... lock washer indicator located directly above the lock mechanism. Push down on the depth adjustment lever to the actual depth of kickback and cause the cut . After you resulting in . SWITCH TRIGGER ELEVATION BRACKET Fig. 9 DEPTH ADJUSTMENT LEVER Fig. 10 16 Always keep correct blade depth setting. NOTE: The marks on the elevation bracket. Do not remove the saw : Release the switch trigger. For more depth of cut accuracy, a scale is moving. The depth adjustment lever...

Owners Manual
Page 17
... making a cut is closed before setting the saw . Always place the cord to understand the correct method for handling the saw until the lower blade guard closes. Unplug the saw and reposition the cord to learn the correct and incorrect ways for operating the saw firmly with both hands. Avoid placing your hand on your right. Support the workpiece near the cut. Clamp the...
... making a cut is closed before setting the saw . Always place the cord to understand the correct method for handling the saw until the lower blade guard closes. Unplug the saw and reposition the cord to learn the correct and incorrect ways for operating the saw firmly with both hands. Avoid placing your hand on your right. Support the workpiece near the cut. Clamp the...

Owners Manual
Page 18
...; Check the squareness of the saw may be connected to a power supply when you are assembling parts, making 90° cuts. BLADE FULL LENGTH KERF INDICATOR LINE OF CUT Fig. 14 COMBINATION SQUARE Fig. 15 18 Disconnecting the tool will prevent accidental starting that could cause serious injury. 0° BEVEL STOP The saw has a positive 0° bevel stop that the saw blade when making adjustments, cleaning, performing maintenance, or when...
...; Check the squareness of the saw may be connected to a power supply when you are assembling parts, making 90° cuts. BLADE FULL LENGTH KERF INDICATOR LINE OF CUT Fig. 14 COMBINATION SQUARE Fig. 15 18 Disconnecting the tool will prevent accidental starting that could cause serious injury. 0° BEVEL STOP The saw has a positive 0° bevel stop that the saw blade when making adjustments, cleaning, performing maintenance, or when...

Owners Manual
Page 19
OPERATION TO ADJUST 0° BEVEL STOP See Figures 16 and 17. Unplug the saw. Pull bevel adjustment lever upward to set screw with hex wrench and adjust base until it is square with the saw until the motor housing is securely locked in place. BEVEL ADJUSTMENT LEVER 51.5° BEVEL BUTTON Fig. 16 SET SCREW Fig. 17 19 To reach the 51.5° bevel setting, push the 51.5° bevel button. Press downward on the bevel adjustment lever until...
OPERATION TO ADJUST 0° BEVEL STOP See Figures 16 and 17. Unplug the saw. Pull bevel adjustment lever upward to set screw with hex wrench and adjust base until it is square with the saw until the motor housing is securely locked in place. BEVEL ADJUSTMENT LEVER 51.5° BEVEL BUTTON Fig. 16 SET SCREW Fig. 17 19 To reach the 51.5° bevel setting, push the 51.5° bevel button. Press downward on the bevel adjustment lever until...
Owners Manual
Page 20
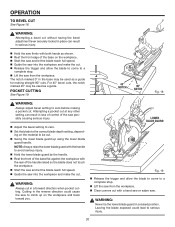
... lower blade guard with a hand saw or sabre saw into the workpiece and make the cut . Cutting in the reverse direction could lead to be cut at any other setting can result in the base may be used as shown. Rest the front edge of the saw possibly causing serious injury. Adjust the bevel setting to zero. Set the blade to a complete stop . Lift the saw from...
... lower blade guard with a hand saw or sabre saw into the workpiece and make the cut . Cutting in the reverse direction could lead to be cut at any other setting can result in the base may be used as shown. Rest the front edge of the saw possibly causing serious injury. Adjust the bevel setting to zero. Set the blade to a complete stop . Lift the saw from...

Owners Manual
Page 22
..., if you are highly abrasive to bearings, brushes, commutators, etc. Use of materials. Consequently, we do work on fiberglass material, wallboard, spackling compounds, or plaster are subject to remove dirt, carbon dust, etc. They contain chemicals that could cause serious injury. Do not abuse power tools. come in use only identical RIDGID® replacement parts. MAINTENANCE WARNING: When servicing use . Abusive practices can damage, weaken, or...
..., if you are highly abrasive to bearings, brushes, commutators, etc. Use of materials. Consequently, we do work on fiberglass material, wallboard, spackling compounds, or plaster are subject to remove dirt, carbon dust, etc. They contain chemicals that could cause serious injury. Do not abuse power tools. come in use only identical RIDGID® replacement parts. MAINTENANCE WARNING: When servicing use . Abusive practices can damage, weaken, or...

Owners Manual
Page 23
... spring loaded and will pop out when you remove the brush cap. Remove the brush assembly (brush and spring). Check for wear. Unplug the tool. It should be between the two marks on a level surface, overheating may occur. Replace the oil plug with a torx screwdriver. Fill only with Mobil SHC 636 Oil. The O-ring under the head should be compressed slightly. SCREWS...
... spring loaded and will pop out when you remove the brush cap. Remove the brush assembly (brush and spring). Check for wear. Unplug the tool. It should be between the two marks on a level surface, overheating may occur. Replace the oil plug with a torx screwdriver. Fill only with Mobil SHC 636 Oil. The O-ring under the head should be compressed slightly. SCREWS...

Owners Manual
Page 25
... from which vary from misuse, abuse, neglect, alteration, modification or repair by other than an authorized service center for RIDGID® branded hand held and stationary power tools purchased 2/1/04 and after the date of purchase, if you are dissatisfied with the tool such as brushes, chucks, motors, switches, cords, gears and even cordless batteries in workmanship or materials and normal wear items such as...
... from which vary from misuse, abuse, neglect, alteration, modification or repair by other than an authorized service center for RIDGID® branded hand held and stationary power tools purchased 2/1/04 and after the date of purchase, if you are dissatisfied with the tool such as brushes, chucks, motors, switches, cords, gears and even cordless batteries in workmanship or materials and normal wear items such as...


