
Operating Instructions
Page 1
For safe and correct use, be sure to the Printer 2 Installing Options 3 Connecting the Printer 4 Configuration 5 Paper and Other Media 6 Replacing Consumables and Maintenance Kit 7 Cleaning the Printer 8 Adjusting the Printer 9 Troubleshooting 10 Removing Misfed Paper 11 Appendix Read this machine and keep it handy for future reference. Operating Instructions Hardware Guide 1 Guide to read the Safety Information before you use this manual carefully before using the machine.
For safe and correct use, be sure to the Printer 2 Installing Options 3 Connecting the Printer 4 Configuration 5 Paper and Other Media 6 Replacing Consumables and Maintenance Kit 7 Cleaning the Printer 8 Adjusting the Printer 9 Troubleshooting 10 Removing Misfed Paper 11 Appendix Read this machine and keep it handy for future reference. Operating Instructions Hardware Guide 1 Guide to read the Safety Information before you use this manual carefully before using the machine.

Operating Instructions
Page 4
... Paper in the Bypass Tray...94 Loading Envelopes...100 Switching Between Paper Trays...105 6. Cleaning the Printer Cautions to Take When Cleaning...129 2 Replacing Consumables and Maintenance Kit Replacing the Toner Cartridge (Print Cartridge 107 Replacing the Maintenance Kit...112 Before Replacing...112 Replacing the Friction Pad...113 Replacing the Transfer Roller...115 Replacing the...
... Paper in the Bypass Tray...94 Loading Envelopes...100 Switching Between Paper Trays...105 6. Cleaning the Printer Cautions to Take When Cleaning...129 2 Replacing Consumables and Maintenance Kit Replacing the Toner Cartridge (Print Cartridge 107 Replacing the Maintenance Kit...112 Before Replacing...112 Replacing the Friction Pad...113 Replacing the Transfer Roller...115 Replacing the...
Operating Instructions
Page 5
Appendix Moving and Transporting the Printer...185 Moving the Printer...185 Consumables...187 Toner Cartridge (Print Cartridge)...187 Maintenance Kit...188 Specifications...189 Mainframe...189 3 Removing Misfed Paper Removing Misfed Paper...167 When "Remove Misfeed Paper Tray" Appears 167 ...Paper Feed Roller...132 Cleaning the Registration Roller...135 8. Troubleshooting Error & Status Messages on the Control Panel 145 Panel Tone...152 Printer Does Not Print...153 Checking the Port Connection...154 Other Printing Problems...156 When You Cannot Print Properly...156 Paper Misfeeds Occur ...
Appendix Moving and Transporting the Printer...185 Moving the Printer...185 Consumables...187 Toner Cartridge (Print Cartridge)...187 Maintenance Kit...188 Specifications...189 Mainframe...189 3 Removing Misfed Paper Removing Misfed Paper...167 When "Remove Misfeed Paper Tray" Appears 167 ...Paper Feed Roller...132 Cleaning the Registration Roller...135 8. Troubleshooting Error & Status Messages on the Control Panel 145 Panel Tone...152 Printer Does Not Print...153 Checking the Port Connection...154 Other Printing Problems...156 When You Cannot Print Properly...156 Paper Misfeeds Occur ...
Operating Instructions
Page 14
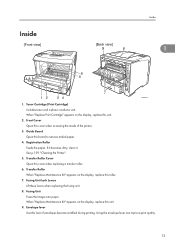
... malfunction may occur due to overheating. 17. Front Cover Release Button Use this tray for printing. The paper tray is fed into the printer. Paper Tray Cover Prevents paper inside the tray from overheating. Plug cables such as the ethernet cable, USB cable and parallel interface cable ...1) Loads up to 500 sheets of the cable to install the optional memory unit. Also, replace the friction pad when the message "Replace Maintenance Kit", appears. 13. Controller Board Slide it out to the outlet. 15. Output Tray (Standard Tray) Stacks printed output with "Tray 1" on and ...
... malfunction may occur due to overheating. 17. Front Cover Release Button Use this tray for printing. The paper tray is fed into the printer. Paper Tray Cover Prevents paper inside the tray from overheating. Plug cables such as the ethernet cable, USB cable and parallel interface cable ...1) Loads up to 500 sheets of the cable to install the optional memory unit. Also, replace the friction pad when the message "Replace Maintenance Kit", appears. 13. Controller Board Slide it out to the outlet. 15. Output Tray (Standard Tray) Stacks printed output with "Tray 1" on and ...
Operating Instructions
Page 15
... become wrinkled during printing. See p.129 "Cleaning the Printer". 5. Envelope lever Use this board to remove misfed paper. 4. If it becomes dirty, clean it. Fusing Unit Fuses the image onto paper. When "Replace Maintenance Kit" appears on the display, replace this unit. 2. ...lever can improve print quality. 13 Front Cover Open this roller. 7. Transfer Roller When "Replace Maintenance Kit" appears on the display, replace this cover when accessing the inside of the printer. 3. Transfer Roller Cover Open this unit. 9. Fusing Unit Lock Levers Lift these levers when ...
... become wrinkled during printing. See p.129 "Cleaning the Printer". 5. Envelope lever Use this board to remove misfed paper. 4. If it becomes dirty, clean it. Fusing Unit Fuses the image onto paper. When "Replace Maintenance Kit" appears on the display, replace this unit. 2. ...lever can improve print quality. 13 Front Cover Open this roller. 7. Transfer Roller When "Replace Maintenance Kit" appears on the display, replace this cover when accessing the inside of the printer. 3. Transfer Roller Cover Open this unit. 9. Fusing Unit Lock Levers Lift these levers when ...
Operating Instructions
Page 109
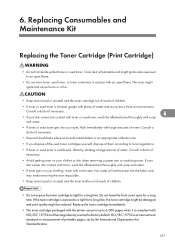
... front cover open flame. • Do not store toner, used toner gets into contact with toner, wash the affected area thoroughly with the printer can print up to local regulations. • If toner or used toner is swallowed, dilute by the International Organization for a long time.... • If your eyes, flush immediately with an open flame. Toner dust is exposed to a light for a long time. Replacing Consumables and Maintenance Kit Replacing the Toner Cartridge (Print Cartridge) • Do not incinerate spilled toner or used or unused) and the toner bottle out of reach of ...
... front cover open flame. • Do not store toner, used toner gets into contact with toner, wash the affected area thoroughly with the printer can print up to local regulations. • If toner or used toner is swallowed, dilute by the International Organization for a long time.... • If your eyes, flush immediately with an open flame. Toner dust is exposed to a light for a long time. Replacing Consumables and Maintenance Kit Replacing the Toner Cartridge (Print Cartridge) • Do not incinerate spilled toner or used or unused) and the toner bottle out of reach of ...
Operating Instructions
Page 110
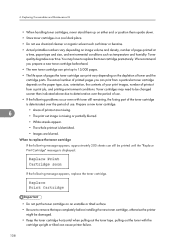
...• Be sure to deterioration over the period of printed pages you prepare a new toner cartridge beforehand. • The new toner cartridge can cause printer failure. 108 Toner quality degrades over the period of use . • If the following message appears, replace the toner cartridge. • Do not ... toner cartridges in a cool dark place. • Do not use chemical cleaner or organic solvent such as temperature and humidity. Replacing Consumables and Maintenance Kit • When handling toner cartridges, never stand them up to replace the toner cartridge prematurely.
...• Be sure to deterioration over the period of printed pages you prepare a new toner cartridge beforehand. • The new toner cartridge can cause printer failure. 108 Toner quality degrades over the period of use . • If the following message appears, replace the toner cartridge. • Do not ... toner cartridges in a cool dark place. • Do not use chemical cleaner or organic solvent such as temperature and humidity. Replacing Consumables and Maintenance Kit • When handling toner cartridges, never stand them up to replace the toner cartridge prematurely.

Operating Instructions
Page 112
Replacing Consumables and Maintenance Kit 6. Place the toner cartridge on a flat surface. Push down the toner cartridge to settle it stops. 6 AUB106S 8. Pull out the tape inside the unit horizontally while holding the cartridge with one hand as shown in appropriate position. 110 AUB105S 6. Hold the grips of the cartridge, and then insert it into the printer until it in the illustration. AFE007S 7.
Replacing Consumables and Maintenance Kit 6. Place the toner cartridge on a flat surface. Push down the toner cartridge to settle it stops. 6 AUB106S 8. Pull out the tape inside the unit horizontally while holding the cartridge with one hand as shown in appropriate position. 110 AUB105S 6. Hold the grips of the cartridge, and then insert it into the printer until it in the illustration. AFE007S 7.
Operating Instructions
Page 114
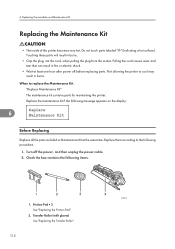
... the parts included in burns. Friction Pad × 3 See "Replacing the Friction Pad". 2. Replacing Consumables and Maintenance Kit Replacing the Maintenance Kit • The inside of this printer becomes very hot. "Replace Maintenance Kit" The maintenance kit contains parts for maintaining the printer. Check the box contains the following procedure. 1. Touching these parts will result in fire or electric shock...
... the parts included in burns. Friction Pad × 3 See "Replacing the Friction Pad". 2. Replacing Consumables and Maintenance Kit Replacing the Maintenance Kit • The inside of this printer becomes very hot. "Replace Maintenance Kit" The maintenance kit contains parts for maintaining the printer. Check the box contains the following procedure. 1. Touching these parts will result in fire or electric shock...
Operating Instructions
Page 115
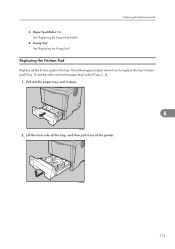
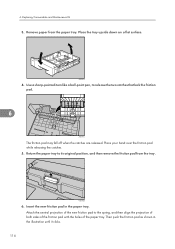
Replacing the Friction Pad Replace all the friction pads in the tray. The following procedure shows how to replace the tray's friction pad (Tray 1) and the other are for the paper feed unit(s) (Tray 2, 3). 1. Pull out the paper tray until it out of the tray, and then pull it stops. 6 AUB108S 2. Fusing Unit See "Replacing the Fusing Unit". Paper Feed Roller × 3 See "Replacing the Paper Feed Roller". 4. Replacing the Maintenance Kit 3. Lift the front side of the printer. AUB109S 113
Replacing the Friction Pad Replace all the friction pads in the tray. The following procedure shows how to replace the tray's friction pad (Tray 1) and the other are for the paper feed unit(s) (Tray 2, 3). 1. Pull out the paper tray until it out of the tray, and then pull it stops. 6 AUB108S 2. Fusing Unit See "Replacing the Fusing Unit". Paper Feed Roller × 3 See "Replacing the Paper Feed Roller". 4. Replacing the Maintenance Kit 3. Lift the front side of the printer. AUB109S 113
Operating Instructions
Page 116
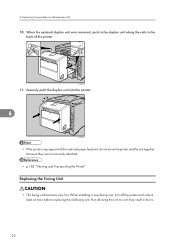
... of the friction pad with the holes of the paper tray. Place your hand over the friction pad while releasing the catches. 5. Replacing Consumables and Maintenance Kit 3. 6. Remove paper from the tray. Place the tray upside down on a flat surface. AUB321S 4. AUB302S 6. Then push the friction pad as shown in the paper...
... of the friction pad with the holes of the paper tray. Place your hand over the friction pad while releasing the catches. 5. Replacing Consumables and Maintenance Kit 3. 6. Remove paper from the tray. Place the tray upside down on a flat surface. AUB321S 4. AUB302S 6. Then push the friction pad as shown in the paper...
Operating Instructions
Page 117
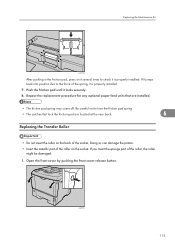
...any optional paper feed units that lock the friction pad are installed. • The friction pad spring may come off. Doing so can damage the printer. • Insert the metallic part of the roller on the back of the socket. AUB101S 115 Open the front cover by pushing the front ...Transfer Roller • Do not insert the roller on the socket. If you insert the sponge part of the spring, it locks securely. 8. Replacing the Maintenance Kit AUB303S After pushing in the friction pad, press on it several times to check it is properly installed. 7. Push the friction pad until it is...
...any optional paper feed units that lock the friction pad are installed. • The friction pad spring may come off. Doing so can damage the printer. • Insert the metallic part of the roller on the back of the socket. AUB101S 115 Open the front cover by pushing the front ...Transfer Roller • Do not insert the roller on the socket. If you insert the sponge part of the spring, it locks securely. 8. Replacing the Maintenance Kit AUB303S After pushing in the friction pad, press on it several times to check it is properly installed. 7. Push the friction pad until it is...
Operating Instructions
Page 118
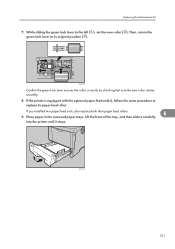
To avoid dirtying your hands with toner from the printer, as shown in the Maintenance Kit. 4. AUB103S 3. Hold the lock levers, and then pull them. 6 AUB304S 5. Hold the green parts of the printer, while raising the front side. 6. Replacing Consumables and Maintenance Kit 2. Pull the toner cartridge out of the roller on both sides, and remove the roller from the transfer roller, wear the gloves included in the illustration. 116 AUB305S
To avoid dirtying your hands with toner from the printer, as shown in the Maintenance Kit. 4. AUB103S 3. Hold the lock levers, and then pull them. 6 AUB304S 5. Hold the green parts of the printer, while raising the front side. 6. Replacing Consumables and Maintenance Kit 2. Pull the toner cartridge out of the roller on both sides, and remove the roller from the transfer roller, wear the gloves included in the illustration. 116 AUB305S
Operating Instructions
Page 119
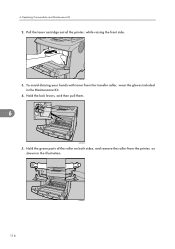
Replacing the Maintenance Kit 6. AUB106S 117 AUB306S 7. Hold the grips of the roller positioned to the left. Insert the new transfer roller on both ends of the printer as shown in the illustration, until they click into the printer until it into place. 6 AUB307S 8. Push down the lock levers on the socket with the gear of the toner cartridge, push it stops. Take the gloves off. 9.
Replacing the Maintenance Kit 6. AUB106S 117 AUB306S 7. Hold the grips of the roller positioned to the left. Insert the new transfer roller on both ends of the printer as shown in the illustration, until they click into the printer until it into place. 6 AUB307S 8. Push down the lock levers on the socket with the gear of the toner cartridge, push it stops. Take the gloves off. 9.

Operating Instructions
Page 120
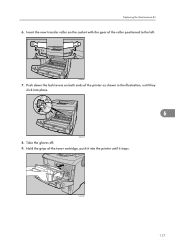
...following procedure shows how to replace the paper feed rollers of it, and then lift it may cause an injury. • Always move the printer horizontally. Otherwise the printer could break or cause injury if dropped. • When lifting the paper feed unit, hold the bottom of the... on the level place. • When the transfer roller is set, the transfer roller cover will result in appropriate position. 11. Turning the printer sideways or tilting it backward or forward while moving will return to settle it in toner leakage. 118 6. Replacing Consumables and Maintenance Kit 10.
...following procedure shows how to replace the paper feed rollers of it, and then lift it may cause an injury. • Always move the printer horizontally. Otherwise the printer could break or cause injury if dropped. • When lifting the paper feed unit, hold the bottom of the... on the level place. • When the transfer roller is set, the transfer roller cover will result in appropriate position. 11. Turning the printer sideways or tilting it backward or forward while moving will return to settle it in toner leakage. 118 6. Replacing Consumables and Maintenance Kit 10.
Operating Instructions
Page 121
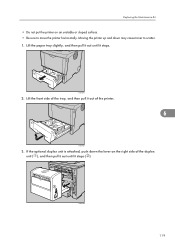
Lift the paper tray slightly, and then pull it out until it stops ( ). Replacing the Maintenance Kit • Do not put the printer on the right side of the tray, and then pull it stops. Lift the front side of the duplex unit ( ), and then pull it out until it out of the printer. 6 AUB109S 3. AUB318S 119 AUB108S 2. If the optional duplex unit is attached, push down may cause toner to move the printer horizontally. Moving the printer up and down the lever on an unstable or sloped surface. • Be sure to scatter. 1.
Lift the paper tray slightly, and then pull it out until it stops ( ). Replacing the Maintenance Kit • Do not put the printer on the right side of the tray, and then pull it stops. Lift the front side of the duplex unit ( ), and then pull it out until it out of the printer. 6 AUB109S 3. AUB318S 119 AUB108S 2. If the optional duplex unit is attached, push down may cause toner to move the printer horizontally. Moving the printer up and down the lever on an unstable or sloped surface. • Be sure to scatter. 1.
Operating Instructions
Page 122
Replacing Consumables and Maintenance Kit 4. 6. Move the printer to the left ( ), and then remove the paper feed roller ( ). AUB309S 120 AUB319S 5. Slide the green lock lever to the edge of the printer ( ). Push the under board levers ( ), and then pull the duplex unit out of a sturdy and stable table or desk. 6 AUB308S 6.
Replacing Consumables and Maintenance Kit 4. 6. Move the printer to the left ( ), and then remove the paper feed roller ( ). AUB309S 120 AUB319S 5. Slide the green lock lever to the edge of the printer ( ). Push the under board levers ( ), and then pull the duplex unit out of a sturdy and stable table or desk. 6 AUB308S 6.
Operating Instructions
Page 123
... the front of the tray, and then slide it carefully 6 into the printer until it stops. Place paper in the removed paper trays. If you installed two paper feed units, also replace both their paper feed rollers. 9. Replacing the Maintenance Kit 7. While sliding the green lock lever to its paper feed roller. AUB310S...
... the front of the tray, and then slide it carefully 6 into the printer until it stops. Place paper in the removed paper trays. If you installed two paper feed units, also replace both their paper feed rollers. 9. Replacing the Maintenance Kit 7. While sliding the green lock lever to its paper feed roller. AUB310S...
Operating Instructions
Page 124
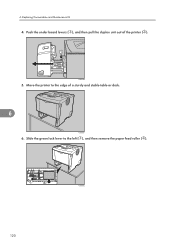
... the unit together, because they are not securely attached. • p.185 "Moving and Transporting the Printer" Replacing the Fusing Unit • The fusing unit becomes very hot. When the optional duplex unit was removed, push in the duplex unit along the ...rails in burns. 122 AUB226S 11. Not allowing the unit to cool may result in the back of the printer. When installing a new fusing unit, turn off the printer and wait at least an hour before replacing the old fusing unit. Replacing Consumables and Maintenance Kit 10. 6.
... the unit together, because they are not securely attached. • p.185 "Moving and Transporting the Printer" Replacing the Fusing Unit • The fusing unit becomes very hot. When the optional duplex unit was removed, push in the duplex unit along the ...rails in burns. 122 AUB226S 11. Not allowing the unit to cool may result in the back of the printer. When installing a new fusing unit, turn off the printer and wait at least an hour before replacing the old fusing unit. Replacing Consumables and Maintenance Kit 10. 6.
Operating Instructions
Page 125
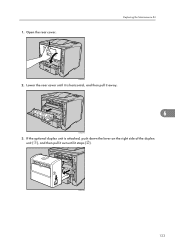
AUB318S 123 Open the rear cover. 1. If the optional duplex unit is horizontal, and then pull it stops ( ). Replacing the Maintenance Kit AUB225S 2. Lower the rear cover until it is attached, push down the lever on the right side of the duplex unit ( ), and then pull it out until it away. 6 AUB234S 3.
AUB318S 123 Open the rear cover. 1. If the optional duplex unit is horizontal, and then pull it stops ( ). Replacing the Maintenance Kit AUB225S 2. Lower the rear cover until it is attached, push down the lever on the right side of the duplex unit ( ), and then pull it out until it away. 6 AUB234S 3.


