
Operating Instructions
Page 8
... Loading Paper in the Bypass Tray 48 5. Guide to the Printer Exterior: Front View 1 Exterior: Rear View 2 Inside...3 Control Panel...4 2. Replacing Consumables Replacing the Print Cartridge 51 Replacing the Waste Toner Bottle 56 vi
... Loading Paper in the Bypass Tray 48 5. Guide to the Printer Exterior: Front View 1 Exterior: Rear View 2 Inside...3 Control Panel...4 2. Replacing Consumables Replacing the Print Cartridge 51 Replacing the Waste Toner Bottle 56 vi
Operating Instructions
Page 9
... the Printer Again after it has been Inactive for a Long Period 98 Moving and Transporting the Printer 100 Moving the Printer 101 Consumables ...102 Print Cartridge ...102 Waste Toner Bottle 103 Specifications...104 Main Unit ...104 Options ...107 INDEX...108 vii Appendix If the Printer is Not Going to a Computer via...
... the Printer Again after it has been Inactive for a Long Period 98 Moving and Transporting the Printer 100 Moving the Printer 101 Consumables ...102 Print Cartridge ...102 Waste Toner Bottle 103 Specifications...104 Main Unit ...104 Options ...107 INDEX...108 vii Appendix If the Printer is Not Going to a Computer via...
Operating Instructions
Page 11
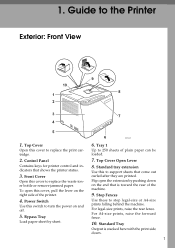
... the machine. 9. Power Switch Use this to the Printer Exterior: Front View ASH022S 1. Top Cover 6. Standard tray extension Use this switch to replace the print cartridge. Guide to support sheets that come out curled after they are printed.
... the machine. 9. Power Switch Use this to the Printer Exterior: Front View ASH022S 1. Top Cover 6. Standard tray extension Use this switch to replace the print cartridge. Guide to support sheets that come out curled after they are printed.
Operating Instructions
Page 13
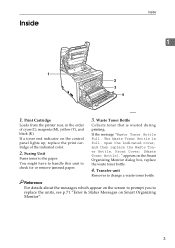
... Collects toner that is full. er Bottle. Reference For details about the messages which appear on the screen to prompt you to the paper. Print Cartridge Loads from the printer rear, in the order of the indicated color. 2. If a toner end indicator on Smart Organizing Monitor". 3 If the message "Waste Toner... a waste toner bottle. Fusing Unit Fuses toner to replace the units, see p.71 "Error & Status Messages on the control panel lights up, replace the print cartridge of cyan (C), magenta (M), yellow (Y), and black (K). Inside Inside 1 ASH024S 1.
... Collects toner that is full. er Bottle. Reference For details about the messages which appear on the screen to prompt you to the paper. Print Cartridge Loads from the printer rear, in the order of the indicated color. 2. If a toner end indicator on Smart Organizing Monitor". 3 If the message "Waste Toner... a waste toner bottle. Fusing Unit Fuses toner to replace the units, see p.71 "Error & Status Messages on the control panel lights up, replace the print cartridge of cyan (C), magenta (M), yellow (Y), and black (K). Inside Inside 1 ASH024S 1.
Operating Instructions
Page 14
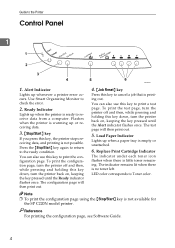
Use Smart Organizing Monitor to Toner color. You can also use this key to print the configuration page. Replace Print Cartridge Indicator The indicator under each toner icon flashes when there is no toner left. Reference For printing the configuration page, see Software Guide. 4 ...{Job Reset} key Press this key, the printer stops receiving data, and printing is printing out. Flashes when the printer is not available for the SP C220N model printer. The indicator remains lit when there is little toner remaining. Note ❒ To print the configuration page using the {Stop/Start} ...
Use Smart Organizing Monitor to Toner color. You can also use this key to print the configuration page. Replace Print Cartridge Indicator The indicator under each toner icon flashes when there is no toner left. Reference For printing the configuration page, see Software Guide. 4 ...{Job Reset} key Press this key, the printer stops receiving data, and printing is printing out. Flashes when the printer is not available for the SP C220N model printer. The indicator remains lit when there is little toner remaining. Note ❒ To print the configuration page using the {Stop/Start} ...
Operating Instructions
Page 18
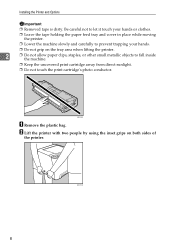
... moving the printer. ❒ Lower the machine slowly and carefully to fall inside the machine. ❒ Keep the uncovered print cartridge away from direct sunlight. ❒ Do not touch the print cartridge's photo conductor. ASH100S A Remove the plastic bag. Be careful not to let it touch your hands. ❒ Do not grip...
... moving the printer. ❒ Lower the machine slowly and carefully to fall inside the machine. ❒ Keep the uncovered print cartridge away from direct sunlight. ❒ Do not touch the print cartridge's photo conductor. ASH100S A Remove the plastic bag. Be careful not to let it touch your hands. ❒ Do not grip...
Operating Instructions
Page 21
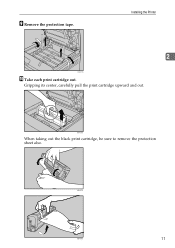
Installing the Printer 2 ASH110S J Take each print cartridge out. Gripping its center, carefully pull the print cartridge upward and out. ASH005S When taking out the black print cartridge, be sure to remove the protection sheet also. I Remove the protection tape. ASH087S ASH088S 11
Installing the Printer 2 ASH110S J Take each print cartridge out. Gripping its center, carefully pull the print cartridge upward and out. ASH005S When taking out the black print cartridge, be sure to remove the protection sheet also. I Remove the protection tape. ASH087S ASH088S 11
Operating Instructions
Page 22
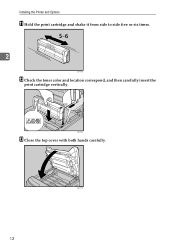
ASH010S 12 Installing the Printer and Options K Hold the print cartridge and shake it from side to side five or six times. 2 ASH113S L Check the toner color and location correspond, and then carefully insert the print cartridge vertically. ASH009S M Close the top cover with both hands carefully.
ASH010S 12 Installing the Printer and Options K Hold the print cartridge and shake it from side to side five or six times. 2 ASH113S L Check the toner color and location correspond, and then carefully insert the print cartridge vertically. ASH009S M Close the top cover with both hands carefully.
Operating Instructions
Page 61
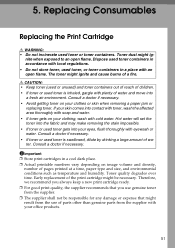
... water. Consult a doctor if necessary. • Avoid getting toner on your clothing, wash with your office products. 51 Replacing Consumables Replacing the Print Cartridge R WARNING: • Do not incinerate used toner gets into your eyes, flush thoroughly with soap and water. • If toner gets on your... skin comes into a fresh air environment. The toner might ignite and cause burns of the print cartridge might be responsible for any damage or expense that might ig- R CAUTION: • Keep toner (used or unused) and toner containers out ...
... water. Consult a doctor if necessary. • Avoid getting toner on your clothing, wash with your office products. 51 Replacing Consumables Replacing the Print Cartridge R WARNING: • Do not incinerate used toner gets into your eyes, flush thoroughly with soap and water. • If toner gets on your... skin comes into a fresh air environment. The toner might ignite and cause burns of the print cartridge might be responsible for any damage or expense that might ig- R CAUTION: • Keep toner (used or unused) and toner containers out ...
Operating Instructions
Page 62
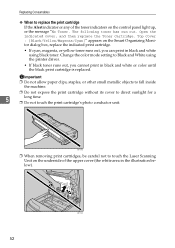
Change the color mode setting to Black and White using black toner. Open the indicated cover, and then replace the Toner Cartridge. ASH100S ❒ When removing print cartridges, be careful not to touch the Laser Scanning Unit on the underside of the toner indicators on the Smart Organizing Monitor dialog ...box, replace the indicated print cartridge. • If cyan, magenta, or yellow toner runs out, you can print in black and white using the printer driver. • If ...
Change the color mode setting to Black and White using black toner. Open the indicated cover, and then replace the Toner Cartridge. ASH100S ❒ When removing print cartridges, be careful not to touch the Laser Scanning Unit on the underside of the toner indicators on the Smart Organizing Monitor dialog ...box, replace the indicated print cartridge. • If cyan, magenta, or yellow toner runs out, you can print in black and white using the printer driver. • If ...
Operating Instructions
Page 63
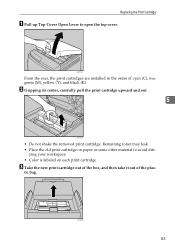
... up Top Cover Open Lever to avoid dirt- B Gripping its center, carefully pull the print cartridge upward and out. 5 ASH005S • Do not shake the removed print cartridge. C Take the new print cartridge out of the box, and then take it out of cyan (C), magenta (M), yellow (Y), and black ...(K). Remaining toner may leak. • Place the old print cartridge on each print cartridge. ASH004S From the rear, the print cartridges are installed in the order of the plas- ASH006S 53 tic bag. ying your workspace. • Color is labeled ...
... up Top Cover Open Lever to avoid dirt- B Gripping its center, carefully pull the print cartridge upward and out. 5 ASH005S • Do not shake the removed print cartridge. C Take the new print cartridge out of the box, and then take it out of cyan (C), magenta (M), yellow (Y), and black ...(K). Remaining toner may leak. • Place the old print cartridge on each print cartridge. ASH004S From the rear, the print cartridges are installed in the order of the plas- ASH006S 53 tic bag. ying your workspace. • Color is labeled ...
Operating Instructions
Page 64
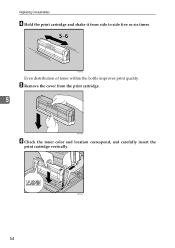
E Remove the cover from side to side five or six times. ASH007S Even distribution of toner within the bottle improves print quality. Replacing Consumables D Hold the print cartridge and shake it from the print cartridge. 5 ASH008S F Check the toner color and location correspond, and carefully insert the print cartridge vertically. 54 ASH009S
E Remove the cover from side to side five or six times. ASH007S Even distribution of toner within the bottle improves print quality. Replacing Consumables D Hold the print cartridge and shake it from the print cartridge. 5 ASH008S F Check the toner color and location correspond, and carefully insert the print cartridge vertically. 54 ASH009S
Operating Instructions
Page 65
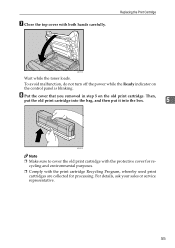
G Close the top cover with the protective cover for processing. Replacing the Print Cartridge ASH010S Wait while the toner loads. cycling and environmental purposes. ❒ Comply with the print cartridge Recycling Program, whereby used print cartridges are collected for re- H Put the cover that you removed in step 5 ...To avoid malfunction, do not turn off the power while the Ready indicator on the old print cartridge. For details, ask your sales or service representative. 55 Then, put the old print cartridge into the bag, and then put it into the box. 5 ASH061S Note ❒ Make ...
G Close the top cover with the protective cover for processing. Replacing the Print Cartridge ASH010S Wait while the toner loads. cycling and environmental purposes. ❒ Comply with the print cartridge Recycling Program, whereby used print cartridges are collected for re- H Put the cover that you removed in step 5 ...To avoid malfunction, do not turn off the power while the Ready indicator on the old print cartridge. For details, ask your sales or service representative. 55 Then, put the old print cartridge into the bag, and then put it into the box. 5 ASH061S Note ❒ Make ...
Operating Instructions
Page 74
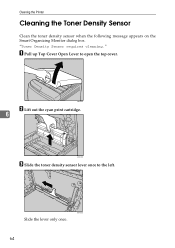
A Pull up Top Cover Open Lever to the left. "Toner Density Sensor requires cleaning." ASH062S Slide the lever only once. 64 ASH004S B Lift out the cyan print cartridge. 6 ASH105S C Slide the toner density sensor lever once to open the top cover. Cleaning the Printer Cleaning the Toner Density Sensor Clean the toner density sensor when the following message appears on the Smart Organizing Monitor dialog box.
A Pull up Top Cover Open Lever to the left. "Toner Density Sensor requires cleaning." ASH062S Slide the lever only once. 64 ASH004S B Lift out the cyan print cartridge. 6 ASH105S C Slide the toner density sensor lever once to open the top cover. Cleaning the Printer Cleaning the Toner Density Sensor Clean the toner density sensor when the following message appears on the Smart Organizing Monitor dialog box.

Operating Instructions
Page 75
Cleaning the Toner Density Sensor D Reattach the cyan print cartridge removed in carefully. Push it all the way in step 2. ASH063S E Close the top cover with both hands carefully. 6 ASH010S 65
Cleaning the Toner Density Sensor D Reattach the cyan print cartridge removed in carefully. Push it all the way in step 2. ASH063S E Close the top cover with both hands carefully. 6 ASH010S 65
Operating Instructions
Page 83
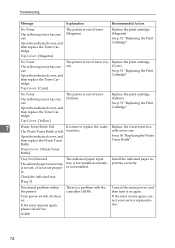
...wipe the interface area on the tridge is Open and then close the top open. print cartridge surface. tridge correctly. print cartridge surface. Replace the print cartridge (Black). Unit Not Detected The indicated print cartridge Set the indicated print car- then check the Toner car- (Cyan) (Cyan) tridge. ...Controller FW download failed. See p.51 "Replacing the Print Cartridge" 73 Top Cover : [Yellow] The error message appears even though the print car- Error & Status Messages on Smart Organizing Monitor ...
...wipe the interface area on the tridge is Open and then close the top open. print cartridge surface. tridge correctly. print cartridge surface. Replace the print cartridge (Black). Unit Not Detected The indicated print cartridge Set the indicated print car- then check the Toner car- (Cyan) (Cyan) tridge. ...Controller FW download failed. See p.51 "Replacing the Print Cartridge" 73 Top Cover : [Yellow] The error message appears even though the print car- Error & Status Messages on Smart Organizing Monitor ...
Operating Instructions
Page 84
...switch off the main power, and then turn it on . Open the indicated cover, and then replace the Toner Cartridge. Open the indicated cover, and then replace the Toner Cartridge. toner box with the controller's ROM. Check the indicated tray. [Tray 1] The indicated paper input tray is ...out of toner (Cyan). Open the indicated cover, and then replace the Toner Cartridge. Replace the print cartridge (Cyan). Top Cover : [Yellow] The printer is a problem with a new one. Install the indicated paper input tray correctly. SC828 There...
...switch off the main power, and then turn it on . Open the indicated cover, and then replace the Toner Cartridge. Open the indicated cover, and then replace the Toner Cartridge. toner box with the controller's ROM. Check the indicated tray. [Tray 1] The indicated paper input tray is ...out of toner (Cyan). Open the indicated cover, and then replace the Toner Cartridge. Replace the print cartridge (Cyan). Top Cover : [Yellow] The printer is a problem with a new one. Install the indicated paper input tray correctly. SC828 There...
Operating Instructions
Page 87
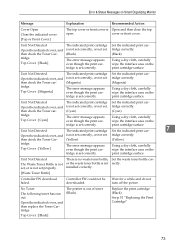
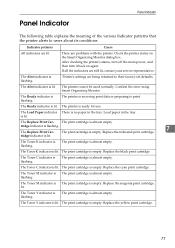
... Print Car- Load paper in the tray. tridge indicator is receiving print data or preparing to print. Replace the indicated print cartridge. Replace the black print cartridge. Replace the magenta print cartridge. The print cartridge is empty. The printer cannot be used normally. The Replace Print Car- The print...all the indicators are lit. The Ready indicator is lit. is lit. tridge indicator is almost empty. The print cartridge is lit. Panel Indicator Panel Indicator The following table explains the meaning of the various Indicator patterns that the printer alerts...
... Print Car- Load paper in the tray. tridge indicator is receiving print data or preparing to print. Replace the indicated print cartridge. Replace the black print cartridge. Replace the magenta print cartridge. The print cartridge is empty. The printer cannot be used normally. The Replace Print Car- The print...all the indicators are lit. The Ready indicator is lit. is lit. tridge indicator is almost empty. The print cartridge is lit. Panel Indicator Panel Indicator The following table explains the meaning of the various Indicator patterns that the printer alerts...
Operating Instructions
Page 94
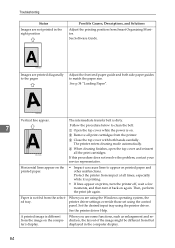
... that displayed in the right position Possible Causes, Descriptions, and Solutions Adjust the printing position from Smart Organizing Monitor. B Remove all print cartridges from impact at all the print cartridges. If this procedure does not resolve the problem, contact your service representative. Then, perform the print job again. When you are printed...
... that displayed in the right position Possible Causes, Descriptions, and Solutions Adjust the printing position from Smart Organizing Monitor. B Remove all print cartridges from impact at all the print cartridges. If this procedure does not resolve the problem, contact your service representative. Then, perform the print job again. When you are printed...
Operating Instructions
Page 96
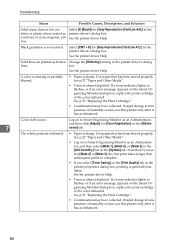
... as broken Change the [Dithering:] setting in the [Anti-humidity:] list on the [System] tab. See p.51 "Replacing the Print Cartridge". • Condensation may have collected. Log on to Smart Organizing Monitor as an Administrator, and then select [Mode 1], [Mode 2], or... in the printer driver's dialog lines. See the printer driver Help. • Toner is not natural. See p.51 "Replacing the Print Cartridge". • Condensation may have collected. Color shift occurs. Use paper that has been stored properly. If rapid change in the printer properties dialog...
... as broken Change the [Dithering:] setting in the [Anti-humidity:] list on the [System] tab. See p.51 "Replacing the Print Cartridge". • Condensation may have collected. Log on to Smart Organizing Monitor as an Administrator, and then select [Mode 1], [Mode 2], or... in the printer driver's dialog lines. See the printer driver Help. • Toner is not natural. See p.51 "Replacing the Print Cartridge". • Condensation may have collected. Color shift occurs. Use paper that has been stored properly. If rapid change in the printer properties dialog...


