
User Guide
Page 24
... without permission. • You can control the use of the machine, as well as prevent machine settings from being changed without authorization. • By setting passwords, you can prevent unauthorized access via the network. • You can erase or encrypt the data on the hard disk to minimize the risk of...
... without permission. • You can control the use of the machine, as well as prevent machine settings from being changed without authorization. • By setting passwords, you can prevent unauthorized access via the network. • You can erase or encrypt the data on the hard disk to minimize the risk of...

User Guide
Page 43
... for Originals), Auto Reduce/Enlarge, Red./Enlg. (Reduce/ Enlarge), Other Func. (Other functions) (except for User Name, File Name, and Password in Store File), number of prints Facsimile: Transmission type, memory transmission/immediate transmission, Select Destination from Address Book (except for folder destinations), Manual ...Entry, TX Status Report, Send Settings (except for Sender Name, Subject, and User Name, File Name, and Password in Store File) Scanner: Original, Send Settings (except for Security Settings in File Type, File Name, Sender Name, and User Name...
... for Originals), Auto Reduce/Enlarge, Red./Enlg. (Reduce/ Enlarge), Other Func. (Other functions) (except for User Name, File Name, and Password in Store File), number of prints Facsimile: Transmission type, memory transmission/immediate transmission, Select Destination from Address Book (except for folder destinations), Manual ...Entry, TX Status Report, Send Settings (except for Sender Name, Subject, and User Name, File Name, and Password in Store File) Scanner: Original, Send Settings (except for Security Settings in File Type, File Name, Sender Name, and User Name...

User Guide
Page 50
...User Code appears. 1. User Code Authentication Using the Control Panel This section explains the procedure for the Login User Name, Login Password, and User Code. Getting Started When the Authentication Screen Is Displayed If Basic Authentication, Windows Authentication, LDAP Authentication, or Integration... you can say that you are logged out. The machine only becomes operable after entering your own Login User Name and Login Password. Enter a User Code (up to the machine when Basic Authentication, Windows Authentication, LDAP Authentication, or Integration Server Authentication is ...
...User Code appears. 1. User Code Authentication Using the Control Panel This section explains the procedure for the Login User Name, Login Password, and User Code. Getting Started When the Authentication Screen Is Displayed If Basic Authentication, Windows Authentication, LDAP Authentication, or Integration... you can say that you are logged out. The machine only becomes operable after entering your own Login User Name and Login Password. Enter a User Code (up to the machine when Basic Authentication, Windows Authentication, LDAP Authentication, or Integration Server Authentication is ...

User Guide
Page 51
... the machine by unauthorized persons, always log out when you are using the machine. 1. Press [Yes]. 49 When the Authentication Screen Is Displayed 2. Enter a Login Password, and then press [OK]. Press the [Login/Logout] key. Press [Login].
... the machine by unauthorized persons, always log out when you are using the machine. 1. Press [Yes]. 49 When the Authentication Screen Is Displayed 2. Enter a Login Password, and then press [OK]. Press the [Login/Logout] key. Press [Login].

User Guide
Page 75
... your machine, this machine. Select the paper tray. 9. You can print them later applying necessary conditions. Press [Store File]. 4. Enter a file name, user name, or password if necessary. 5. For details, see page 119 "Storing Data". Stores scanned originals in the Document Server The Document Server enables you to store another document...
... your machine, this machine. Select the paper tray. 9. You can print them later applying necessary conditions. Press [Store File]. 4. Enter a file name, user name, or password if necessary. 5. For details, see page 119 "Storing Data". Stores scanned originals in the Document Server The Document Server enables you to store another document...

User Guide
Page 88
Fax Storing a Document You can specify a name for the stored documents as not to send to send documents after storing files. 1. Password You can be automatically assigned names such as a password. A four to eight digit number can set this function if necessary to know who and what departments stored documents in the preview...
Fax Storing a Document You can specify a name for the stored documents as not to send to send documents after storing files. 1. Password You can be automatically assigned names such as a password. A four to eight digit number can set this function if necessary to know who and what departments stored documents in the preview...

User Guide
Page 89
...]. • File Name Press [File Name], enter a file name, and then press [OK]. • Password Press [Password], enter a password using the number keys, and then press [OK]. Set the user name, file name, and password as necessary. Re-enter the password for confirmation, and then press [OK]. 6. Sending Stored Documents The machine sends documents stored...
...]. • File Name Press [File Name], enter a file name, and then press [OK]. • Password Press [Password], enter a password using the number keys, and then press [OK]. Set the user name, file name, and password as necessary. Re-enter the password for confirmation, and then press [OK]. 6. Sending Stored Documents The machine sends documents stored...

User Guide
Page 90
... original to thumbnail display. 4. Press [ ] to switch the screen to stored documents, place the original, and then select any scan settings you select a document with a password, enter the password using the number keys, and then press [OK]. 5.
... original to thumbnail display. 4. Press [ ] to switch the screen to stored documents, place the original, and then select any scan settings you select a document with a password, enter the password using the number keys, and then press [OK]. 5.

User Guide
Page 97
... corner of the control panel, and press the [Printer] icon on the [Home] screen. Enter a User ID in the "User ID:" box, and then enter a password in the upper left of the window, and then click [Print]. 2. In the "Select Printer" list, select the printer you want to use. 3. Click [OK...]. 8. In the "Job Type:" list, click [Locked Print]. 5. CXC252 95 Click the WordPad menu button in the "Password:" box. 7. Click [OK]. 10. Locked Print Locked Print Sending a Locked Print File 1. Click [Details...]. 6.
... corner of the control panel, and press the [Printer] icon on the [Home] screen. Enter a User ID in the "User ID:" box, and then enter a password in the upper left of the window, and then click [Print]. 2. In the "Select Printer" list, select the printer you want to use. 3. Click [OK...]. 8. In the "Job Type:" list, click [Locked Print]. 5. CXC252 95 Click the WordPad menu button in the "Password:" box. 7. Click [OK]. 10. Locked Print Locked Print Sending a Locked Print File 1. Click [Details...]. 6.

User Guide
Page 98
... 5. To change the print settings of the document is selected. Select the files you do not need to view a preview, proceed to print. Enter the password using the number keys, and then press [OK]. 9. Enter the number of the document. If you want to step 7. 6. A preview cannot be displayed.... Press [Exit] to check the print image of copies using the number keys if necessary, and then press [Resume Prt.]. 96 Enter the password using the number keys, and then press [OK]. Press [Locked Jobs]. 4. Press [Print]. 8. 5. If necessary, press [Preview] to close the preview...
... 5. To change the print settings of the document is selected. Select the files you do not need to view a preview, proceed to print. Enter the password using the number keys, and then press [OK]. 9. Enter the number of the document. If you want to step 7. 6. A preview cannot be displayed.... Press [Exit] to check the print image of copies using the number keys if necessary, and then press [Resume Prt.]. 96 Enter the password using the number keys, and then press [OK]. Press [Locked Jobs]. 4. Press [Print]. 8. 5. If necessary, press [Preview] to close the preview...

User Guide
Page 101
... machine. • Stored Print (Shared) Stores the file in the machine and allows any user who has print privileges can optionally set a file name and a password of Stored Print: To use . 3. Click [Details...]. 6. Click [OK]. 10. Start printing from the application's [Print] dialog box. 99 Click the WordPad menu button in...
... machine. • Stored Print (Shared) Stores the file in the machine and allows any user who has print privileges can optionally set a file name and a password of Stored Print: To use . 3. Click [Details...]. 6. Click [OK]. 10. Start printing from the application's [Print] dialog box. 99 Click the WordPad menu button in...

User Guide
Page 102
... select all the Stored Print files at once by pressing [All Jobs] after the printing has been completed. If you set the password in the printer driver, enter the password. 100 5. Print Printing a Stored Print File Using the Control Panel • The stored documents are not deleted even after selecting a file. 5. Press...
... select all the Stored Print files at once by pressing [All Jobs] after the printing has been completed. If you set the password in the printer driver, enter the password. 100 5. Print Printing a Stored Print File Using the Control Panel • The stored documents are not deleted even after selecting a file. 5. Press...

User Guide
Page 103
The number of copies using the number keys if necessary, and then press [Resume Prt.]. 101 Enter the number of files to the entered password and files that do not require a password. To change the print settings of these require a password, the machine prints files that correspond to be printed is displayed on the confirmation screen. 7. Stored Print If multiple print files are selected, and some of the document, press [Det.Settings]. 8.
The number of copies using the number keys if necessary, and then press [Resume Prt.]. 101 Enter the number of files to the entered password and files that do not require a password. To change the print settings of these require a password, the machine prints files that correspond to be printed is displayed on the confirmation screen. 7. Stored Print If multiple print files are selected, and some of the document, press [Det.Settings]. 8.
User Guide
Page 109
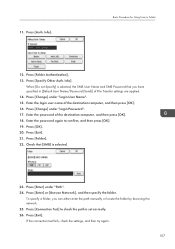
... Procedure for Using Scan to confirm, and then press [OK]. 19. Press [Change] under "Login User Name". 15. Press [Exit]. 21. Enter the password again to Folder 12. Press [Enter] or [Browse Network], and then specify the folder. 11. To specify a folder, you have specified in [Default User... and then press [OK]. 18. Check that you can either enter the path manually or locate the folder by browsing the network. 25. Enter the password of the destination computer, and then press [OK]. 16. Press [Folder]. 22. Press [Exit]. When [Do not Specify] is selected, the SMB...
... Procedure for Using Scan to confirm, and then press [OK]. 19. Press [Change] under "Login User Name". 15. Press [Exit]. 21. Enter the password again to Folder 12. Press [Enter] or [Browse Network], and then specify the folder. 11. To specify a folder, you have specified in [Default User... and then press [OK]. 18. Check that you can either enter the path manually or locate the folder by browsing the network. 25. Enter the password of the destination computer, and then press [OK]. 16. Press [Folder]. 22. Press [Exit]. When [Do not Specify] is selected, the SMB...

User Guide
Page 112
...user name field to display the soft keyboard. 9. Check the connection test result, and then press [Exit]. 11. 6. Press [OK]. 7. Press [Password] for logging in to the computer. Press [SMB]. 3. Press [Enter] in to the computer. A connection test is "desk01": \\desk01\user ...6. Press [Enter] on the destination setting, enter the password for the password to display the soft keyboard. 8. Depending on the destination setting, enter the user name for the folder. Press [Connection Test]. Press [...
...user name field to display the soft keyboard. 9. Check the connection test result, and then press [Exit]. 11. 6. Press [OK]. 7. Press [Password] for logging in to the computer. Press [SMB]. 3. Press [Enter] in to the computer. A connection test is "desk01": \\desk01\user ...6. Press [Enter] on the destination setting, enter the password for the password to display the soft keyboard. 8. Depending on the destination setting, enter the user name for the folder. Press [Connection Test]. Press [...

User Guide
Page 117
... settings remain. Press [ ] three times, and then press [Store File]. 6. Make sure that may result from unauthorized access by specifying passwords. • Scan file stored in the machine may be accessed by other users on the [Home] screen. Files that you protect stored...to HDD]. 7. Place originals. 4. Press [Send Settings]. 5. If necessary, specify file information, such as [User Name], [File Name], and [Password]. • User Name 115 We advise against using DeskTopBinder. Basic Procedure for Storing Scan Files Basic Procedure for Storing Scan Files • You can...
... settings remain. Press [ ] three times, and then press [Store File]. 6. Make sure that may result from unauthorized access by specifying passwords. • Scan file stored in the machine may be accessed by other users on the [Home] screen. Files that you protect stored...to HDD]. 7. Place originals. 4. Press [Send Settings]. 5. If necessary, specify file information, such as [User Name], [File Name], and [Password]. • User Name 115 We advise against using DeskTopBinder. Basic Procedure for Storing Scan Files Basic Procedure for Storing Scan Files • You can...

User Guide
Page 118
...]. 116 After specifying a user name, press [OK]. • File Name Press [File Name], enter a file name, and then press [OK]. • Password Press [Password], enter a password, and then press [OK]. Press [Send Settings]. 2. Press [ ] four times, and then press [Select/Manage Stored File]. 3. From the list of stored... files. 1. 6. To specify an unregistered user name, press [Manual Entry], and then enter the name. Re-enter the password for resolution and scan size. 10. You can select more than one file. 4. If necessary, press [Send Settings] or [Original] to...
...]. 116 After specifying a user name, press [OK]. • File Name Press [File Name], enter a file name, and then press [OK]. • Password Press [Password], enter a password, and then press [OK]. Press [Send Settings]. 2. Press [ ] four times, and then press [Select/Manage Stored File]. 3. From the list of stored... files. 1. 6. To specify an unregistered user name, press [Manual Entry], and then enter the name. Re-enter the password for resolution and scan size. 10. You can select more than one file. 4. If necessary, press [Send Settings] or [Original] to...

User Guide
Page 121
... type. Depending on the security setting, [Access Privileges] may appear instead of the file name. 119 Password To prevent unauthorized printing, you can specify a password for storing documents on the supplied CD-ROM. 7. For the information not included in the Document Server... For details about the Address Book, see Copy/ Document Server on the Document Server. • A document accessed with a correct password remains selected even after operations are ended. Document Server This chapter describes frequently used Document Server functions and operations. After the operation, ...
... type. Depending on the security setting, [Access Privileges] may appear instead of the file name. 119 Password To prevent unauthorized printing, you can specify a password for storing documents on the supplied CD-ROM. 7. For the information not included in the Document Server... For details about the Address Book, see Copy/ Document Server on the Document Server. • A document accessed with a correct password remains selected even after operations are ended. Document Server This chapter describes frequently used Document Server functions and operations. After the operation, ...

User Guide
Page 122
...tray. 13. 7. Press [To Scanning Scrn.]. 3. Enter a file name, and then press [OK]. 7. You can use four to eight digits for the password. 9. After scanning, a list of the control panel, and press the [Document Server] icon on the top left of stored documents will be displayed. Press...], and then enter a user name. 5. CXC252 2. The original is saved in the Document Server. Press the [Home] key on the [Home] screen. Press [Password]. 8. Document Server 1. Press [User Name]. 4. Specify a user name, and then press [OK]. To specify a name not shown in the Address Book. The ...
...tray. 13. 7. Press [To Scanning Scrn.]. 3. Enter a file name, and then press [OK]. 7. You can use four to eight digits for the password. 9. After scanning, a list of the control panel, and press the [Document Server] icon on the top left of stored documents will be displayed. Press...], and then enter a user name. 5. CXC252 2. The original is saved in the Document Server. Press the [Home] key on the [Home] screen. Press [Password]. 8. Document Server 1. Press [User Name]. 4. Specify a user name, and then press [OK]. To specify a name not shown in the Address Book. The ...

User Guide
Page 158
... or disable beep alerts. A control panel or screen key was incorrect. An invalid key was pressed on the control panel or screen, or the entered password was pressed. Troubleshooting Panel Tone The following table describes the meaning of the various beep patterns that the machine produces to alert users of a paper...
... or disable beep alerts. A control panel or screen key was incorrect. An invalid key was pressed on the control panel or screen, or the entered password was pressed. Troubleshooting Panel Tone The following table describes the meaning of the various beep patterns that the machine produces to alert users of a paper...


